
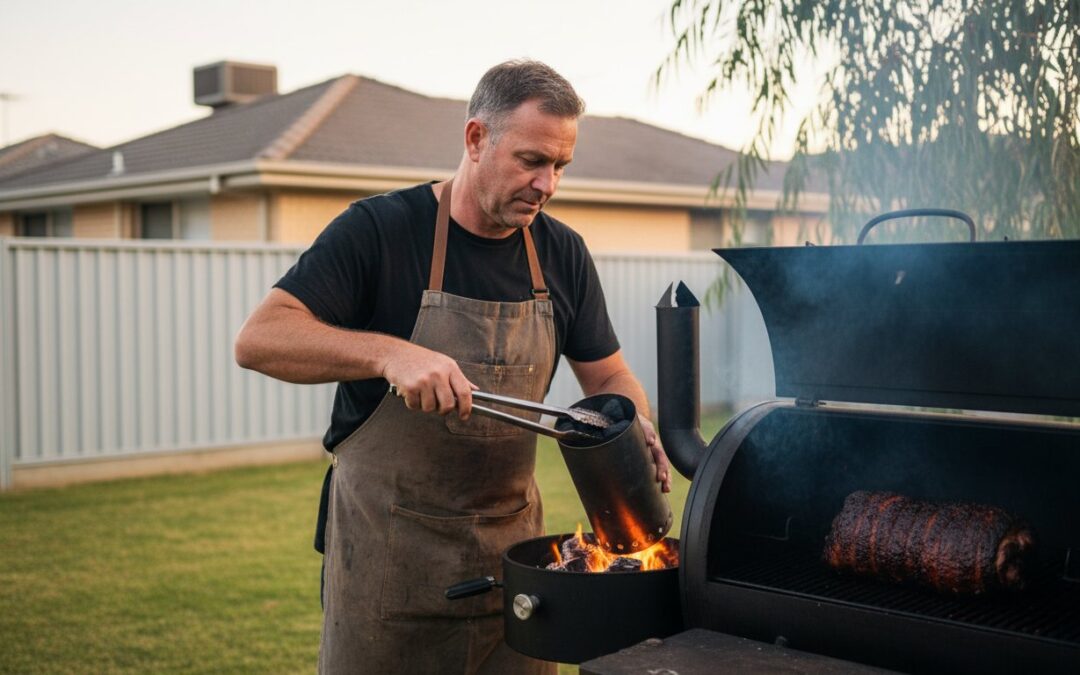
Running out of fuel during a twelve hour pork shoulder cook isn’t a sign of failure; it’s a test of your skill as a pitmaster. You’ve spent hours monitoring the vents and internal temperatures, only to see the needle drop while the meat is still in the stall. It’s a high-stakes moment where the fear of “dirty smoke” or a ruined brisket can lead to panic. Knowing running out of charcoal mid cook what to do is the difference between a professional recovery and a cold dinner.
With 75% of U.S. households owning a grill or smoker in 2026, this emergency happens more often than most experts admit. This guide provides the professional triage steps to save your BBQ, manage emergency fuel additions, and prevent mid-cook flame-outs forever. We will examine how to maintain a steady internal temperature and why your setup might be burning through fuel faster than the 6.2% annual growth rate seen in the premium charcoal market. Get ready to master your fire management and protect your cook.
Key Takeaways
- Trust your grill’s thermal mass. It retains heat longer than you think, providing a critical buffer to stabilize temperatures before the meat is affected.
- Master the professional response for running out of charcoal mid cook what to do by using a chimney starter to add pre-lit coals, ensuring clean smoke and zero flavour impact.
- Understand the “wrap and finish” stage where a kitchen oven becomes a valid tool for completing a low-and-slow cook once the bark is established.
- Deploy the “Snake” or “Minion” fuel-loading methods to achieve consistent, 12-hour burn times and prevent future fuel shortages.
The 30-Second Triage: Immediate Steps When Charcoal Runs Low
Don’t panic and walk away if the temperature starts to dip. A typical heavy-duty smoker or ceramic grill possesses enough thermal mass to retain cooking temperatures for 20 to 30 minutes after the fuel source starts to fade. This is your window of opportunity. If you’re stressed about running out of charcoal mid cook what to do, your first priority is to stabilize the environment. Stop the heat loss by closing the bottom vents slightly. This traps the remaining thermal energy inside the cooking chamber while you prepare your next move.
To better understand this concept, watch this helpful video:
Assessing the Internal Temperature
Check your meat probe immediately to determine your exact buffer time. If your protein is currently below 65°C, it’s still in the phase where it absorbs smoke readily. Adding unlit fuel now is a significant risk. Meat at this temperature is highly susceptible to “dirty smoke” or acrid flavours from the volatile organic compounds released by freshly ignited charcoal. By understanding the properties of charcoal, you know that the initial ignition phase is the least stable. If the internal temp is dropping at a rate of one degree every 60 to 90 seconds, you have roughly 10 minutes to act before the cook enters a stall that’s difficult to recover from.
Managing Airflow During the Crisis
Many hobbyists make the mistake of opening all vents wide when the pit temperature drops. This is a tactical error. Wide-open vents create a massive draft that pulls the remaining heat out of the chimney. Keep the top vent at its current setting to maintain a steady convection current. This keeps the air moving without dumping your precious thermal reserve. It’s also the time to set your meat probe alarm to trigger if the ambient pit temperature drops more than 15 degrees below your target. This gives you a clear signal to move the meat to a secondary heat source, such as a preheated kitchen oven or a freshly lit chimney of premium hardwood lump charcoal, before the internal meat temperature begins to crash.
How to Safely Add New Charcoal Mid-Cook
Adding cold, unlit charcoal to a dying fire is the most common mistake when figuring out running out of charcoal mid cook what to do. This action smothers the remaining embers and forces the temperature to plummet further. The golden rule is simple: lit fuel is always superior to unlit fuel for mid-cook additions. Use a chimney starter to ignite your backup supply at least 15 feet away from the grill. This distance ensures that fine ash and sparks don’t blow onto your meat while the new coals catch fire.
Once the coals are glowing orange and covered in a light grey ash, they’re ready for the firebox. Use long-handled tongs to shuffle the existing embers to one side. This creates a concentrated heat zone that acts as a bridge for the new fuel. Be prepared for a sudden temperature spike. When you open the firebox, a rush of oxygen enters the chamber. Work fast and close the lid within 30 seconds to prevent the fire from becoming uncontrollable. Managing this oxygen intake is critical for maintaining a steady cook.
Lump Charcoal vs. Briquettes: The Reload Battle
Lump charcoal is the superior choice for emergency reloads because it consists of 100% natural hardwood. It ignites faster and produces a cleaner heat profile than processed alternatives. Briquettes often contain cornstarch or chemical binders that release a thick, chemical-smelling smoke during the initial ignition phase. If you must add briquettes to a hardwood fire, ensure they’re fully ashed over in a chimney first. To avoid these flavour risks entirely, always keep a bag of professional-grade charcoal on hand for long sessions.
Avoiding the Dirty Smoke Trap
In an emergency, the colour of your smoke tells you everything. You want “blue smoke,” which looks like a thin, almost invisible shimmer. Thick white smoke indicates incomplete combustion and high levels of Volatile Organic Compounds (VOCs). If your reload produces heavy white clouds, leave the exhaust vent fully open for two minutes. This allows the VOCs to burn off before you seal the lid. Your nose is your most reliable sensor. If the smoke smells like a clean campfire, your fuel is ready. If it smells acrid or like a factory, wait. Reaching the safe minimum internal temperature is your goal, but not at the expense of your meat’s flavour.
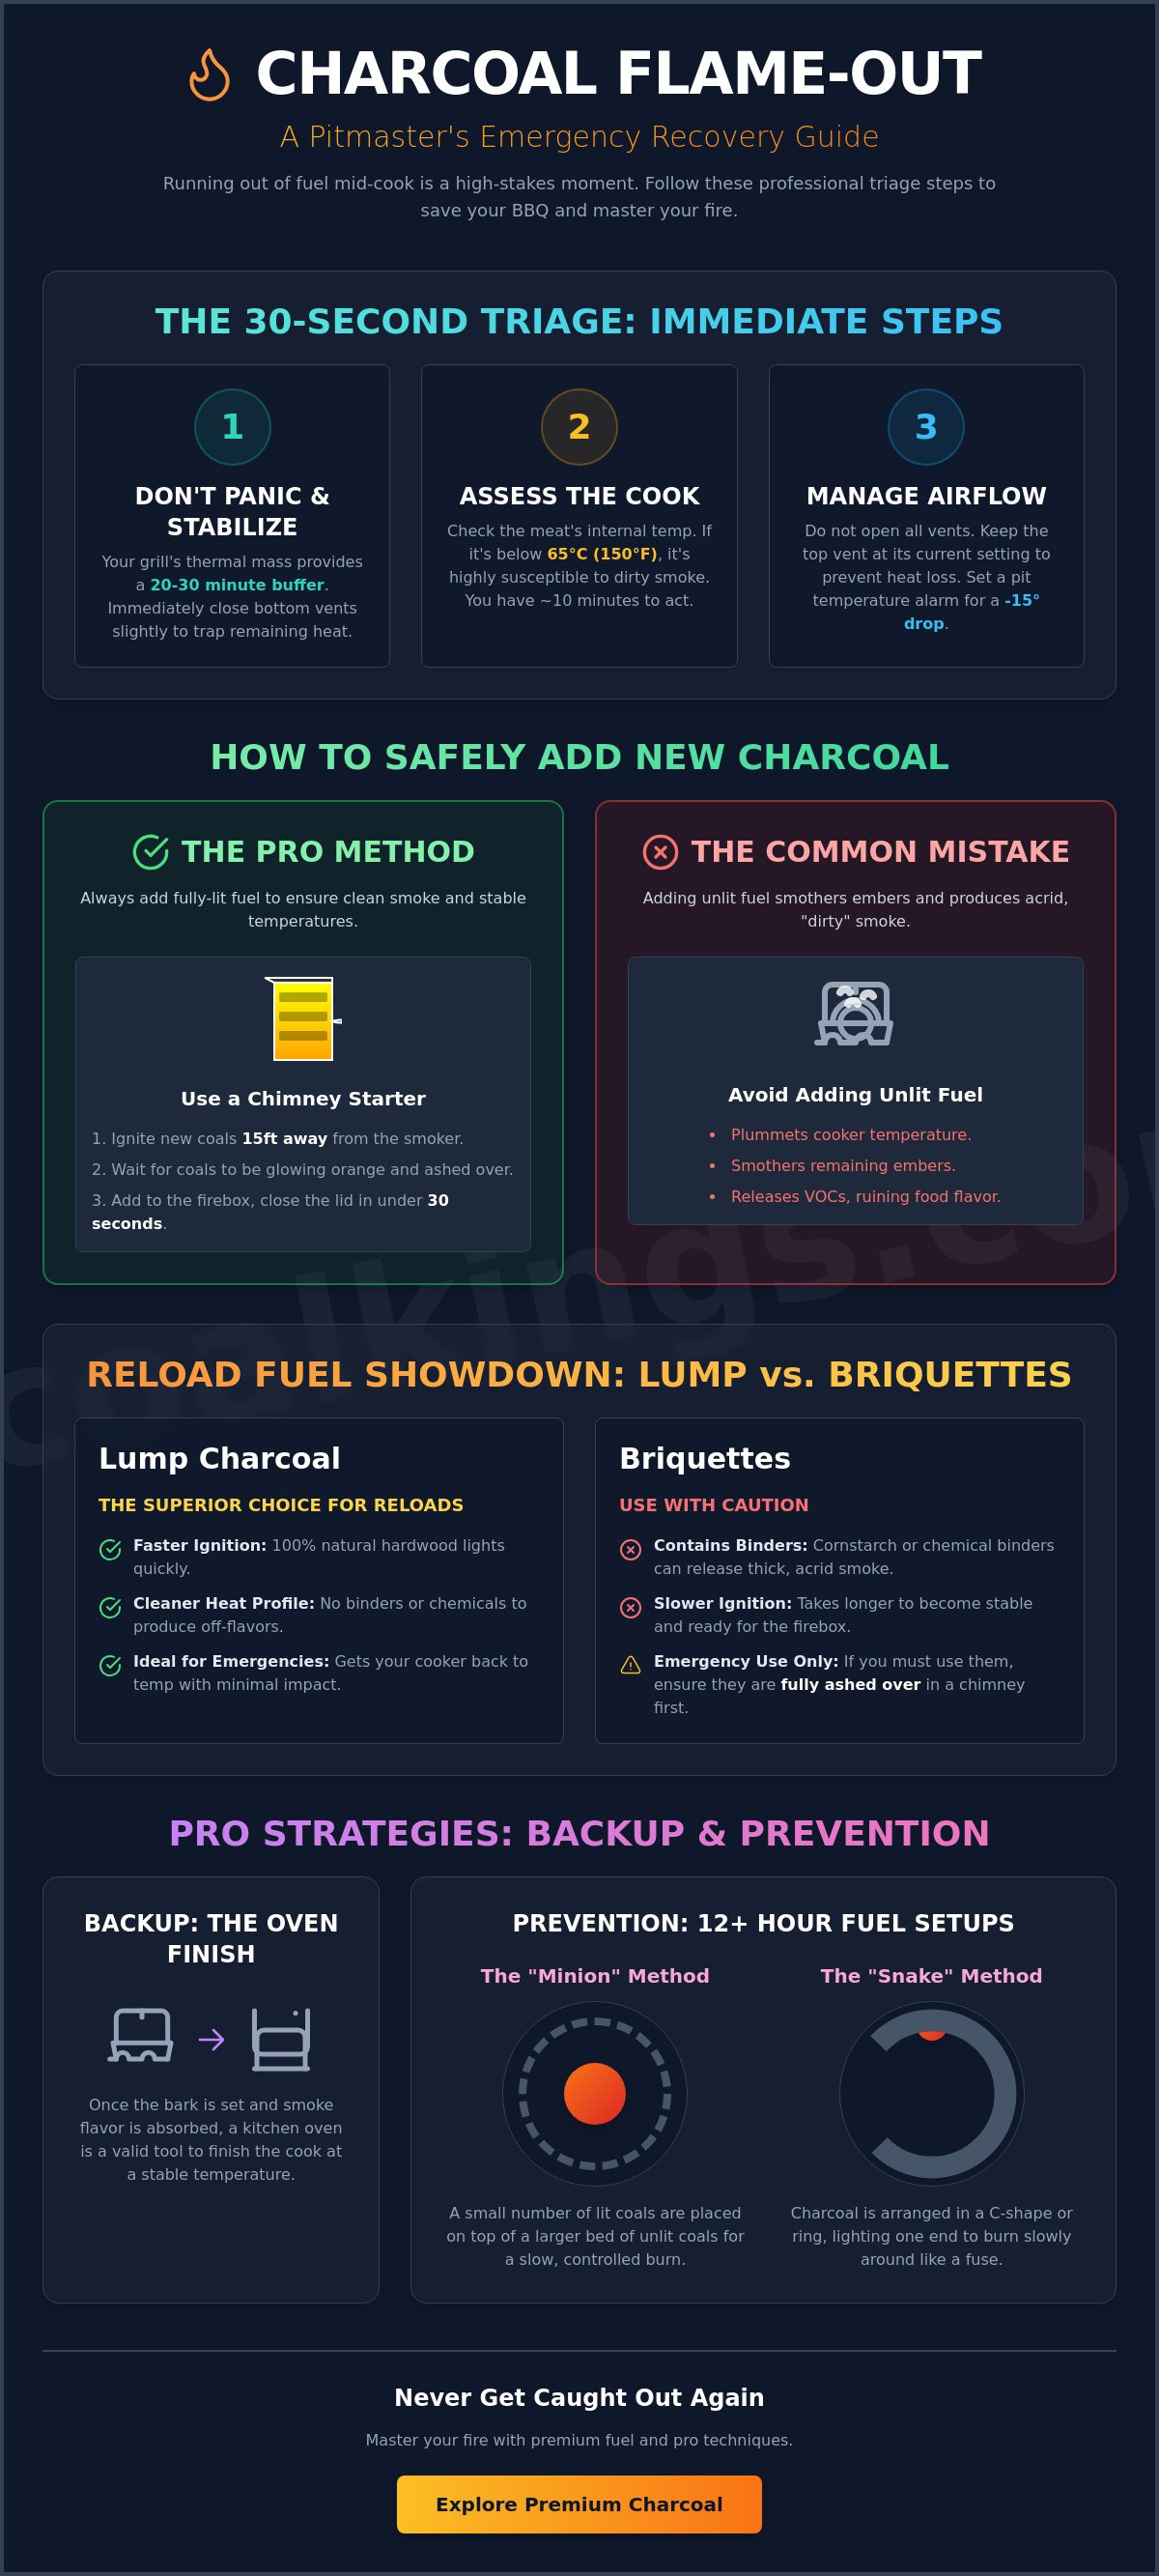
The Pitmaster’s Backup: Finishing the Cook Indoors
Moving your BBQ to a kitchen oven isn’t “cheating”; it is a tactical recovery used by professionals to save high-value cuts of meat. When you are faced with running out of charcoal mid cook what to do, the oven provides a controlled environment that eliminates the variables of wind and failing embers. The science of bark formation supports this move. Once the surface of the meat has reached its smoke saturation point, typically after 4 to 6 hours of exposure, the protein stops taking on significant smoke flavour. At this stage, heat and humidity are the only requirements to break down collagen and reach your target temperature.
Transitioning from the grill to the oven requires speed to prevent moisture loss. If your pit temperature has already dropped below 100°C, move the meat immediately. Wrap the protein tightly to trap existing steam and place it on a heavy-duty wire rack inside a roasting pan. This setup allows for 360-degree heat circulation, mimicking the convection currents of a high-quality offset smoker. By bridging the gap with an indoor heat source, you ensure the meat doesn’t linger in the danger zone where bacterial growth or “stalling” occurs.
The Texas Crutch Strategy
The “Texas Crutch” is your best friend during an indoor finish. Use heavy-duty aluminium foil if your primary goal is to retain every drop of moisture and accelerate the cook. If you want to preserve the bark you’ve spent hours building, opt for peach butcher paper. Set your conventional oven between 105°C and 120°C. This temperature range maintains the “low and slow” environment without drying out the exterior. To mimic the airflow of a smoker, avoid using the fan-forced setting if it is too aggressive, as this can lead to uneven surface evaporation. Utilise carry-over cooking by pulling the meat 2 to 3 degrees before your final target, allowing the internal residual heat to finish the job during the rest period.
Maximising Thermal Mass
Grill construction dictates how much time you have before an indoor move becomes mandatory. Ceramic Kamado-style grills have superior thermal mass and can continue cooking for up to 45 minutes after the charcoal has extinguished. In contrast, thin-walled steel kettles lose heat within 10 to 15 minutes. If you need time to restart your fire with fresh hardwood lump charcoal, use the “Faux Cambro” method. Place your wrapped meat inside a clean Esky or insulated cooler lined with towels. This setup can hold internal temperatures for 2 to 4 hours, giving you a massive window to reload your fuel and get the pit back to temperature. Professional-grade results require professional-grade problem-solving.
Diagnosing the Flame-Out: Why Did You Run Out of Fuel?
If you’ve found yourself searching for running out of charcoal mid cook what to do, the first step to prevention is a post-cook autopsy. Flame-outs rarely happen because of a single error. They’re usually the result of inefficient fuel combined with poor airflow management. A common culprit is a faulty lid gasket. Even a 2mm gap in a smoker’s seal can increase fuel consumption by 15% to 20% as the unit struggles to maintain a consistent temperature against escaping heat. This forces the fire to work harder, exhausting your charcoal supply hours before the meat reaches its target.
Fuel quality is the next major factor. Cheap, low-density charcoal is the primary cause of mid-cook failures. Many supermarket brands use softwoods or scrap timber that burns away in under three hours. In contrast, premium hardwood lump charcoal provides a dense carbon structure that can maintain 110°C for over eight hours in a standard kettle. When you combine low-quality fuel with the “Chimney Effect”—where wide-open vents pull air through the fire at high velocity—you create a forge that consumes fuel at an unsustainable rate.
The Impact of Australian Climate on BBQ
Coastal regions present unique challenges for pitmasters. High salt air and humidity levels can increase the moisture content of your firewood and charcoal if not stored in airtight containers. A 5% increase in fuel moisture requires significantly more energy to evaporate before the fuel can ignite. Strong wind gusts also act as an unwanted bellows. If your grill isn’t shielded, a 20km/h wind can force oxygen into the firebox, turning your slow cook into a high-heat furnace that consumes fuel twice as fast as a summer cook in regional Australia.
Understanding Fuel Density
Density is the secret to longevity when barbecuing with charcoal. Australian hardwoods like Gidgee or Mallee are world-renowned for their extreme density. These woods produce charcoal that burns 50% longer than lighter “softwood” varieties. Cheap briquettes often contain up to 30% filler materials like coal dust or starch. These fillers don’t provide heat; they just create excessive ash that chokes the fire’s oxygen supply and leads to an early flame-out. Stop guessing your burn times and upgrade to premium hardwood charcoal for your next long cook. Understanding these variables ensures you’ll never have to worry about running out of charcoal mid cook what to do during your next twelve-hour brisket session.
Prevention: How to Never Run Out of Charcoal Again
Mastering fire duration is the final step in becoming a true pitmaster. Instead of reacting to a failing fire, you must engineer your fuel layout for the specific length of your cook. For kettle grill users, the “Snake Method” is the gold standard for low and slow sessions. By overlapping your briquettes or lump charcoal in a semi-circle around the grate, you create a slow-burning fuse that can provide consistent heat for up to 12 hours. This eliminates the anxiety of running out of charcoal mid cook what to do because the fuel consumption is regulated by the physical layout of the coals.
If you use a bullet smoker or a gravity-fed unit, the “Minion Method” is your primary tool. This involves filling the charcoal chamber with unlit fuel and placing a small amount of lit coals on top. The fire slowly works its way down, igniting new fuel only as needed. For the longest possible burn times, professionals often invest in high-performance Binchotan charcoal. This Japanese-style white charcoal is incredibly dense and can maintain a steady temperature for significantly longer than standard supermarket lump charcoal. It is the ultimate insurance policy for overnight cooks.
The “Overfill” Philosophy
Adopting an “overfill” mindset is a basic requirement for serious BBQ. It is always better to finish a cook with 2kg of unburnt charcoal remaining than to run out 60 minutes before the meat is tender. High-quality hardwood lump charcoal is an investment. If you have leftover fuel once the meat is pulled, simply close all vents to snuff out the oxygen. These partially burnt coals can be shaken to remove ash and reused for your next session. A cost-benefit analysis shows that premium fuel is actually cheaper over time. You use less volume to achieve the same thermal output, and the lack of chemical fillers ensures your fire doesn’t choke on its own ash.
Tools for the Proactive Pitmaster
Reliable data prevents disasters. Every Australian griller should use a dual-probe thermometer equipped with a low-temperature alarm. Set your pit alert to 100°C. This gives you a 10 to 15-minute lead time to address a dying fire before the meat temperature begins to stall. Charcoal baskets are another essential accessory. They keep your fuel consolidated, which promotes better airflow and more efficient combustion. Finally, protect your investment with a dedicated weather-proof storage bin. Keeping your fuel bone-dry ensures it ignites instantly and burns at its maximum rated duration. Master these habits and get sizzlin’ with total confidence.
Master Your Fire for the Long Haul
A mid-cook flame-out is a challenge, not a catastrophe. By trusting your grill’s thermal mass and acting within a 20-minute window, you can stabilize the temperature without sacrificing the meat. Always prioritize adding pre-lit coals to maintain clean smoke and avoid acrid flavors. If the environment becomes too unstable, transitioning to a conventional oven for the final stages is a professional recovery that preserves moisture and texture. You now have a complete tactical protocol for running out of charcoal mid cook what to do, ensuring your brisket or pork butt stays on track.
Consistency starts with the quality of your fuel. Don’t settle for supermarket scrap that often burns out in under three hours. Upgrade to Premium Australian Hardwood Charcoal for your next long cook to experience the difference of 100% natural, chemical-free hardwood. These products are expertly curated for low-and-slow masters and offer the longest burn times in Australia. Superior fuel ensures you spend less time managing emergencies and more time perfecting your craft. Grab a bag today and get sizzlin’!
Frequently Asked Questions
Can I add unlit charcoal directly onto the remaining embers?
You can add unlit fuel, but it’s risky. Unlit coals absorb existing heat to ignite, causing a 20-degree dip in pit temperature. If you’re using natural hardwood lump, the smoke remains clean. Avoid adding unlit briquettes mid-cook, as the binders release acrid odors. Using a chimney starter to add pre-lit coals is the professional way to handle running out of charcoal mid cook what to do.
How much charcoal do I need for an 8-hour low-and-slow cook?
Plan for 5kg to 7kg of premium hardwood lump for an 8-hour session in a standard kettle. Ceramic grills are more efficient, requiring 30% less fuel for the same duration. Dense Australian hardwoods like Gidgee provide a more consistent burn than lightweight supermarket varieties. Always overfill your firebox by 20% to account for environmental factors like wind or low ambient temperatures.
Will adding more charcoal mid-cook make my meat taste like chemicals?
Natural lump charcoal won’t impart chemical flavors because it contains zero additives. The risk comes from using cheap briquettes that rely on starch or chemical binders for structure. These binders produce thick white smoke during the initial ignition phase. If you must add fuel mid-session, wait for the smoke to turn thin and blue before closing the lid to protect the meat’s flavor profile.
Is it better to move the meat to the oven or wait for new coals to light?
Move the meat to a preheated oven if your pit temperature falls below 100°C for more than 15 minutes. This prevents the protein from entering the bacterial danger zone. Lighting a fresh chimney of charcoal takes roughly 15 minutes. If you don’t have a backup heat source ready, the oven is the safest tool to maintain a consistent internal temperature while you troubleshoot the fire.
How do I restart the fire without taking the meat off the grill?
Use the side access door on your grill or lift a hinged section of the cooking grate to add fuel. If your grill lacks these features, carefully lift the entire grate with the meat still on it and place it on a heat-safe surface for 60 seconds. Pour the pre-lit coals from a chimney starter into the firebox. Work fast to minimize heat loss from the cooking chamber.
What is the fastest way to light a new batch of charcoal mid-cook?
A chimney starter remains the most efficient tool, reaching full ignition in 12 to 15 minutes. If you need an immediate heat boost, a high-intensity propane torch can ignite several hot spots in under 60 seconds. For those wondering running out of charcoal mid cook what to do in a time crunch, combining a torch with small pieces of dry hardwood lump provides the fastest thermal recovery.
Does the type of charcoal affect how quickly it burns out?
Fuel density is the primary factor in burn duration. Softwood charcoals are porous and burn out 40% faster than dense hardwoods. Premium Australian Gidgee or Mallee charcoal provides a concentrated carbon source that maintains 110°C for twice as long as standard scrap-wood varieties. Investing in high-density fuel reduces the frequency of mid-cook reloads and ensures a more stable pit environment.
What happens if the grill temperature drops below 100°C for an hour?
A temperature drop below 100°C for 60 minutes puts your cook at risk of foodborne illness. According to food safety standards, meat shouldn’t linger in this zone for extended periods. Additionally, the low heat stops the breakdown of tough connective tissues. This results in a stalled cook that produces a dry, chewy texture. If your fire fails for this long, move the meat to a 120°C oven immediately.