

Forget the guesswork and the frustration of food that’s either charred black or dangerously raw. The authentic, smoky flavour of a true Aussie barbie comes from one source: real, natural fire. Yet many are intimidated by the process, struggling with lighting techniques and unpredictable temperatures. This guide provides the essential, no-nonsense knowledge you need for barbecuing with charcoal, putting you in complete control of the flame.
You will learn to select the right premium fuel, achieve a perfect light every time, and master temperature for consistent, delicious results. We will show you how to set up dual heat zones to cook anything to perfection and lock in that incredible smoky taste. Stop guessing and start grilling with confidence. It’s time to become the master of your grill and impress everyone at your next cook-up. Get Sizzlin’!
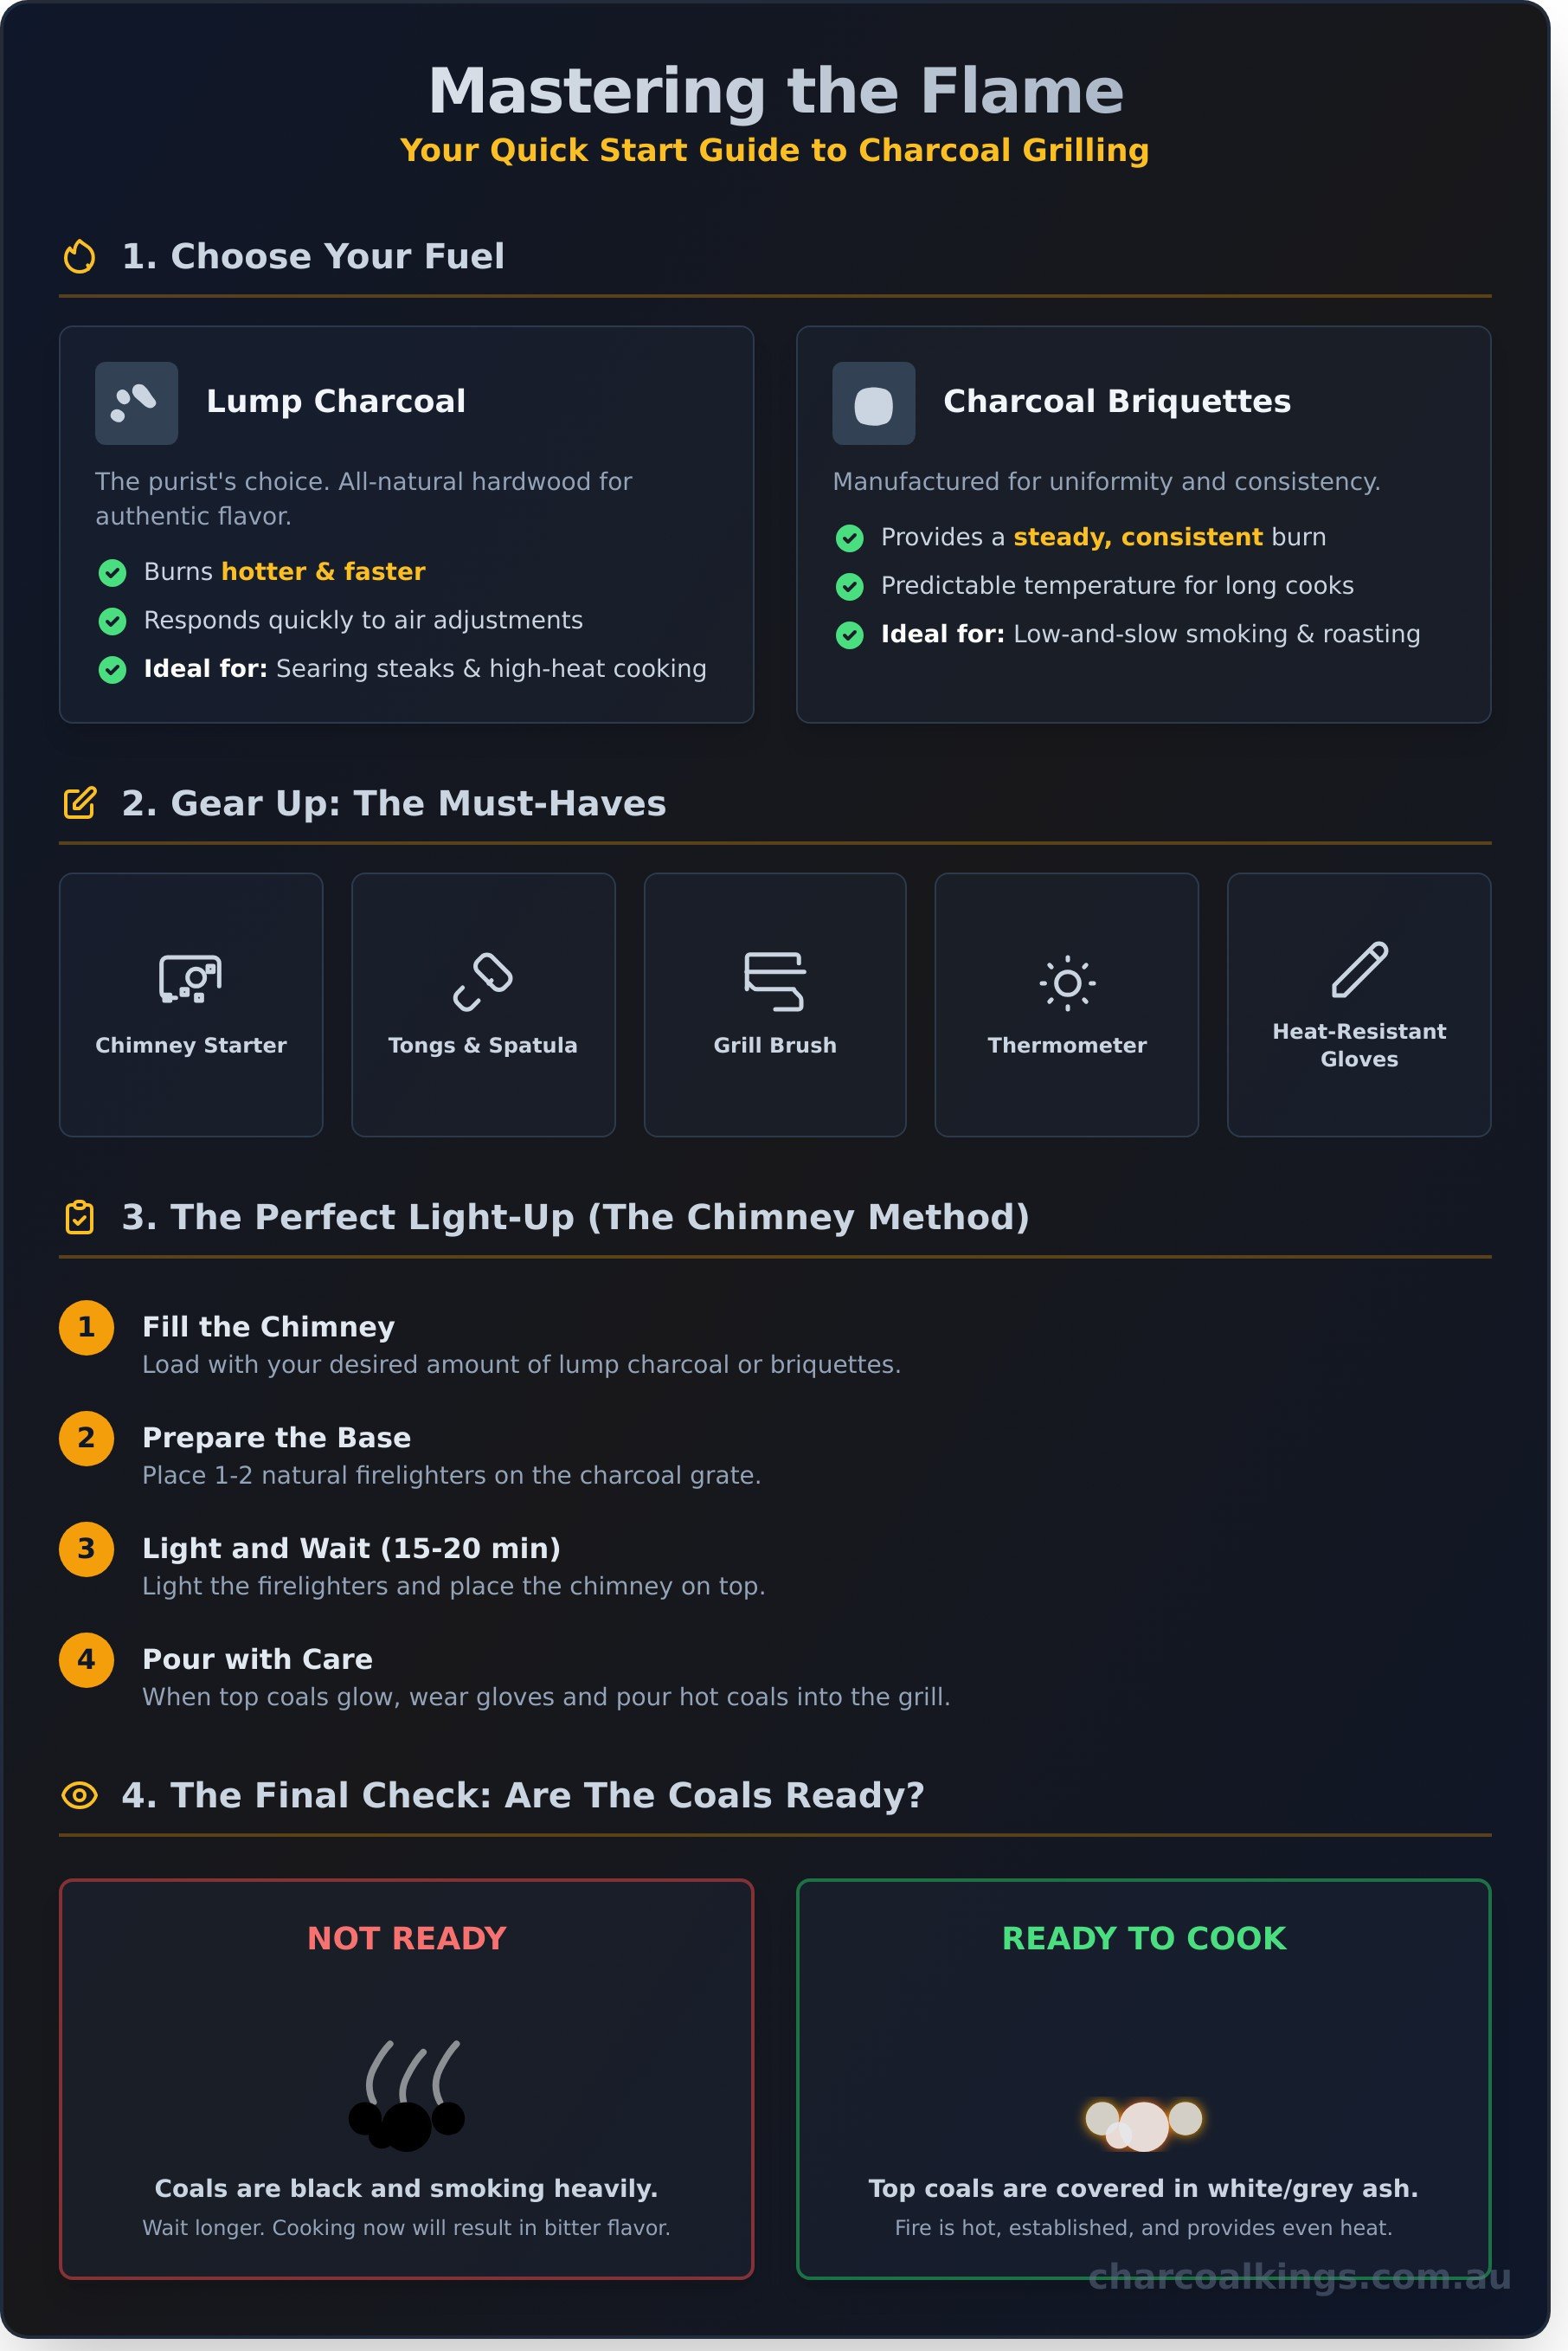
The Foundation: Choosing Your Fuel and Essential Tools
To master the art of barbecuing with charcoal, you must start with the fundamentals: your fuel and your tools. While gas grills offer convenience, they can never replicate the authentic, smoky flavour that comes from cooking over real fire. This direct-heat cooking method, a core component of many grilling techniques, imparts a rich, complex taste that is the hallmark of true barbecue. Building a solid foundation with the right charcoal and equipment is the first step toward becoming a grill master.
To see these principles in action, this video provides a great overview of the process:
Lump Charcoal vs. Charcoal Briquettes
Not all charcoal is created equal. Your choice of fuel directly impacts temperature control, burn time, and flavour. Lump charcoal is the purist’s choice-it’s all-natural hardwood that has been fired in a low-oxygen environment. It burns hotter and faster, responding quickly to oxygen adjustments for precise temperature control, making it ideal for searing steaks. Briquettes, on the other hand, are manufactured for uniformity, providing a steady, consistent burn that is excellent for low-and-slow smoking. For the best performance and a clean, chemical-free burn, we recommend a quality hardwood fuel. Explore our premium natural hardwood lump charcoal.
Must-Have BBQ Tools and Accessories
Serious barbecuing with charcoal requires the right gear. Forget the flimsy kits; invest in quality tools that ensure safety and deliver consistent results. Your non-negotiable toolkit should include:
- Chimney Starter: The fastest, cleanest, and most reliable way to light your charcoal without lighter fluid, which can taint the flavour of your food.
- Long-Handled Tongs & Spatula: Keep a safe distance from the intense heat. Sturdy, long-handled tools give you control without risking burns.
- Grill Brush: A clean cooking surface is essential for preventing food from sticking and ensuring clean flavour transfer. A quality wire brush is a must.
- Instant-Read Thermometer: Take the guesswork out of grilling. An accurate thermometer ensures your meat is cooked to perfection every time.
- Heat-Resistant Gloves: Standard oven mitts won’t cut it. Invest in a pair of high-quality, heat-resistant gloves for handling hot grates, chimney starters, and adjusting coals safely.
Lighting Your Charcoal Grill The Right Way
The first step to mastering the art of barbecuing with charcoal is learning to light it correctly. Forget the old myth of dousing your briquettes in lighter fluid. This chemical-heavy shortcut imparts a harsh, unpleasant flavour to your food, undermining the quality of both your ingredients and your premium natural charcoal. The professional standard for a clean, efficient, and flavour-neutral start is the chimney starter. It’s a simple, one-time investment that guarantees consistent results every time.
Using a chimney ensures your coals burn evenly and cleanly, producing a predictable, high-performance fire without any chemical residue. This is the foundation for superior flavour and control.
Step-by-Step Guide to Using a Chimney Starter
A chimney starter is the most reliable tool for getting your charcoal lit quickly and evenly. Follow these simple, no-nonsense steps for a perfect start.
- Fill the Chimney: Load the chimney with your desired amount of Charcoal Kings lump charcoal or briquettes. The quantity depends on what you are cooking and for how long.
- Prepare the Base: Place one or two natural firelighters or some crumpled newspaper on the grill’s charcoal grate, directly underneath where the chimney will sit.
- Light and Wait: Light the paper or firelighters and place the chimney on top. Let it work for 15-20 minutes. You will see flames licking up through the coals.
- Pour with Care: Once the top coals are glowing, put on a pair of heat-proof gloves and carefully pour the hot coals into your grill. Arrange them for your desired cooking method (e.g., two-zone heating).
How to Know When Your Coals Are Ready
Patience at this stage is critical. Cooking over unlit fuel results in uneven heat and a bitter, smoky taste. The visual cues are straightforward and reliable. Look for the top layer of coals to be mostly covered in a fine layer of white or grey ash. This indicates the fire is hot, established, and ready for cooking. This even heat is crucial for hitting the safe grilling temperatures required for different meats. At night, you’ll see a brilliant orange glow from beneath the ash. If the coals are still black and smoking heavily, they are not ready. Give them more time to light properly before you start cooking.
Mastering Temperature Control: The Grill Master’s Secret
A charcoal grill is not an unpredictable beast; it is a precision instrument. Think of it as a convection oven where you control the heat with two simple inputs: fuel and air. True mastery in barbecuing with charcoal is less about secret recipes and more about understanding how to manage these elements. Get this right, and you can cook anything from a perfectly seared steak to a low-and-slow smoked brisket.
How to Arrange Coals for Different Temperatures
The foundation of your temperature is the charcoal itself. More charcoal creates a hotter potential fire. Just as crucial is the quality. Using a premium, natural hardwood charcoal provides a stable, hot base to work with. The composition is critical for predictable heat, as detailed in reports on EU standards for charcoal composition, which directly impact burn time and heat consistency. For total control, arrange your coals strategically:
- Two-Zone Fire: The most versatile setup for any grill master. Bank all hot coals to one side of the grill. This creates a direct, high-heat zone for searing and an indirect, cooler zone for roasting or moving food to prevent flare-ups.
- Even Spread: Distribute lit coals evenly across the bottom grate. This method is for when you need the entire grill surface screaming hot for quick-cooking items like burgers or thin steaks.
The Role of Vents: Your Gas Pedal and Brake
Once your fire is established, the vents become your temperature dials. They regulate oxygen, which is the fuel for your fire. Understand these two controls:
- Bottom Vents (Intake): These feed oxygen to the coals. The more open they are, the more oxygen gets in, and the hotter your fire burns.
- Top Vents (Exhaust): These control how much heat and smoke escape. Keeping it partially open draws air through the grill.
The rule is simple: more open vents mean a hotter fire. Closing them down starves the fire of oxygen and lowers the temperature. Always make small adjustments and wait 5-10 minutes to see the effect. Patience is critical.
Using the Lid for Roasting and Smoking
Cooking with the lid off is for quick, direct searing only. For everything else, the lid is essential. It traps heat, creating an oven-like environment for even cooking and consistent temperatures. It also traps smoke, infusing your food with that authentic flavour that is the hallmark of barbecuing with charcoal. For maximum smoke flavour, position the top vent on the opposite side of the food. This forces the smoke to travel across the food before it escapes.
Essential Cooking Techniques: Direct vs. Indirect Heat
To master the art of barbecuing with charcoal, you must first master heat control. The single most important concept is the difference between direct and indirect heat. This is the practical application of the two-zone fire setup, a technique that gives you complete control over your cook and transforms a simple grill into a versatile outdoor kitchen. Understanding when to use each method is the key to unlocking consistent, professional-level results.
Direct Heat: For Searing and Fast Cooking
Direct heat is cooking directly over the hot coals. This method delivers intense, radiant heat that is perfect for searing meat and cooking smaller items quickly. If you experience a flare-up from dripping fats, simply move the food to the cool zone temporarily to let the flames die down. This is your go-to method for high-temperature grilling.
- Best for: Steaks, burgers, sausages, chops, skewers, and vegetables like capsicum and zucchini.
Indirect Heat: For Roasting and ‘Low and Slow’
Indirect heat means cooking on the cool side of the grill, away from the coals, with the lid on. This setup turns your barbecue into a convection oven. Hot air circulates around the food, cooking it gently and evenly from all sides. It’s the essential technique for larger cuts that would burn on the outside before the inside is cooked through.
- Best for: Whole chickens, roasts, ribs, brisket, and delicate whole fish.
The Sear and Slide Method
The best results often come from combining both techniques. The ‘Sear and Slide’ is the professional’s choice for thick cuts of meat like a ribeye steak or a pork roast. First, sear the meat over the intense direct heat to create a flavourful, caramelised crust. Then, slide it over to the indirect side to finish cooking gently to the perfect internal temperature. This ensures a fantastic exterior texture and a tender, juicy interior.
Adding Flavour and Pro-Level Tips
You’ve mastered the heat, now it’s time to master the flavour. Truly exceptional barbecuing with charcoal moves beyond simply cooking the meat; it’s about infusing every bite with a deep, smoky character that can’t be replicated. With a few professional techniques and the right fuel, you can elevate your barbecue from a simple meal to a memorable event. Don’t be afraid to experiment-confidence is built over hot coals.
Using Smoking Woods for Authentic BBQ Flavour
The secret to that authentic, sought-after BBQ taste is wood smoke. Adding smoking woods to your charcoal fire imparts a natural, aromatic flavour that complements your food. The two main forms are chips and chunks.
- Wood Chips: Best for shorter cooks. They ignite quickly and provide a fast, intense burst of smoke. Soaking them in water for 30 minutes before use is recommended to prevent them from burning out too fast.
- Wood Chunks: Ideal for longer, low-and-slow sessions. Chunks are larger, smoulder for hours, and provide a steady, consistent stream of high-quality smoke.
For best results, place chunks or a handful of soaked chips directly on top of your lit charcoal. As for pairings, start with these classics: Hickory for pork and bacon, Mesquite for beef, and fruitwoods like Apple or Cherry for chicken. Find the perfect smoking woods for your next cook.
Troubleshooting Common Issues
Every pitmaster runs into issues. The key is knowing how to solve them quickly. Here are straightforward solutions to the most common problems you’ll face when barbecuing with charcoal.
- Problem: The fire won’t stay hot.
Solution: Fire needs oxygen. Open the vents on your grill to increase airflow to the coals. An excess build-up of ash can also smother the fire, so be sure to clear your ash catcher before a long cook. - Problem: Food is sticking to the grates.
Solution: A clean, hot, and oiled grate is non-stick. Before adding food, ensure the grate is preheated, then scrub it clean with a quality wire brush. Finally, apply a light coat of high-smoke-point oil (like canola or grapeseed) using tongs and a folded paper towel. - Problem: Flare-ups are burning the food.
Solution: Flare-ups are caused by fat dripping onto hot coals. The most effective way to manage this is with a two-zone fire. If a flare-up occurs, simply move the food to the cooler, indirect heat zone until the flames die down.
The Aftermath: Safe Shutdown and Easy Cleanup
The success of your cookout isn’t just measured by the perfectly seared steak or the fall-off-the-bone ribs. A true master of barbecuing with charcoal knows the process isn’t over when the food comes off the grill. Proper shutdown and routine cleaning are non-negotiable steps that ensure safety, prolong the life of your equipment, and set you up for success next time you fire it up.
How to Safely Extinguish Your Charcoal
Resist the urge to douse your grill with water. The most effective and safest method is to starve the fire of oxygen. It’s a simple, hands-off process.
- Close all vents: Shut the lid and close both the top and bottom vents on your grill completely. This cuts off the oxygen supply, and the coals will gradually extinguish themselves.
- Let it cool: Allow the grill and the charcoal to cool down completely. This can take several hours, or even overnight. Never leave a hot grill unattended.
- Save your fuel: Once cool, you can often salvage larger, unburnt pieces of lump charcoal for your next cook. This is one of the key benefits of using a premium natural hardwood product.
Crucial Safety Note: Never use water to extinguish the fire in a ceramic grill (like a Kamado). The rapid temperature change can cause thermal shock, cracking the ceramic and ruining your investment.
Cleaning Your Grill for Next Time
A clean grill performs better. It delivers consistent heat, prevents flare-ups, and ensures the only flavours you taste are the ones you intended. A few simple steps after each cook make all the difference.
First, scrape your cooking grates with a quality grill brush while they are still warm, but not blazing hot. This is when food residue and grease are easiest to remove. Once the grill is completely cool, empty the ash catcher. Removing old ash is vital; it can absorb moisture, leading to rust, and it blocks airflow to the new coals on your next cook, resulting in a less efficient fire. A clean start is essential for mastering the art of barbecuing with charcoal.
Using high-quality lump charcoal produces less ash, making this final step even easier. For a cleaner burn and superior performance, explore the premium range at charcoalkings.com.au.
Become the Master of the Flame
You now have the essential knowledge to elevate your grill game. This guide has equipped you with the core principles of barbecuing with charcoal, from selecting the right tools to mastering temperature control. Remember, the foundation of every great cookout is premium fuel, and understanding heat management is the secret to unlocking incredible flavour and perfect texture every time.
The next step is to put this knowledge into practice. As a trusted supplier to retail, wholesale, and food service industries across Australia, Charcoal Kings provides only premium, 100% natural hardwood charcoal. Our chemical-free products deliver the consistent, long-lasting heat you need for a superior result. Ready to ignite your passion? Shop our range of premium, all-natural charcoal and Get Sizzlin’!
The grill is waiting. Fire it up with confidence and create something truly memorable.
Frequently Asked Questions About Barbecuing with Charcoal
How much charcoal should I use for my grill?
The amount of charcoal depends on your grill size and cooking method. For a standard 57cm kettle grill, a full chimney starter is a reliable measure for direct grilling. For longer, slower cooks like a pork shoulder, use the minion method by arranging unlit charcoal around the grill and adding a small number of lit coals. This ensures a long, steady burn, crucial for quality results when barbecuing with charcoal.
Can I reuse charcoal after I’ve finished cooking?
Absolutely. To save unused charcoal, shut all vents on your grill immediately after cooking. This starves the fire of oxygen and extinguishes the coals. The remaining unburnt pieces can be used to start your next cook, saving you time and money. This works best with high-quality, natural lump charcoal, as it leaves less ash and relights easily. It is an efficient way to manage your fuel supply.
How do I add more charcoal during a long cook?
For extended cooking sessions, always light additional charcoal in a chimney starter before adding it to the grill. Adding unlit fuel directly to the fire can produce acrid smoke and cause a significant temperature drop, tainting your food. Once the new coals are ashed over and glowing, carefully add them to the existing fire. This method maintains consistent heat and a clean burn for superior flavour and performance.
Is lump charcoal better than briquettes?
Premium hardwood lump charcoal offers superior performance. It lights faster, burns hotter, and produces less ash than most briquettes. Because it’s 100% natural wood with no binders or fillers, it imparts a cleaner, more authentic wood-smoke flavour to your food. While briquettes provide a uniform shape and burn time, the pure performance and flavour from quality lump charcoal make it the preferred choice for serious grill masters seeking authentic results.
How do I stop my food from burning on a charcoal grill?
The most effective method is to create a two-zone fire. Bank all your hot coals to one side of the grill, creating a direct heat zone for searing and an indirect heat zone for cooking through. This gives you total control. Sear your food over the hot side, then move it to the cooler, indirect side to finish cooking without burning. This technique is fundamental to mastering your charcoal grill.
What’s the easiest thing to cook on a charcoal grill for a beginner?
Sausages are the perfect starting point for any beginner. They are forgiving, cook relatively quickly, and don’t require complex temperature management. The natural flavour of quality Australian sausages is enhanced by the smoke from the charcoal. Simply grill them over a medium, direct heat, turning regularly until browned and cooked through. This builds confidence and delivers a fantastic, smoky result every time.
To complete the classic Aussie experience, consider pairing your smoky sausages with a clean, local beverage. The herbal infusions from Australian brand Yuvo Naturals offer a refreshing counterpoint to the rich barbecue flavours.
And for a sweet finish that everyone will love, consider a selection of nostalgic treats. The online store Sweet Trolley specializes in personalized candy gifts that are perfect for sharing at a cookout.