
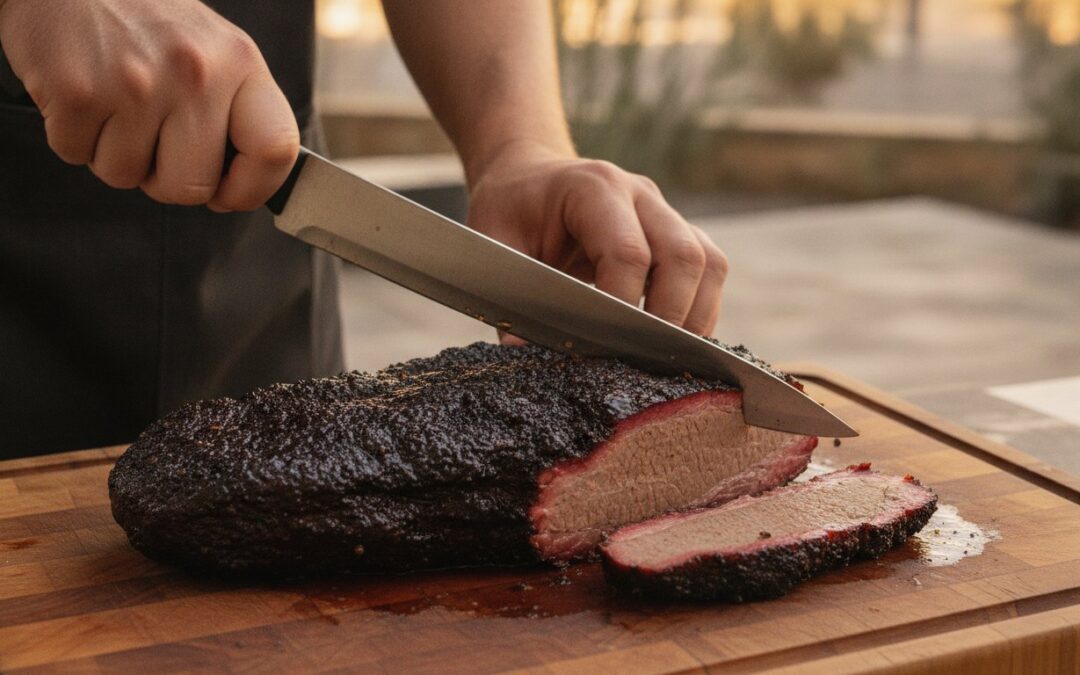
A 16-hour smoke session can be ruined in exactly sixty seconds of bad knife work. You have invested hours managing Hardwood Lump Charcoal and monitoring precise internal temperatures, but the final presentation is where many cooks lose their edge. Learning how to slice a brisket properly is the final, critical step in the process. Technical mastery at the cutting board is what separates a backyard hobbyist from a seasoned pitmaster.
You know the frustration of watching a perfect bark fall away or serving meat that turned out chewy because of the wrong grain direction. This guide provides the technical expertise needed to ensure every serving is pencil-tender and passes the industry-standard bend test. We will provide a definitive breakdown of the anatomy between the point and the flat, the essential high-performance tools required for the task, and the specific cutting angles that preserve moisture. Master these professional techniques to transform a standard cook into a superior dining experience for your guests.
Key Takeaways
- Resting the meat is a non-negotiable step that ensures muscle fibers relax and reabsorb essential juices for a tender serve.
- Mastering how to slice a brisket properly requires identifying the unique, intersecting grain directions of the flat and point muscles.
- Utilize a sharp, long slicing blade to produce uniform 6mm strips without dragging or damaging the bark.
- Wait for the internal temperature to stabilize before cutting to prevent the fat from liquifying and the seasoned crust from sliding.
- Maintain moisture by slicing only what you intend to serve immediately and using rendered tallow or au jus for a professional finish.
The Critical Pre-Cut: Why Resting is Non-Negotiable
Slicing a brisket the moment it leaves the smoker is a common amateur mistake. While the bark looks perfect and the aroma is overwhelming, the internal structure is still under immense thermal stress. During the cook, muscle fibres contract and push moisture toward the surface. If you cut into the meat immediately, those high-pressure juices escape onto the board. This leaves the meat dry and gives the interior an unappealing grey appearance. Professional results depend on allowing those fibres to relax. Mastering how to slice a brisket properly begins with patience and a foundational understanding of brisket anatomy.
To better understand the impact of proper technique and resting, watch this helpful demonstration:
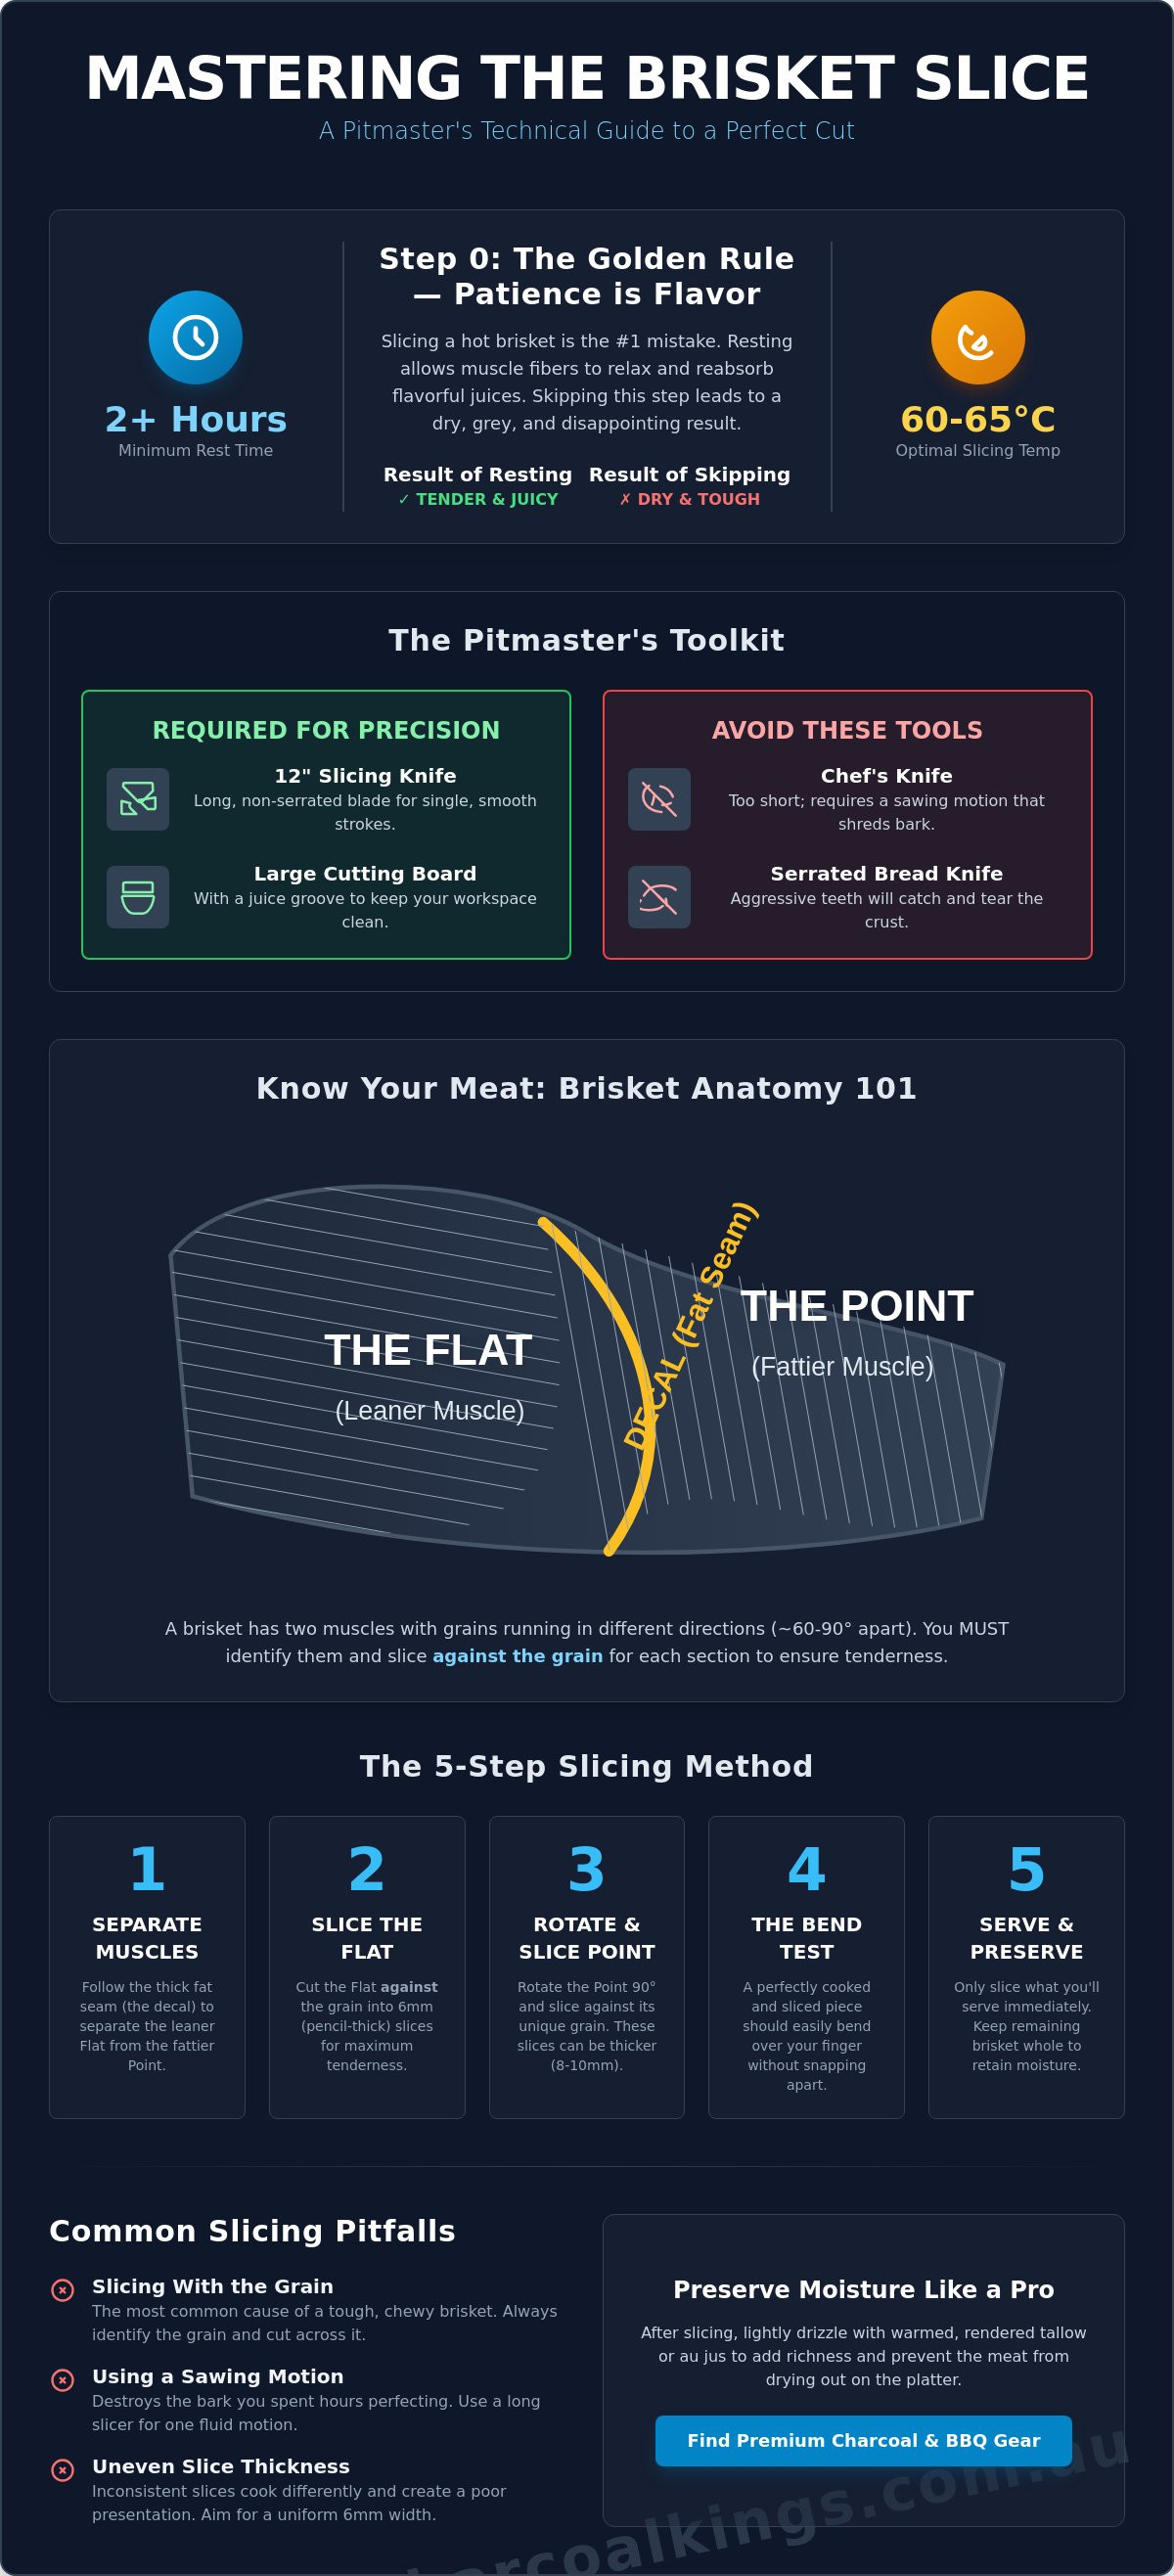
A full-packer brisket requires a minimum rest of two hours in an insulated cooler. This duration allows the internal temperature to descend to the optimal slicing range of 60°C to 65°C. At this stage, the rendered fats and juices thicken and reincorporate into the fibres. The result is a slice that remains moist on the platter rather than drying out within seconds of exposure to the air. Using an insulated environment prevents the meat from entering the bacterial danger zone while the internal structure stabilizes.
The Science of Residual Heat
Professional pitmasters pull meat at approximately 95°C because of carry-over cooking. Residual heat continues the collagen-to-gelatin conversion even after the meat leaves the smoker. This ensures the connective tissue fully breaks down without overcooking the exterior. Active rest is a technique where the pitmaster holds the meat at a stable, food-safe temperature in a warming oven for several hours to maximize tenderness. Long hold times are the secret behind the texture found in the world’s best BBQ joints.
The Pitmaster’s Tool Kit
Precision requires specific BBQ Accessories. A 12-inch scalloped slicing knife is superior to a standard chef’s knife because its length allows for single, smooth strokes that preserve the bark. Short blades require a sawing motion that inevitably shreds the seasoned crust. Avoid serrated bread knives; the aggressive teeth catch on the bark and tear it away from the meat. The right gear is essential for anyone learning how to slice a brisket properly. A large cutting board with a deep juice groove is also mandatory to keep your workspace clean.
Understanding Brisket Anatomy: The Flat vs. The Point
The brisket is not a single uniform muscle. It consists of two distinct sections: the lean “Flat” (pectoralis profundus) and the fatty “Point” (pectoralis superficialis). These two muscles are joined by a thick fat seam known as the “Decal”. Understanding this structure is mandatory for anyone learning how to slice a brisket. The muscle fibres in the flat run in one direction, while the fibres in the point run roughly 60 to 90 degrees apart. If you slice straight through the entire brisket without adjusting your angle, you will inevitably cut with the grain on one half. This results in a tough, stringy texture that ruins the dining experience.
Successful slicing starts before the meat even hits the smoker. Experienced pitmasters use a “grain marker” technique to avoid confusion later. Before applying your rub, locate the grain of the raw flat and notch a small corner off the meat, cutting against the grain. Once the cook is finished and the meat is encased in a dark crust, that notch remains visible. It serves as a permanent guide for your first cut. This simple preparation removes the guesswork when you are ready to learn how to slice a brisket properly in a high-pressure kitchen or backyard setting.
Locating the Grain Through the Bark
Identifying the grain direction through a heavy bark can be difficult. Using premium hardwood lump charcoal is beneficial here; it produces a clean, professional bark that doesn’t crumble or obscure the meat’s natural contours. Look for parallel lines of muscle fibre visible on the surface. If you are still unsure, perform a “test slice” at the thin tip of the flat. Remove a tiny sliver to see the interior grain. If the muscle fibres look like small rubber bands pointing at you, you are cutting with the grain. Rotate the meat until the fibres look like the end of a bundle of straws.
Separating the Muscles
The point and flat overlap in the middle of the brisket. You have two options: slice through both at once or separate them entirely. Many professionals prefer the “Texas Slide” to remove the point from the flat. This involves following the natural fat seam with your knife until the two muscles pull apart. Separating them allows you to rotate each piece individually to ensure every cut is perfectly against the grain. For the best flavour profile, consider using high-quality smoking woods to enhance the point’s rich fat content. Slicing the point separately also makes it easier to cube the meat for burnt ends.
The 5-Step Masterclass on How to Slice Brisket Properly
Positioning the meat is the first technical requirement. Place the rested brisket on a stable cutting board with the lean flat section facing your knife hand. This orientation provides the best leverage for long, clean strokes. Following a professional guide on ensures you respect the anatomical differences between the two muscles. Technical mastery begins with this specific setup.
Start at the tip of the flat. Aim for uniform strips approximately 6mm thick, which is roughly the thickness of a standard pencil. This dimension is the gold standard for competition-style serves. However, technical skill involves real-time adjustments based on the cook’s outcome. If the meat feels slightly tough, slice it thinner to shorten the muscle fibres. If the brisket is exceptionally soft, cut thicker slices to help the meat hold its shape on the platter. Learning how to slice a brisket properly requires this level of constant tactile feedback.
The Lean Flat: Precision and Consistency
Consistency is the marker of a master. Ensure your blade maintains a strict 90-degree angle to the grain. This perpendicular cut is the secret to maximum tenderness. Use long, single-stroke pulls. Do not use a sawing motion. Sawing creates jagged edges and causes the bark to crumble. Achieving the structural integrity required for these clean cuts is easier when mastering the art of barbecuing with charcoal; the stable heat produces a consistent internal cook and a firm, resilient bark.
Once you reach the section where the point sits on top of the flat, the grain direction changes significantly. Rotate the brisket 90 degrees. This adjustment is non-negotiable. Failure to rotate here means you will be slicing with the grain of the point, resulting in a rubbery and unappealing texture. The rotation ensures every bite remains tender across both muscles regardless of the fat content.
The Fatty Point: Handling the Richness
The point muscle contains significantly more intramuscular fat. This richness allows it to handle slightly thicker slices than the lean flat without losing its quality. Thicker cuts help the fatty slices remain intact during plating. Alternatively, many pitmasters choose to cube this section for traditional “Burnt Ends.” If cubing, aim for 25mm uniform squares. High fat content makes the point more delicate. Handle each piece with care to prevent the rendered fat from causing the slice to fall apart before it reaches the guest.
Preserving the Bark: Common Slicing Mistakes to Avoid
The bark is the crowning achievement of a long smoke. It represents hours of careful fire management and temperature control. Destroying that seasoned crust at the very end is a failure of technique. Mastering how to slice a brisket properly requires as much respect for the exterior texture as the internal moisture. If you don’t handle the meat with precision, you risk serving a platter of shredded beef rather than professional, uniform slices.
Avoid these four critical mistakes to keep your presentation intact:
- Using a dull knife: A blade without a razor edge won’t bite into the bark. Instead, it drags the crust across the meat, tearing it away from the surface.
- Slicing while too hot: If you cut the meat before it reaches the 60°C to 65°C range, the fat remains liquified. This acts as a lubricant that causes the bark to slide off the moment the knife applies pressure.
- Slicing with the grain: This is the most common error. It results in a stringy, chewy texture that is impossible to eat comfortably, regardless of how tender the meat is.
- Over-handling with tongs: Tongs exert localized pressure that crushes the bark and squeezes out juice. Use a flat hand or heat-resistant BBQ gloves to stabilize the brisket on the board.
The Impact of the “Texas Crutch”
Your choice of wrapping material dictates how you must approach the final cut. Foil creates a high-moisture environment that effectively braises the meat. This results in a much softer bark that is prone to falling off. If you use foil, you must use almost zero downward pressure and rely entirely on the knife’s slicing motion. Butcher paper is the superior choice for bark lovers. It allows steam to escape while protecting the meat, resulting in a resilient, “set” bark that can withstand the blade without crumbling. A clean-burning fire is the primary secret to achieving this durable, professional finish.
Troubleshooting a Crumbling Bark
If the bark starts to pull away during the cut, stop immediately. Check the sharpness of your blade. You can also try the “cold knife” trick. Chilling your slicing knife in ice water for a few seconds can help prevent the fat from melting as the metal passes through the meat. This provides a cleaner break through the crust. For future cooks, ensure you use a high-quality BBQ rub. These professional blends are designed to create a superior protein bond, ensuring the bark stays attached to the meat from the smoker to the plate.
Protect your investment by using the right tools for the job. Upgrade your setup with professional-grade accessories from Charcoal Kings.
Serving and Storage: Keeping the Slices Moist
The final stage of learning how to slice a brisket properly involves managing the meat after it leaves the cutting board. Brisket is highly susceptible to oxidation. Oxygen is the enemy. The lean flat can lose its vibrant colour and moisture within minutes of exposure to the air. To prevent this, only slice the specific amount you intend to eat immediately. Keep the remaining unsliced portion wrapped tightly in its original butcher paper or foil. This keeps the internal temperature stable and prevents the meat from drying out during the meal.
For a professional finish, dip each individual slice back into the collected au jus or rendered tallow before placing it on the platter. This adds a layer of protection against the air and enhances the mouthfeel. Arrange your slices in an overlapping shingle pattern. This configuration traps heat and residual moisture between the pieces. It ensures the last slice on the tray remains as juicy as the first. A dry brisket is a failure of service, not just a failure of the cook. Technical excellence must extend from the smoker to the final bite.
The Platter Presentation
A master pitmaster understands guest preferences and presents options accordingly. Separate your lean flat slices from the fatty point slices on the platter. This allows guests to choose their preferred level of richness. For a competition-standard look, apply a final dusting of a high-quality rub or a light drizzle of warm tallow to the meat. This creates a glossy, professional appearance that highlights the bark’s texture. Serve your brisket with traditional Australian sides. Crisp slaw and sharp pickles provide the necessary acidity to cut through the heavy fat of the point. This balance is essential for a high-performance BBQ experience.
Handling Leftovers Without Drying Them Out
If you have significant portions remaining, don’t slice them beforehand. Keep the meat in large blocks to minimize the surface area exposed to oxygen. The best way to preserve quality is to vacuum seal these unsliced portions once they have cooled to room temperature. Preserve every drop. For reheating, skip the traditional oven. The “Sous Vide” or “Butter Bath” method is the industry standard for maintaining the meat’s original texture. This involves placing the sealed bag in a water bath held at 70°C until the meat is warmed through. Never use a microwave to reheat brisket because the high-intensity radiation toughens the protein fibres and turns the rendered fat into a greasy mess.
Master the Board for Professional Results
Technical precision on the cutting board is the final requirement for any serious cook. You have already mastered the fire and the stall; now you must master the grain. Identifying the directional shift between the lean flat and the fatty point is the only way to guarantee tenderness in every bite. Learning how to slice a brisket properly is the difference between a stringy, difficult meal and a professional dining experience that rewards your hours of labor at the smoker.
Consistency starts with your fuel. Upgrade your next smoke with our Premium Hardwood Lump Charcoal. This is the exact fuel used by Australia’s top competitive pitmasters to achieve world-class results. Our charcoal is 100% natural hardwood with zero additives. It provides the high-heat, long-burn performance required to set a resilient bark that won’t crumble under your knife. Take pride in the final cut and serve with confidence. Keep the smoke rolling.
Frequently Asked Questions
Do you slice brisket with or against the grain?
Slicing against the grain is mandatory for maximum tenderness. This technique shortens the muscle fibres, making them easy to chew. Because the grain direction shifts approximately 90 degrees between the flat and the point muscles, you must rotate the meat halfway through the process to maintain this perpendicular angle.
How long should I let a brisket rest before slicing?
A full-packer brisket requires a minimum rest of two hours in an insulated cooler. This duration allows the internal temperature to descend and the muscle fibres to reabsorb rendered fats and juices. Slicing too early leads to immediate moisture loss and a dry, grey interior.
Can I use a regular kitchen knife to slice my brisket?
A standard kitchen knife is inadequate for professional results. You need a 12-inch scalloped slicing knife to produce clean, single-stroke cuts. Short blades require a sawing motion that shreds the bark and ruins the presentation. Proper BBQ accessories are essential for maintaining the structural integrity of the meat.
What do I do if my brisket is falling apart while I slice it?
If the meat crumbles, increase the thickness of your slices immediately. This usually indicates the brisket is slightly overcooked and the connective tissue has fully dissolved. Cutting 12mm slices instead of the standard 6mm helps the meat hold its structural integrity on the platter.
How thick should brisket slices be?
The standard thickness for a perfect serve is 6mm, or roughly the width of a pencil. This is the ideal dimension for anyone learning how to slice a brisket properly. You should adjust this based on the meat’s feel; tougher meat needs thinner slices, while softer meat needs more bulk to stay intact.
Should I remove the fat cap before slicing?
Do not remove the fat cap before slicing. The fat provides essential flavour and moisture to every serving. High-quality briskets should be trimmed to a 6mm fat cap before the smoke, and this layer must remain intact to protect the meat and enhance the mouthfeel during the final presentation.
How do I find the grain on a brisket with a heavy rub?
The most reliable method is to notch the corner of the raw flat against the grain before applying your rub. If the meat is already cooked, look for subtle parallel lines in the bark or perform a small test slice at the tip of the flat to confirm the fibre direction before proceeding with the full cut.
What is the best temperature to slice a brisket?
The optimal internal temperature for slicing is between 60°C and 65°C. At this range, the rendered fats have stabilized and won’t liquify upon contact with the blade. Knowing how to slice a brisket properly at the right temperature ensures the meat stays moist and the bark remains firmly set on the surface.