

Most pitmasters spend years chasing the smoke while completely ignoring the texture of the skin. Learning how to get crispy chicken skin on a smoker is the difference between a wasted weekend and a legendary meal. It’s frustrating to pull a beautiful bird off the grate only to find the skin is tough, rubbery, and pulls off in one sad piece. You want that bite-through crunch that shatters like glass, not a texture that feels like chewing on a rubber band. We know the struggle because we’ve seen it at countless backyard cookouts across Australia.
This guide provides the professional blueprint to banish rubbery skin and master the heat for competition-grade results. You’ll gain the confidence to manage your smoker temperatures like a seasoned expert. We’ll break down the science of moisture removal, the necessity of premium natural hardwood fuel, and the precise temperature spikes required to transform your chicken into a crispy masterpiece every single time. Get ready to stop guessing and start sizzlin’.
Key Takeaways
- Understand why traditional low-and-slow methods fail poultry and how high-heat rendering is the secret to perfect skin.
- Learn the essential dry brine technique to dehydrate skin and transform its protein structure for maximum crispiness.
- Discover how to get crispy chicken skin on a smoker using premium hardwood lump charcoal for intense, reliable heat.
- Identify the common mistakes—like spritzing and foil-wrapping—that introduce unwanted moisture and turn skin rubbery.
- Select the ultimate Australian setup, including high-performance grills and local smoking woods like Ironbark, for a professional finish.
The Science of Rubbery Skin: Why Low and Slow Fails Poultry
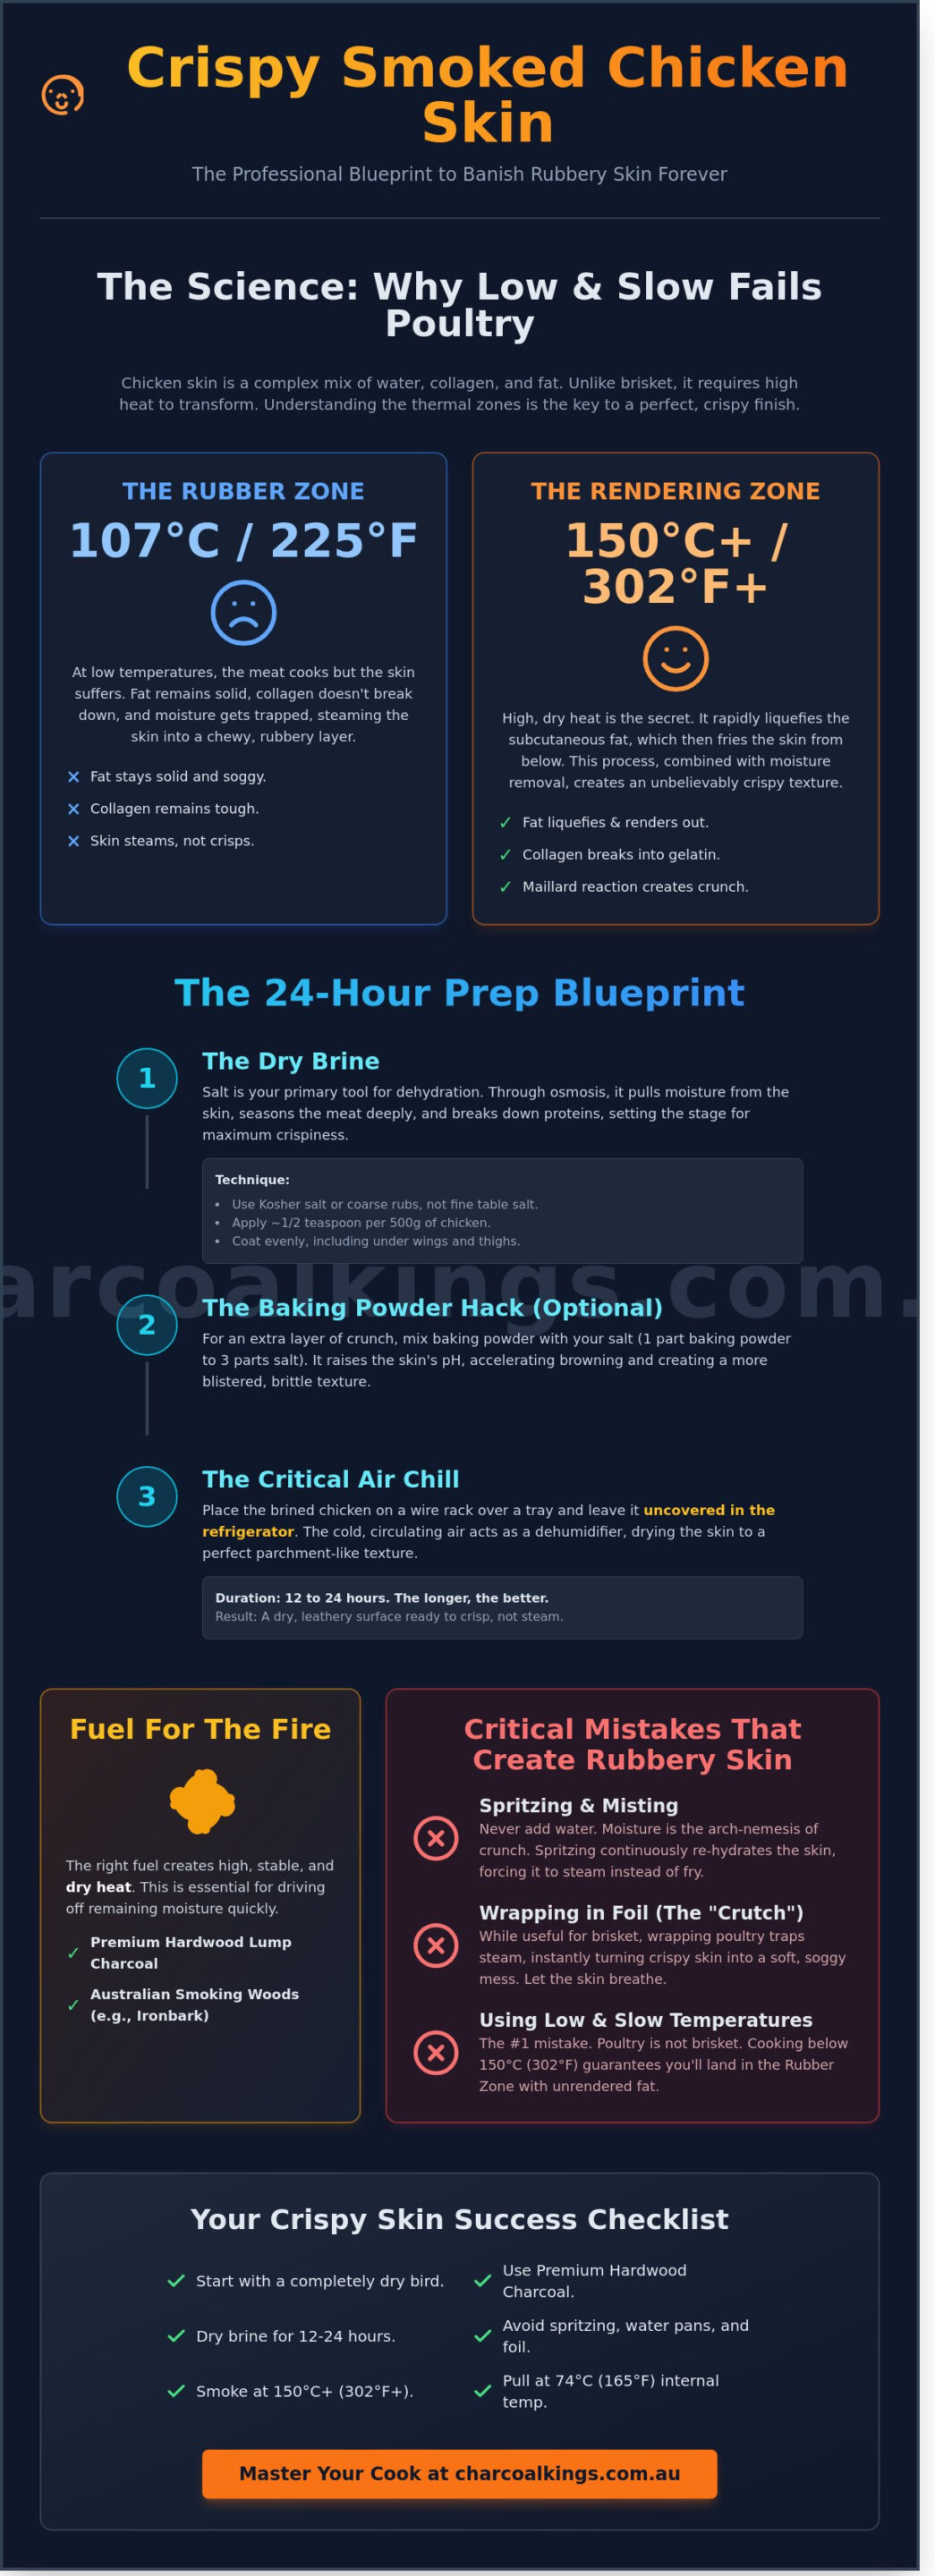
Chicken skin is a complex structure made of water, collagen, and subcutaneous fat. Mastering how to get crispy chicken skin on a smoker starts with rejecting the standard low and slow rules used for beef. While the 107°C (225°F) mantra is perfect for breaking down tough connective tissue in a brisket, it is the direct enemy of poultry. At these lower temperatures, you enter the “Rubber Zone.” This is a thermal dead space where the meat cooks through, but the skin remains a chewy, unrendered mess. Collagen requires significant heat to transform into gelatin, and subcutaneous fat needs a high enough temperature to liquefy and escape the skin layers.
To better understand this concept, watch this helpful video:
Moisture: The Arch-Nemesis of Crunch
Surface moisture is the primary barrier to achieving a perfect bite. When wet skin hits the heat of a smoker, the moisture turns into steam. This process poaches the skin from the outside in, preventing it from ever becoming brittle. Many Australian supermarkets use water immersion chilling, which can increase the bird’s weight by 5% to 8% in retained water. This “Wet Skin” trap means your chicken is saturated before you even open the packet. To win this battle, you must achieve a dry, leathery texture on the surface before the bird ever touches the grate. Using premium hardwood charcoal helps maintain the consistent, dry heat environment necessary to drive off this remaining moisture quickly.
Fat Rendering vs. Meat Temperature
The real challenge of poultry is the delicate balance between rendering fat and avoiding dry meat. Subcutaneous fat stays solid at low temperatures, acting as a soggy insulator. You need a higher ambient temperature, typically between 150°C and 175°C, to liquefy these fat deposits rapidly. This heat ensures the fat renders out and fries the skin from the underside before the breast meat reaches the 74°C safety limit. Understanding these thermal variables is the first step in learning how to get crispy chicken skin on a smoker. The Maillard reaction is a chemical process where amino acids and reducing sugars react under heat to create the distinct brown colour and crisp texture of perfectly smoked poultry skin.
- 107°C: The Rubber Zone where fat stays solid.
- 150°C+: The Rendering Zone where fat liquefies and skin crisps.
- 74°C: The target internal temperature for safe, juicy chicken.
Preparation Mastery: Dehydrating for Success
Moisture is the primary obstacle when learning how to get crispy chicken skin on a smoker. If the skin is wet, the smoker’s heat spends its energy evaporating water instead of rendering fat and crisping the surface. To achieve professional results, you must start the preparation 24 hours before you light your charcoal.
The dry brine is the most critical step in this process. Salt isn’t just a seasoning; it’s a chemical tool. When applied to raw chicken, salt draws out internal moisture through osmosis. This moisture dissolves the salt into a concentrated brine, which is then reabsorbed into the meat. This process seasons the bird deeply while simultaneously breaking down protein structures in the skin, making it thinner and more prone to crisping.
Your refrigerator is your best friend during this phase. Place the salted chicken on a wire rack over a tray and leave it uncovered. The cold, circulating air in a standard refrigerator acts as a dehumidifier. Within 12 to 24 hours, the skin will take on a translucent, parchment-like appearance. This is exactly what you want. A dry surface is the only way to ensure the skin fries in its own fat rather than steaming in the pit.
The Dry Brine Process
Selection of salt is vital. Avoid table salt; its fine grains make over-salting too easy. Use Kosher salt or professional-grade rubs, sauces & cures for even coverage. Apply approximately 1/2 teaspoon of salt per 500g of chicken. Ensure you coat the underside of the wings and the thighs. Aim for a 12-hour minimum brine time. Do not exceed 24 hours, as the meat can begin to take on a cured, ham-like texture that lacks the traditional roast chicken feel.
The Baking Powder Hack
The baking powder technique is a proven scientific method for better texture. Baking powder is alkaline, which raises the pH level of the chicken skin. This chemical shift allows the peptide bonds in the skin to break down more efficiently. The result is a skin that blisters and crackles rather than turning leathery. It creates more surface area for the heat to work on.
- The Ratio: Mix 1 part baking powder with 3 parts of your preferred dry rub.
- The Application: Dust the mixture lightly over the skin. You don’t need a thick layer.
- The Warning: You must use aluminium-free baking powder. Standard baking powder contains sodium aluminium sulfate. This creates a bitter, metallic aftertaste when exposed to the high heat of a smoker.
If you want to ensure your setup is ready for a high-heat finish, check out the latest premium fuel options to maintain consistent temperatures. Proper preparation ensures that once the chicken hits the heat, the skin reacts immediately. Get Sizzlin’!
Heat and Fuel: Choosing the Right Fire
Temperature control starts with your fuel. If you load your firebox with low-quality materials, you’ll struggle to reach the intensities required for fat rendering. High-quality hardwood lump charcoal is the best foundation for high-heat smoking. It burns hotter and cleaner than standard supermarket options, providing the thermal energy needed to transform soft skin into a crunchy crust.
You need to hit the sweet spot of 150°C to 175°C (300°F to 350°F). Traditional low and slow temperatures around 110°C are great for brisket, but they leave chicken skin rubbery. At 150°C and above, the subcutaneous fat begins to render and fry the skin from the inside out. This thermal transition is the core secret of how to get crispy chicken skin on a smoker.
Maintaining a clean, hot burn is vital. You want thin, blue smoke. Thick, white smoke indicates incomplete combustion, which deposits acrid soot on your bird. This soot sticks to the rendering fat and ruins the flavor profile of your poultry. Keep your fire small and hungry for oxygen to ensure a clean finish.
Lump Charcoal vs. Briquettes for Poultry
Lump charcoal is the superior choice for crisping skin. It responds faster to oxygen adjustments, allowing you to spike temperatures during the final 20 minutes of the cook. Our premium natural hardwood charcoal contains no chemical binders or fillers. These additives in cheap briquettes can produce dirty smoke that permeates delicate chicken meat. Natural fuel ensures the only flavor you taste is the wood and the bird. It’s about performance and purity.
Setting Up Your Smoker for High Heat
Maximized airflow is your best tool for heat. Open your intake and chimney vents fully to provide the fire with maximum oxygen. Use a two-zone setup for the best results. This allows you to manage the cook without scorching the meat.
- Indirect Zone: Cook the chicken here until the internal temperature reaches approximately 65°C. This dries the skin surface.
- Direct Zone: Move the bird over the hot zone for the final stage to blast the skin with radiant heat.
For whole birds, the reverse sear method works perfectly. Start at 150°C to cook the meat evenly, then finish over direct coals. For wings, keep the heat high throughout the entire process. This consistent thermal energy is essential for how to get crispy chicken skin on a smoker every single time. Get sizzlin’ with a fire that actually performs.
Smoking Techniques: What NOT to Do
Achieving the perfect crunch requires breaking some common barbecue habits. If you want to master how to get crispy chicken skin on a smoker, you have to eliminate excess moisture at every stage of the cook. Many backyard pitmasters treat chicken like a brisket, but those same techniques will leave you with rubbery, unappealing skin. Follow these rules to ensure your poultry comes off the rack with a professional finish.
- Stop spritzing: Moisture is the enemy of the crunch you crave. Spritzing prevents the fat from rendering and keeps the skin soft.
- Never wrap in foil: The ‘Texas Crutch’ is great for pork, but it creates a steam bath for poultry. This will ruin any texture you’ve developed.
- Monitor internal temperatures: Use a digital probe to pull the bird at 74°C. This prevents the meat from drying out while you’re chasing that perfect exterior.
- Position for airflow: Place the bird with the skin facing the primary heat source or the path of the airflow to maximize the drying effect.
- Rest on a wire rack: Never place hot chicken directly on a flat plate or board. The bottom will sweat and turn soggy within minutes.
The Spritzing Myth
Spritzing works for a 12 hour pork butt because it helps build bark and maintain surface moisture over a long duration. Chicken is a different beast. Adding liquid to the surface creates a barrier that prevents the skin from reaching the high temperatures needed for a proper snap. If you want to add flavour without adding water, use a high quality dry rub or a light coating of oil. Save the glazes or sauces for the final 10 minutes of the cook. This allows the sugars to set without compromising the structural integrity of the skin.
Airflow and Placement
Airflow is just as important as temperature. In an offset smoker, the convection effect is what actually dries out the skin. Stagnant air leads to soft results, even if your thermometer reads 160°C. If you use a water pan to stabilize your pit, keep it away from the meat. You want the humidity in the chamber to remain low enough that the skin can dehydrate. Position your chicken where the air moves fastest to ensure the fat renders out completely.
Ready to upgrade your fuel for a hotter, cleaner burn? Shop our premium natural hardwood charcoal and get sizzlin’ today.
The Charcoal Kings Professional Setup
Achieving legendary results requires more than just basic technique. You need gear that performs under pressure. Selecting the right bbq is the first step toward mastering how to get crispy chicken skin on a smoker. Cheap, thin-walled units lose heat too fast. This causes the skin to turn rubbery rather than brittle. We recommend heavy-duty steel offsets or ceramic kamados that maintain a steady 150°C to 175°C without constant fiddling. High-quality hardware makes managing the necessary temperature spikes effortless. You want the fat to render completely before the meat overcooks. Professional-grade equipment ensures your fire stays clean and your heat stays consistent.
Essential Hardware for the Perfect Crunch
Heavy-duty steel smokers hold the thermal mass required for rendering stubborn fat. If your smoker struggles to reach high finishing temperatures, consider using a hibachi grill for a final skin sear. This Japanese technique provides an unbeatable crunch by applying direct, intense heat from Binchotan charcoal. Essential tools like an accurate instant-read thermometer are non-negotiable. You can’t guess internal temperatures when you’re pushing for a specific texture. Keep high-heat gloves nearby to move grates or adjust coals safely. Precision is the difference between a golden bird and a burnt one.
Choosing Your Flavour Profile
Poultry is a delicate protein. Heavy smoke can easily overpower it. Stick to premium Australian smoking woods like Cherry or Apple for a sweet, subtle finish. For those who want a more traditional, robust profile, Ironbark provides a clean, long-lasting burn that complements the natural juices. This is a core part of learning how to get crispy chicken skin on a smoker while maintaining a professional flavour profile. Use Charcoal Kings rubs to accelerate the Maillard reaction. These blends are formulated to draw out moisture and create a textured, savoury crust that shatters with every bite. The right rub contains just enough sugar and salt to caramelise without burning under high heat.
Final Checklist: From Spark to Bite
- Dry the skin with paper towels 24 hours before cooking.
- Apply a light coating of oil or cornstarch to the surface.
- Maintain a clean fire using 100% natural Australian hardwoods.
- Monitor internal temps to hit 74°C for the meat while the skin crisps.
- Rest the bird uncovered for 10 minutes to prevent steam from softening the skin.
Stop settling for mediocre results. Get your gear sorted, fire up the coals, and transform your next cookout into a professional showcase. It’s time to show your guests what a real pitmaster can do. Get Sizzlin’!
Master the Crunch on Your Next Cook
Achieving the perfect bite starts long before the meat hits the grate. You need to air-dry your poultry in the fridge for at least 12 to 24 hours to strip away surface moisture. Low temperatures are the enemy of texture; instead, maintain a steady 150°C or higher to render fat effectively. Mastering how to get crispy chicken skin on a smoker requires shifting away from traditional low-and-slow methods and embracing high, consistent heat. Quality fuel is the final piece of the puzzle. We provide 100% natural hardwood charcoal that burns hotter and longer than standard supermarket briquettes. As an Australian-owned and operated business, we supply expert-approved BBQ rubs and heavy-duty hardware built for local conditions. Stop settling for rubbery, subpar results. It’s time to take control of your fire and deliver professional-grade results every time you light the pit. Your guests will notice the difference the moment they hear that first crackle.
Upgrade your fuel and Get Sizzlin’ with Charcoal Kings!
Frequently Asked Questions
Can I get crispy skin at 107°C (225°F)?
No, 107°C is too low to render fat properly for a crunch. Fat renders effectively between 150°C and 175°C. At lower temperatures, the skin remains rubbery and tough. For the best results on how to get crispy chicken skin on a smoker, finish your cook at 190°C during the final 15 minutes. This high heat flash dries the exterior and creates the desired texture.
Is it better to smoke chicken whole or in pieces for crispy skin?
Smoking chicken in pieces is more effective for achieving uniform crispiness. Pieces increase the surface area exposed to direct heat and airflow. Spatchcocking a whole bird is a reliable alternative, as it lays the chicken flat on the grill. This method ensures heat hits the skin evenly rather than trapping steam in the cavity. Increased airflow is the key to avoiding soggy spots.
Should I put oil or butter on the skin before smoking?
Use a light coating of oil with a high smoke point rather than butter. Butter contains roughly 15% to 18% water, which creates steam and prevents crisping. A premium natural oil helps the heat transfer to the skin quickly. Apply it sparingly after drying the skin thoroughly with a paper towel. This creates a conductive layer that fries the skin as it smokes.
How do I keep the meat juicy while cooking at higher temperatures?
Brining the chicken for 4 to 12 hours before smoking is the most effective way to retain moisture. A standard wet brine uses 60 grams of salt per litre of water. This process allows the muscle fibres to absorb liquid, protecting them from drying out at 160°C. Pull the chicken off the heat exactly when the internal temperature hits 74°C. Use a digital thermometer for accuracy.
Does the type of smoker affect skin crispiness?
Charcoal smokers generally produce crispier skin because they provide drier, more intense radiant heat. Pellet smokers often struggle with moisture levels, sometimes leading to soft skin. Using premium hardwood charcoal creates a clean, hot fire with lower humidity. This environment is ideal for how to get crispy chicken skin on a smoker. Natural lump charcoal burns hotter and more consistently than compressed pellets.
What happens if I put sauce on the chicken too early?
Applying sauce too early results in burnt sugar and soggy, limp skin. Most commercial barbecue sauces contain over 40% sugar. These sugars caramelise and burn at temperatures above 135°C. Wait until the last 10 minutes of the cook to glaze your bird. This allows the skin to crisp fully before the sauce sets without adding moisture during the crucial rendering phase.
Can I fix rubbery skin after the chicken is finished smoking?
Yes, a high heat sear or a quick stint under a grill can rescue rubbery skin. If the skin is soft, place the chicken under a preheated oven grill for 2 to 3 minutes. Keep a close watch to prevent charring. Alternatively, use a kitchen torch to target specific areas. This rapid heat application mimics the final rendering process that should have happened inside the smoker.
Is it necessary to flip the chicken during the smoking process?
Flipping is usually unnecessary if your smoker has good convection and airflow. Most modern smokers circulate heat evenly around the meat. Flipping can actually damage the skin or cause the rub to fall off into the grates. If you use an offset smoker, simply rotate the tray 180 degrees halfway through the cook. This ensures even browning without disturbing the delicate skin surface. Get Sizzlin’!