

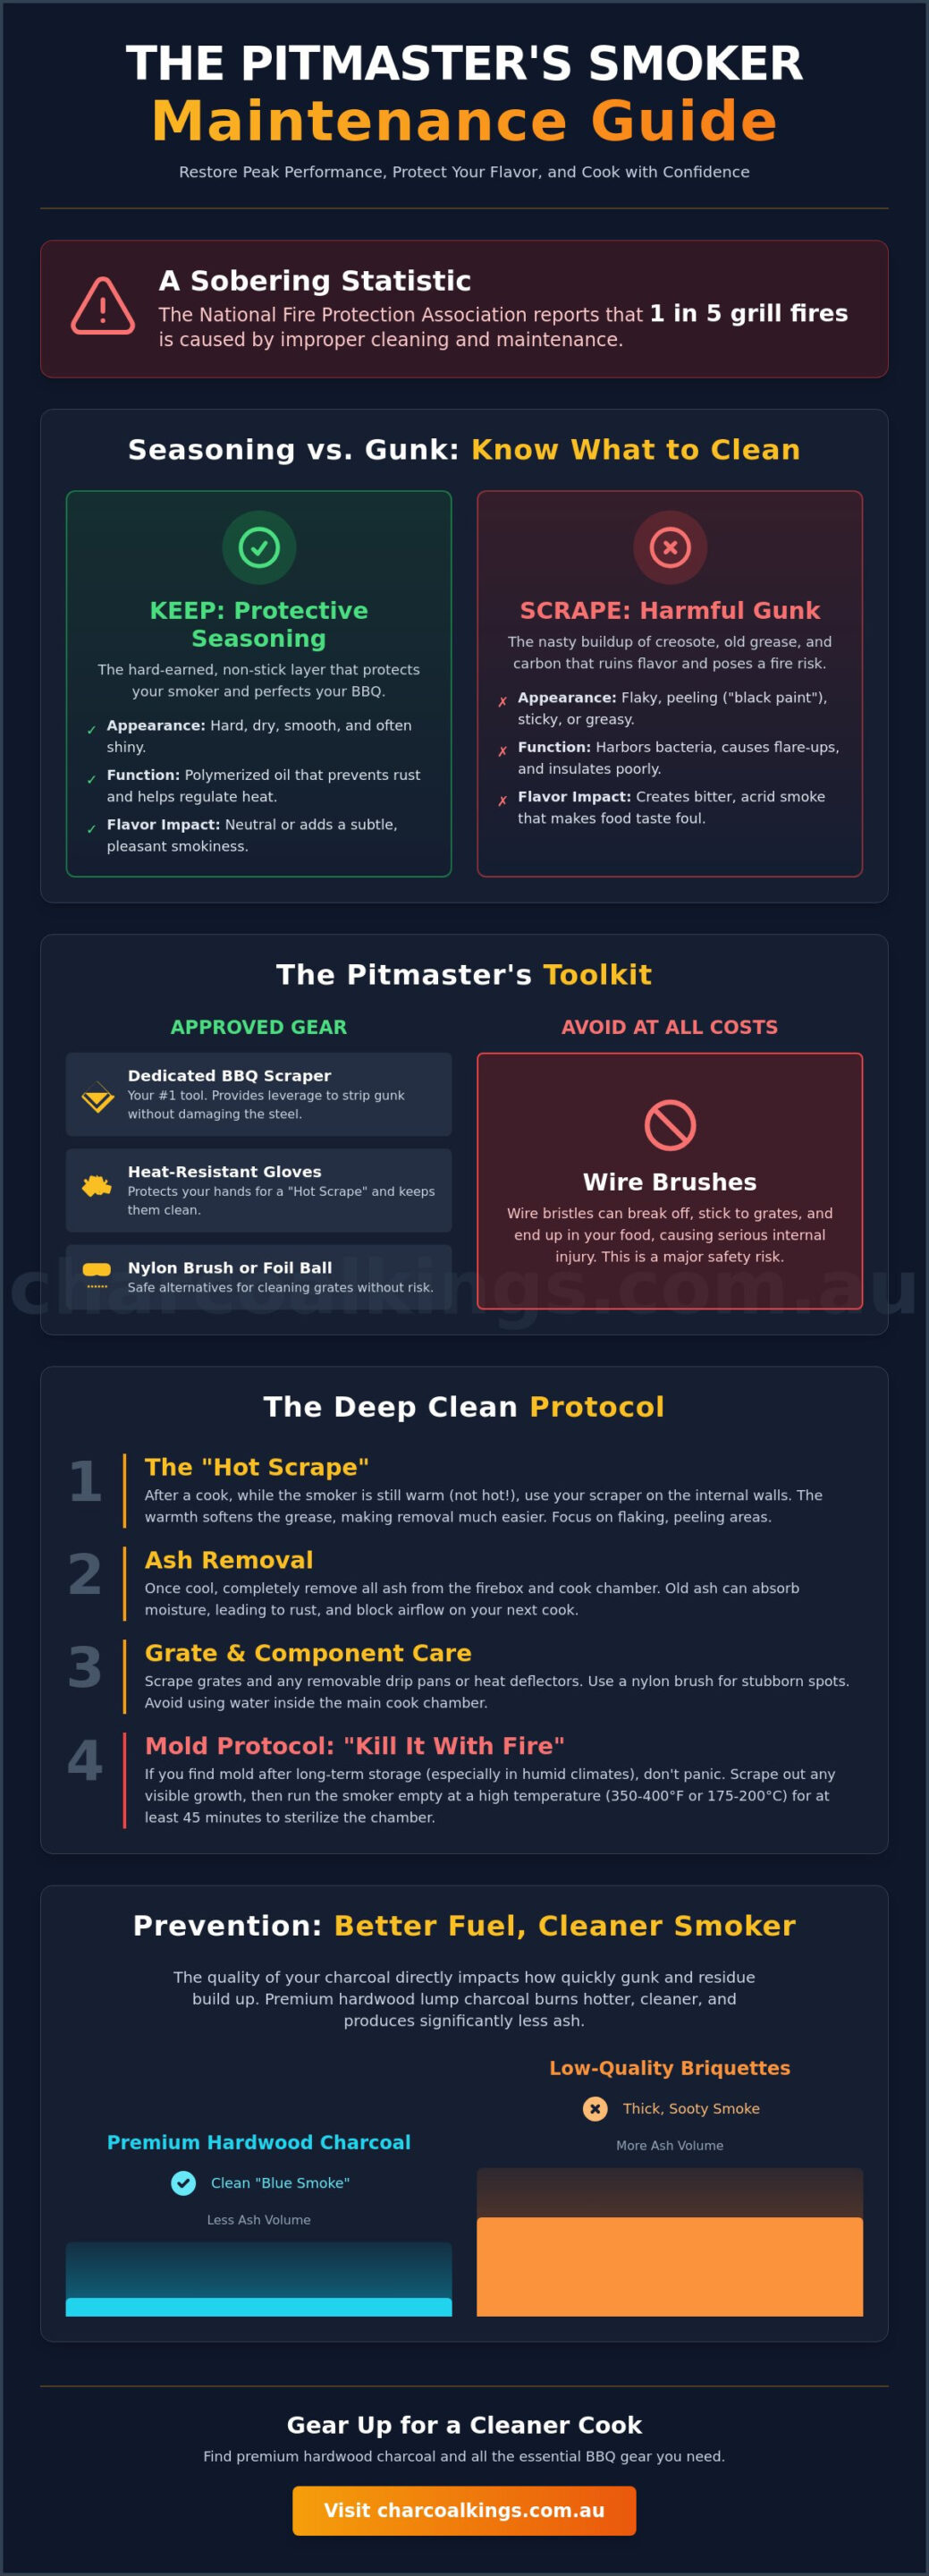
Did you know that one in five grill fires is caused by a unit that hasn’t been properly maintained? It’s a sobering statistic from the National Fire Protection Association that every pitmaster should take to heart. You’ve likely spent months, if not years, building a perfect black patina inside your cook chamber. The thought of taking a heavy-duty scraper to those walls feels like destroying your hard work. You need the rancid grease gone, but you’re terrified of stripping away the seasoning that gives your brisket its signature edge. It’s a common struggle to find the line between a functional tool and a sterile, lifeless box.
This guide will show you exactly how to clean a dirty smoker to restore peak performance while protecting the essential polymerized oil layer. You’ll learn how to identify dangerous creosote buildup, eliminate mold growth, and achieve the clean blue smoke that marks a true professional. We’ll break down which components require a deep scrub and which parts are best left alone. We will also look at how choosing pure hardwood lump charcoal can prevent future gunk from forming in the first place. It’s time to stop guessing and start maintaining your gear like a seasoned expert.
Key Takeaways
- Learn to distinguish between the protective polymerised seasoning layer and the rancid creosote gunk that ruins BBQ flavour.
- Master the professional “Hot Scrape” method and learn how to clean a dirty smoker safely without damaging its internal surfaces.
- Identify why a dedicated BBQ scraper is your most important tool and understand the safety risks associated with traditional wire brushes.
- Discover the “Kill It With Fire” protocol to effectively sterilise your cook chamber and eliminate mold growth caused by humidity.
- Understand how using premium hardwood charcoal reduces ash volume and prevents the rapid buildup of future residue.
Seasoning vs. Gunk: Knowing What to Clean
Every pitmaster knows the value of a well-seasoned cook chamber. Seasoning is the hard, polymerized oil layer that acts as a barrier against rust and helps the steel retain heat. It is a sign of a hard-working machine. Gunk is different. Gunk consists of rancid grease, carbon flakes, and potential mold growth. Knowing how to clean a dirty smoker requires distinguishing between these two layers. You want to keep the seasoning but destroy the gunk. The science of smoking dictates that heat and smoke should interact with the meat, not with the decomposing remains of last month’s pork butt.
A neglected smoker won’t produce the “thin blue smoke” required for world-class BBQ. Instead, you’ll get thick, grey, or white smoke that tastes like a house fire. This happens because the heat is burning off old residue rather than fresh wood. Perform a visual test. If the walls are shiny and smooth, that is seasoning. If the walls are sticky, soft, or covered in what looks like peeling black paint, you have a problem. Clean equipment is the foundation of consistent flavor.
To better understand this concept, watch this helpful video:
The Danger of Creosote and Rancid Fats
Creosote forms when airflow is restricted or when you use wood with high moisture content. Creosote is a thick, black, bitter-tasting byproduct of incomplete combustion. This substance doesn’t just taste bad; it is the residue of poor fire management. Old grease is equally dangerous. Fats that sit in the bottom of a cook chamber can go rancid and harbour bacteria. This creates a foul environment that compromises the safety and flavor of your food. Removing these contaminants is essential for maintaining a safe cooking environment.
When to Perform a Deep Restoration
You don’t need to strip your smoker to bare metal after every cook. Routine maintenance involves scraping the grates and clearing the ash. However, you need a deep restoration if you see “black paint” flaking off the inside of the lid. That isn’t paint. It is carbon buildup that will eventually fall onto your food. A healthy smoker should smell like sweet hardwood and clean smoke. If your unit smells like stale grease or a damp basement, it’s time for a deep clean. Plan for a thorough restoration at least once a year or after any period of long-term storage to ensure your gear remains in peak condition.
The Pitmaster’s Toolkit: Essential Cleaning Supplies
A master craftsman is only as good as his tools. This rule is absolute when you are learning how to clean a dirty smoker. You don’t need a garage full of specialized gadgets, but you do need equipment that can handle carbonized grease and high heat. Your most critical asset is a high-quality BBQ scraper. Unlike flimsy kitchen spatulas, a dedicated scraper provides the leverage needed to strip away stubborn creosote without gouging the underlying steel. It’s the difference between a surface that’s truly clean and one that’s just smeared with soot.
Avoid wire brushes at all costs. The Consumer Product Safety Commission has issued clear warnings that wire bristles can break off, stick to the grates, and end up in your food. These metal shards are responsible for thousands of emergency room visits. Switch to nylon brushes or use a ball of heavy-duty aluminum foil for the grates. You should also wear heavy-duty heat-resistant gloves and old clothes. Professional cleaning is a messy process. You are dealing with concentrated carbon and liquid fats that will ruin standard fabrics instantly. Protective gear allows you to apply the necessary force without worrying about personal safety.
Mechanical vs. Chemical Cleaning
Mechanical cleaning is the gold standard for the main cook chamber. Scraping is always better than soaking. Water is the enemy of steel; it creates rust and can damage sensitive gaskets or insulation. Only use a pressure washer on removable components like heavy grates or drip pans. Never spray the interior of an offset or pellet smoker with high-pressure water. It forces moisture into seams where it won’t evaporate. For a more efficient clean, use the steam method. Place a pan of water inside the unit during the final 30 minutes of a cook. The residual heat creates steam that loosens the gunk, making it much easier to scrape away once the unit cools to a safe temperature.
Safe Degreasers for Food Surfaces
Chemical cleaners should be a last resort for the internal chamber. If you must use them, prioritize natural solutions like a thick paste made from baking soda and water. A simple spray of vinegar and lemon juice works well for light grease on the exterior surfaces. Adhering to strict food safety protocols is vital when selecting commercial products. Look for labels that explicitly state the formula is food-safe and non-toxic. After using any commercial chemical, always perform a high-heat “burn-off” for at least 45 minutes. This ensures no chemical residue remains to taint your next brisket. Investing in professional-grade BBQ accessories ensures you have the power to maintain your gear without compromising the purity of your cook.
Step-by-Step: Deep Cleaning Your Smoker
Restoring a neglected unit requires a logical order of operations. If you clean the bottom first, you’ll simply cover it in soot again when you tackle the lid. Learning how to clean a dirty smoker effectively means working from the top down and from the inside out. This systematic approach ensures every square inch of the cook chamber is functional and safe. Follow these five steps for a complete restoration.
- Step 1: The Ash Audit. Remove every trace of spent fuel and fine dust from the firebox and the floor of the cook chamber. A shop vac is the best tool for reaching into corners where moisture-trapping ash hides.
- Step 2: The Hot Scrape. Fire up the unit to approximately 250°F. This softens the hardened grease and carbon, making it pliable and significantly easier to remove with your scraper.
- Step 3: Component Breakdown. Remove all racks, water pans, and heat baffles. It is impossible to clean the interior walls properly with these obstructions in the way.
- Step 4: The Interior Wall Scrape. Target the flaky carbon buildup on the lid and side walls. Focus on removing anything that looks like “peeling paint” while leaving the thin, hard seasoning intact.
- Step 5: Degreasing and Rinsing. Use your chosen food-safe cleaner on high-contact areas like the door seals and exterior handles. Wipe down the surfaces with a damp cloth to remove loose debris.
Establishing this routine is the only way to ensure consistent results. When you know how to clean a dirty smoker using a repeatable process, the task becomes a standard part of your maintenance schedule rather than a dreaded chore.
Cleaning the Grates and Racks
Stainless steel grates benefit from a long soak in a large tub of hot, soapy water. This loosens the “meat glue” and sugar-based rubs that carbonize during long cooks. For cast iron grates, avoid soaking. Instead, use heat and a stiff brush to remove debris, then immediately re-apply a thin layer of oil to prevent oxidation. For stubborn grate residue that won’t budge, use a crumpled ball of heavy-duty aluminium foil to scrub the bars. The foil conforms to the shape of the grates, providing a custom abrasive surface that won’t leave dangerous bristles behind.
Ash Management and Firebox Care
The firebox is the heart of your machine and the area most prone to failure. Ash is hygroscopic, meaning it pulls moisture from the air. When ash and moisture mix, they create a corrosive lye that eats through steel fireboxes. Clean your air intakes and chimneys regularly to maintain the airflow required for barbecuing with charcoal at a professional level. While the firebox is empty, inspect the firegrate for warping or deep rust. Replacing a thin, burnt-out grate before it fails ensures your fire remains elevated and well-oxygenated for your next cook.
The Aussie Smoker Problem: Dealing with Mold and Rust
Australia’s climate is notoriously brutal on outdoor cooking equipment. High humidity levels and sudden tropical downpours create a perfect breeding ground for mold inside a closed cook chamber. If you open your unit after a few weeks of storage to find a layer of white fuzz, don’t panic. You don’t need to scrap the machine. Knowing how to clean a dirty smoker infested with mold is a vital skill for any Australian pitmaster. It requires a specific sterilization protocol that goes beyond a simple scrape and wipe.
Rust is the second major threat. You must distinguish between surface rust and structural rot. Surface rust is a cosmetic issue that occurs when the seasoning layer fails. It looks like orange dust and can be easily treated. Structural rot is deep, flaky, and compromises the integrity of the steel. If you can poke a screwdriver through the metal, the smoker is a safety hazard. Regular inspection and aggressive maintenance are the only ways to prevent your investment from turning into a pile of iron oxide.
Mold Remediation Protocol
Sterilization is the goal when dealing with mold. Wear a mask and heavy-duty gloves before you start to avoid inhaling spores. First, use a plastic scraper to remove the visible “fuzz” and discard it immediately. Once the bulk is gone, fire up the smoker. You must reach a temperature of at least 400°F (204°C) and maintain it for one hour. This “Kill It With Fire” approach ensures all internal surfaces are completely sterile. After the unit cools, apply a fresh coating of high-smoke-point oil to every internal surface to rebuild the protective barrier. This process effectively resets the chamber for your next cook.
Rust Prevention in Coastal Areas
Salt air accelerates steel decay at an alarming rate. If you live within ten kilometres of the coast, your smoker is under constant attack. Prevention is more efficient than repair. Apply a thin “protective coat” of oil to the exterior of the smoker once a month. This acts as a sacrificial layer that blocks moisture and salt from reaching the paint or steel. Choosing the right cover is equally important. Avoid cheap, non-breathable plastic covers that trap condensation against the metal. Use a heavy-duty, breathable fabric cover that allows moisture to escape while blocking rain. If you find surface rust, sand it back to bare metal and apply high-heat paint or oil immediately. Maintaining your gear ensures it survives the harsh Australian elements. For the best maintenance gear, explore our range of BBQ accessories to keep your setup in peak condition.
Prevention: How Fuel Quality Keeps Your Smoker Cleaner
The most effective way to avoid the labor-intensive process of how to clean a dirty smoker is to stop the contamination at its source. Your choice of fuel is the primary factor in how much residue accumulates inside your cook chamber. Low-quality fuels burn inefficiently and produce excessive waste. They leave behind thick layers of soot and ash that mix with grease to form a stubborn, acidic sludge. By investing in high-standard materials, you reduce the mechanical work required to maintain your gear and ensure a purer flavor profile.
Supermarket briquettes often contain fillers like cornstarch, coal dust, and chemical binders. These additives do not contribute to heat; they only contribute to ash volume and chemical residue. This fine dust travels with the airflow and coats every internal surface, including your food. Conversely, premium hardwood charcoal consists of pure carbonized wood. It burns hotter and cleaner, leaving behind minimal residue. This purity ensures that your firebox stays clear and your smoker walls remain free of the chemical film that ruins a good seasoning layer.
Choosing Clean-Burning Fuel
Lump charcoal produces significantly less ash than cheap briquettes. For those seeking the absolute peak of purity and performance, Binchotan charcoal offers a near-zero residue experience. Its extreme carbon density allows for a long, consistent burn without the flaky carbon byproduct associated with softer woods or additive-heavy fuels. Avoid “easy-light” products. These chemicals evaporate and bond with the seasoning on your smoker walls, creating a toxic layer that is nearly impossible to remove without a full restoration. Clean fuel is the foundation of a clean machine.
Moisture management is also critical for firebox health. Using unseasoned or wet wood causes incomplete combustion, resulting in the heavy creosote buildup mentioned previously. Ensure your smoking wood is properly seasoned with a moisture content below 20%. A clean, oxygen-rich fire produces the desired translucent blue smoke. If your fire is smouldering due to poor airflow or wet fuel, you are essentially spray-painting the interior of your smoker with soot. Keep your intakes clear and your fuel dry to minimize the need for deep cleaning.
Post-Cook Maintenance Routine
A 5-minute habit after every cook saves hours of labor later. While the unit is still hot, give the grates a quick scrape. This is when the grease is most pliable and easiest to remove. Empty the ash pan every single time. There are no exceptions to this rule. Ash traps moisture and triggers the corrosive lye reactions that eat through steel. Once the smoker has cooled down but remains slightly warm, apply a light misting of food-grade oil to the internal walls. This maintenance seasoning prevents rust and ensures that any new gunk won’t bond tightly to the steel. Consistency is the hallmark of a professional pitmaster. Get the right fuel and the right tools, and you will spend more time cooking and less time scrubbing.
Master the Fire, Maintain the Machine
Mastering the fire is only half the battle; maintaining the machine ensures that fire produces world-class results every time. You now have the definitive protocol for distinguishing protective seasoning from hazardous gunk. By following a top-down cleaning sequence and using the right mechanical tools, you’ll protect the integrity of your steel and the purity of your flavor profile. Learning how to clean a dirty smoker isn’t about achieving a sterile factory finish; it’s about restoring a functional, high-performance cooking environment.
Prevention remains your most powerful strategy. High-quality fuel reduces ash volume and prevents the rapid accumulation of creosote and chemical residue. Upgrade your BBQ game with Australia’s premium hardwood charcoal to experience the difference that 100% natural hardwood makes. Our products contain no additives and are trusted by professional pitmasters across the country. With Australia-wide shipping, getting the right fuel for a cleaner cook has never been easier. Fire up your unit with confidence and keep those blue smoke trails rolling. Let’s get to work.
Frequently Asked Questions
Can I use a pressure washer to clean my smoker?
Avoid using a pressure washer on the main cook chamber of your smoker. High-pressure water forces moisture into gaskets, seams, and insulation where it cannot easily evaporate. This trapped moisture leads to hidden rust and eventually destroys the structural integrity of the steel. Only use a pressure washer for removable components like heavy steel grates or drip pans that you can dry thoroughly in the sun after cleaning.
How do I get rid of mold inside my BBQ smoker?
Sterilize the chamber using high heat to kill spores effectively. First, wear a mask and gloves to scrape away visible mold growth. Then, fire your unit to at least 400°F and maintain that temperature for one hour. This heat-based protocol is the safest way to address how to clean a dirty smoker infested with mold. Always apply a fresh coating of oil to the internal walls once the unit cools to restore the protective seasoning.
Is it safe to use oven cleaner on a smoker?
Do not use standard oven cleaners on the internal surfaces of your smoker. These products contain caustic chemicals that can leave behind toxic residues, which will taint the flavor and safety of your food. If you require a commercial degreaser, select one with a specific food-safe rating. A high-heat burn-off is a much safer alternative for removing stubborn carbonized grease without introducing synthetic contaminants into your cooking environment.
What is the best way to clean smoker racks?
Soaking racks in a large tub of hot, soapy water is the most efficient method for breaking down “meat glue” and sugar-based rub residue. Submerge the racks for at least 30 minutes to let the soap penetrate the carbonized layers. For stubborn debris, use a crumpled ball of heavy-duty aluminum foil to scrub the bars. This method provides a custom abrasive surface and eliminates the safety risks associated with breaking wire bristles.
How often should I deep clean my offset smoker?
Perform a deep restoration at least once a year or whenever you notice black flakes falling from the lid. These flakes are carbonized grease, not paint, and they will ruin the appearance and taste of your meat. If you maintain a consistent routine of scraping grates and clearing ash after every cook, you will significantly reduce the frequency of these intensive deep-cleaning sessions. Consistency is the hallmark of a professional setup.
What happens if I don’t remove the ash from my smoker?
Leaving ash in your firebox leads to rapid corrosion and eventual structural failure. Ash is hygroscopic, which means it pulls moisture from the air to create a caustic lye. This substance eats through steel fireboxes and iron firegrates with alarming speed. Emptying the ash pan after every single cook is a non-negotiable maintenance step for any pitmaster who wants their equipment to last for decades rather than years.
Can I use soap to clean the inside of my smoker?
Only use mild dish soap on removable parts like grates, water pans, and baffles. Never use soap on the internal walls of the cook chamber because it can strip away the protective seasoning layer you’ve worked hard to build. A simple scrape with a dedicated tool is usually enough for the walls. If you encounter extreme grease buildup, use a natural paste made from baking soda and water to target those specific areas.
How do I re-season my smoker after a deep clean?
Re-seasoning requires a thin coating of high-smoke-point oil and a controlled burn to polymerize the surface. Apply a light, even layer of canola or grapeseed oil to all internal steel surfaces once they are dry. Fire your smoker to 300°F and maintain that heat for approximately two hours. This process creates a fresh, hard barrier that prevents rust and provides a non-stick surface for your next professional-grade cook.