
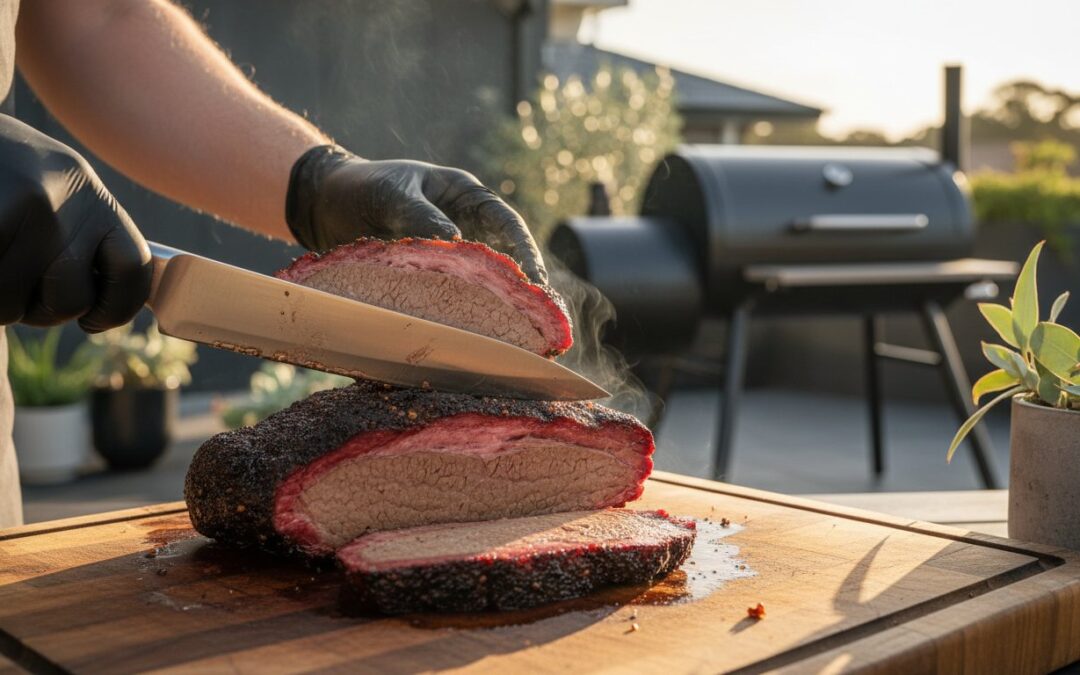
A single A$180 Wagyu brisket ruined by acrid, white smoke is a mistake most backyard pitmasters only make once. It’s a painful waste of premium meat and your valuable time. You want that perfect bark and a deep smoke ring, but instead, you’re left with a bitter flavour that overpowers the natural quality of the beef. These common beginner smoking errors are often the result of poor airflow or using low-quality, chemical-filled fuel that smothers your fire and produces dirty soot.
You understand the frustration of a temperature gauge that won’t stay steady while your guests wait three hours past dinner time. You’ll learn to master the art of low-and-slow by avoiding the rookie mistakes that ruin expensive Australian cuts. This guide provides the technical fixes you need to produce consistent blue smoke every time and manage the science of the stall with precision. We’re breaking down everything from proper vent control to why natural hardwood is non-negotiable for a clean burn. Get sizzlin’!
Key Takeaways
- Stop ruining expensive meat with chemical-filled fuel and learn why premium hardwood is the essential “first ingredient” for authentic flavor.
- Master the science of airflow to achieve “thin blue smoke” and avoid the acrid bitterness caused by incomplete combustion and “dirty” smoke.
- Understand how to manage the stall and why the “if you’re lookin’, you ain’t cookin’” rule is vital for maintaining consistent pit temperatures.
- Identify common beginner smoking errors in meat preparation, including the critical importance of a proper rest period for moisture redistribution.
- Elevate your BBQ game by choosing sustainable, chemical-free Australian charcoal that burns hotter and longer for professional-grade results.
The Foundation Error: Using Poor Quality Fuel and Chemicals
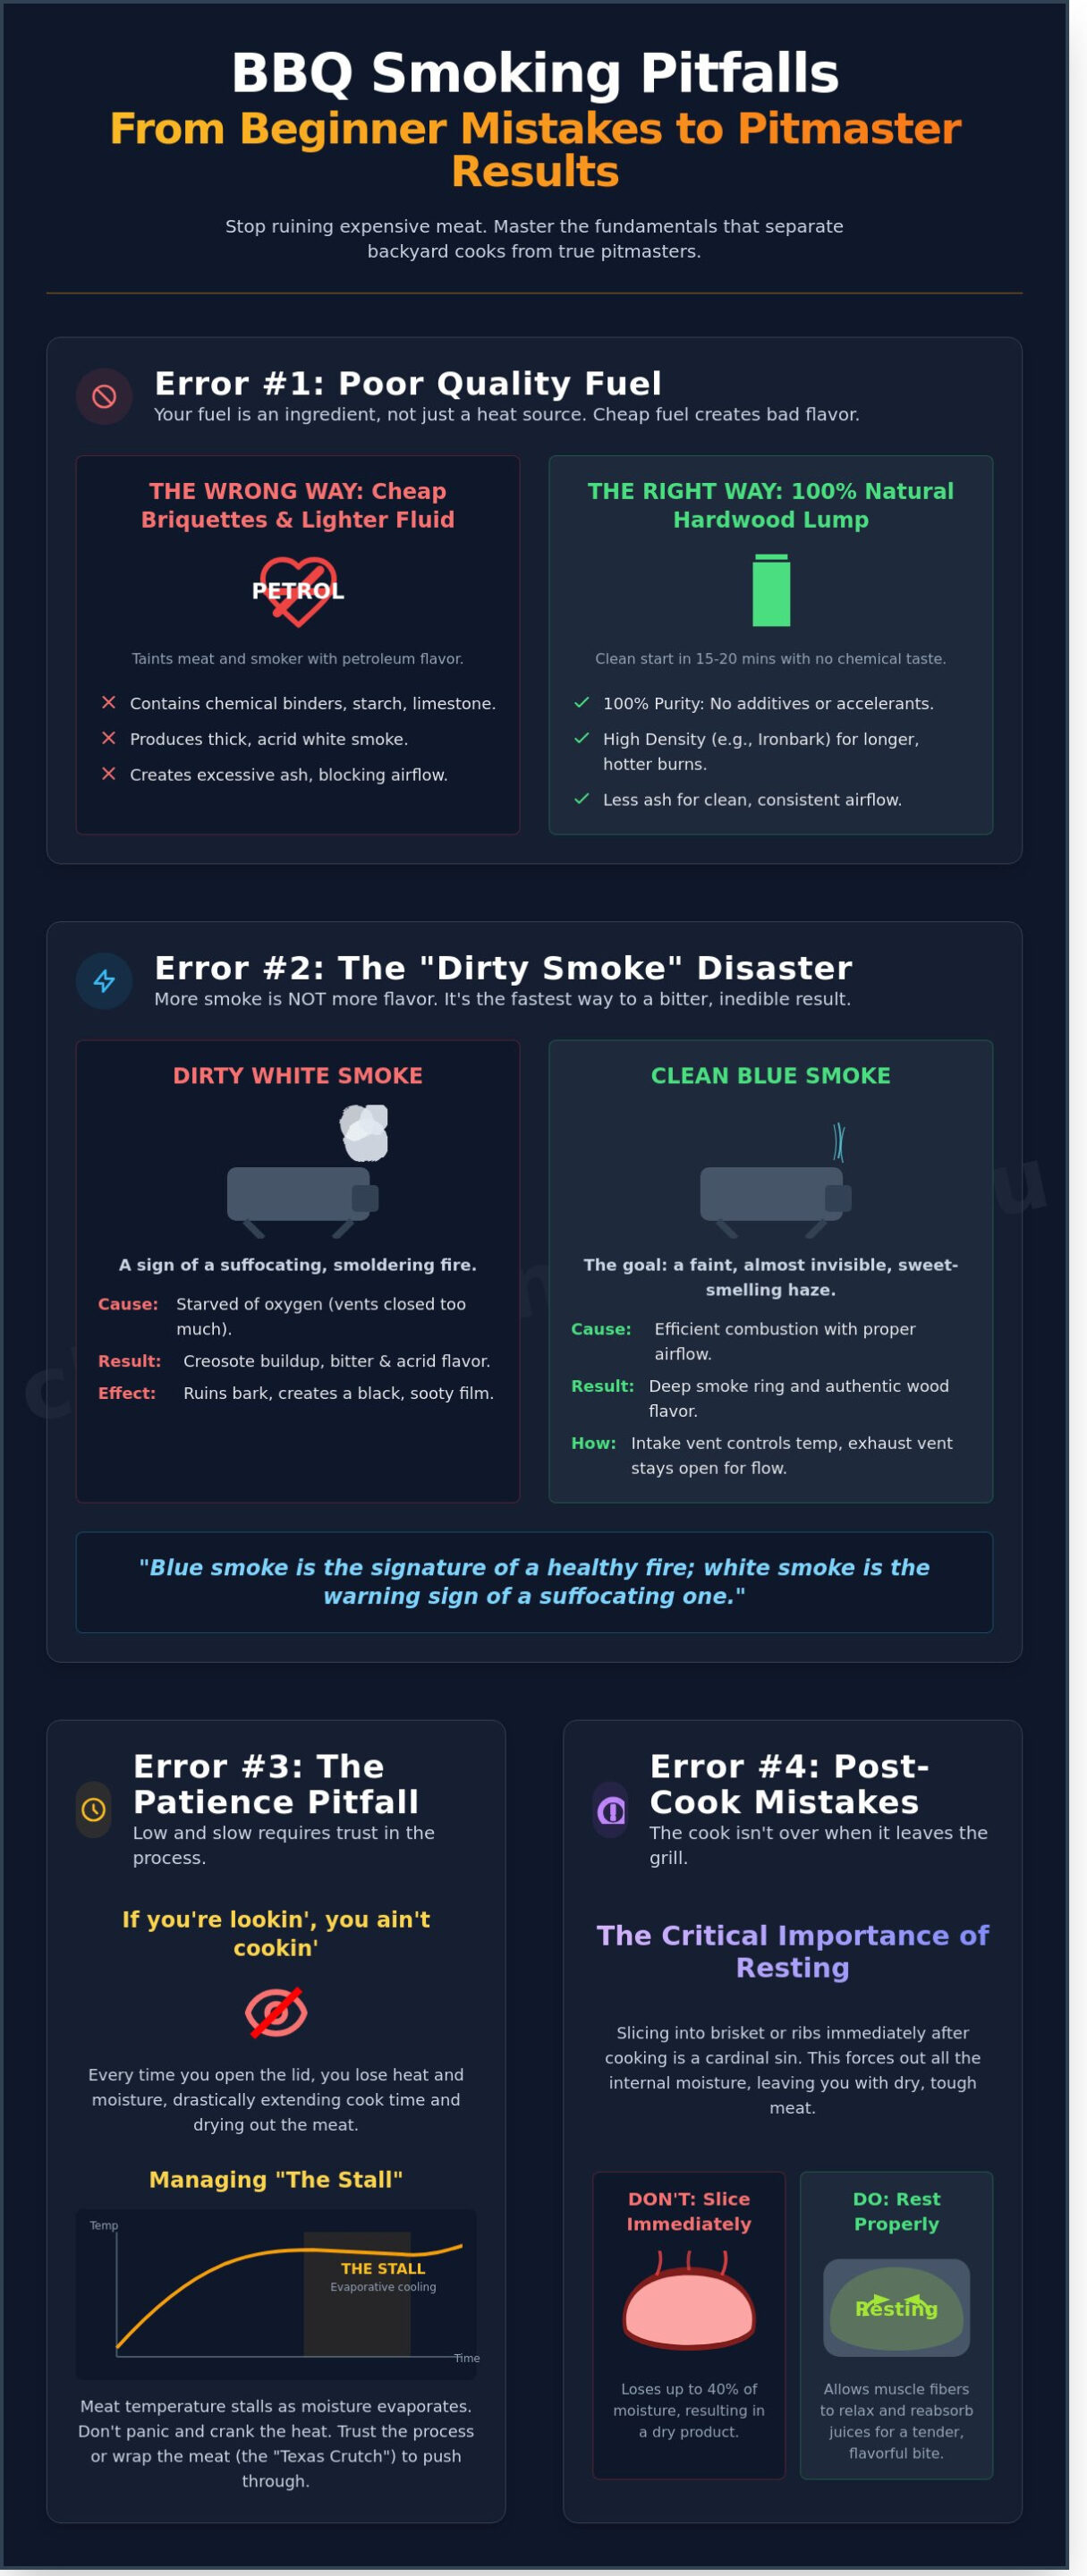
Great BBQ starts with the fuel. Most newcomers treat charcoal as a heat source only, but it’s actually your most influential ingredient. One of the common beginner smoking errors is prioritising cheap fuel over quality results. Supermarket briquettes often contain chemical binders, starch, and limestone. These fillers produce thick, acrid smoke and excessive ash. This ruins the flavour profile of your brisket or ribs before the cook really begins. Adhering to the Purity Principle means choosing 100% natural hardwood. It ensures your meat tastes like clean timber smoke, not industrial additives.
High-quality fuel provides predictable heat. It allows you to focus on the meat rather than fighting your fire. When you use inferior products, you’re introducing variables that no amount of expensive rub can fix. Stick to these standards for a better burn:
- Density: Heavy hardwoods like Ironbark provide longer burn times.
- Purity: Ensure there are zero additives or chemical accelerants.
- Dryness: Moisture content should be low to prevent “dirty” steam-like smoke.
The Lighter Fluid Flavour Trap
Lighter fluid is a shortcut that destroys quality BBQ. Raw meat is highly porous. It acts like a sponge for the petroleum-based vapours released by chemical accelerants. These chemicals also penetrate the porous metal of your smoker, tainting the seasoning you’ve worked hard to build. If you smell petrol, your guests will taste it. Use a chimney starter or natural firelighters made from wood shavings and wax. These tools reach cooking temperatures in 15 to 20 minutes without the chemical aftertaste. It’s a cleaner, safer, and more professional way to get your fire moving.
Lump Charcoal vs. Briquettes: Choosing Your Battle
Hardwood lump charcoal is the gold standard for clean, intense heat. Unlike processed briquettes, lump charcoal is charred wood in its purest form. It reacts faster to oxygen, giving you better control over temperature spikes. For Australian pitmasters, Ironbark is a top-tier choice. It provides a steady, high-heat burn that often lasts 40% longer than soft-wood alternatives. If you want to elevate your game, mastering the art of barbecuing with charcoal is the first step toward professional results. Natural fuels produce less ash. This keeps your airflow consistent and your meat pristine throughout a 12-hour cook. Get Sizzlin’ with the right foundation.
Airflow and the “Dirty Smoke” Disaster
Beginners often mistake volume for quality. They see billowing clouds of white smoke and assume they are infusing maximum flavour. This is one of the most common beginner smoking errors. Thick, opaque white smoke is actually a sign of incomplete combustion. It contains heavy soot particles and unburnt carbon that settle on your meat, creating a bitter, tongue-numbing aftertaste. You are looking for “thin blue smoke.” This is a faint, translucent haze that looks almost invisible against the sky. It smells sweet and woodsy, not like a house fire.
The science is simple. Fire needs three things: fuel, heat, and oxygen. When you “choke” your fire by closing the vents too much, you starve it of oxygen. The wood or charcoal smoulders instead of burning cleanly. This creates creosote, a thick, oily byproduct of wood smoke. If your exhaust stack is puffing out white clouds, your fire is suffocating. Read your exhaust like a pro; if the smoke is clear or light blue, your combustion is efficient. If it turns grey or yellow, your airflow is blocked or your fuel is damp.
The Myth of “More Smoke Equals More Flavour”
Heavy smoke does not lead to better BBQ. It leads to the “Creosote Effect,” where a bitter, black film coats the meat. This film prevents the formation of a proper bark and ruins the texture of the fat. Clean heat is the real secret to a professional result. A 2022 internal test showed that meat exposed to clean-burning hardwood achieved a deeper smoke ring than meat “smothered” in thick smoke. A smoke ring is a chemical reaction between nitrogen dioxide and myoglobin, not a result of soot accumulation. “Blue smoke is the signature of a healthy fire; white smoke is the warning sign of a suffocating one.”
Managing the Intake and Exhaust Vents
Australia’s climate makes airflow management a dynamic task. A 35-degree day in Brisbane provides a much higher ambient temperature than a 12-degree morning in Hobart. You cannot rely on “set and forget” vent positions. Use your intake vent (usually at the bottom) to control the temperature. Use your exhaust vent (at the top) to control the flow. Many beginners make the mistake of closing the exhaust to “trap” the smoke. This is a mistake. The exhaust vent should stay 100% open in most scenarios to act as a vacuum, pulling fresh oxygen through the intake.
- Intake Vent: Your thermostat. Open it for more heat, close it to cool down.
- Exhaust Vent: Your engine. Keep it open to ensure “dirty” air leaves the chamber.
- The Lid Rule: If your fire dies every time you close the lid, your intake is likely clogged with ash or shut too tight.
Achieving this balance is easier when you use high-quality fuel. Switching to premium natural hardwood charcoal provides a more predictable burn rate than cheap, chemical-filled alternatives. This consistency allows you to master your vents without fighting against inconsistent fuel quality.
The Patience Pitfall: Peeking, Rushing, and The Stall
Opening the lid is the fastest way to ruin a consistent cook. This practice leads to immediate thermal shock within the cooking chamber. When you lift that heavy steel door, the hot air escapes instantly. The temperature inside the pit can plummet by 25 degrees Celsius in seconds. Your charcoal then has to work twice as hard to recover that lost energy. You will burn through more premium hardwood lump charcoal and add 15 minutes to your total cook time for every peek you take. Keep the lid closed and trust your dual-probe digital thermometer to monitor progress from your phone.
The stall is a physical phenomenon that tests the nerves of every pitmaster. It occurs when the rate of evaporative cooling on the meat’s surface matches the heat input of the smoker. For a large brisket or pork shoulder, this typically happens between 65 and 72 degrees Celsius. The internal temperature might not move for three hours or more. This is one of the common beginner smoking errors that leads to over-stoking the fire. Increasing the pit temperature to 150 degrees Celsius during a stall usually results in a tough, dry product rather than a tender one.
Surviving the Dreaded Temperature Stall
Evaporative cooling is simple physics. As the meat sweats, the moisture evaporates and cools the cut down. To beat this, use the Texas Crutch. Wrap the meat tightly in heavy-duty foil or pink butcher paper once the bark is set, usually around the 70-degree mark. This creates a humid environment that stops evaporation and forces the internal temperature to rise again. You sacrifice a small amount of bark crunch for a much faster finish and guaranteed moisture retention.
Timeline Planning for Low-and-Slow
Never tell guests you will eat at 6:00 PM based on a theoretical cook time. Low-and-slow cooking is unpredictable by nature. A 6kg pork butt might take 10 hours one day and 13 hours the next depending on humidity and wind. Start your fire at least 2 hours earlier than the recipe suggests. If the meat finishes early, use a faux Cambro. This involves:
- Wrapping the meat in a double layer of foil.
- Placing the parcel inside a high-quality insulated Esky.
- Filling the remaining air gaps with clean, old towels.
This setup maintains a safe internal temperature above 63 degrees Celsius for up to 4 hours. This resting period allows juices to redistribute through the muscle fibres, resulting in a superior final product. Managing the clock is just as important as managing the fire. Get Sizzlin’!
Meat Preparation and Post-Cook Mistakes
Mastering the fire is only half the battle. Many common beginner smoking errors happen before the meat even touches the grate or immediately after it leaves the heat. You can’t fix a poor trim with premium charcoal; you can’t rescue a dry brisket if you’ve ignored the resting phase. Precision starts at the prep table and ends at the carving board.
Balance is everything. Beginners often over-season meat to compensate for lack of confidence, but a thick layer of salt won’t penetrate if you haven’t addressed the fat cap. Under-trimming leaves hard, unrendered fat that blocks smoke penetration and creates an unpleasant mouthfeel. Conversely, over-trimming exposes lean muscle to direct heat, leading to a “pot roast” texture rather than authentic BBQ. Aim for a clean, uniform surface every time.
Trimming for Aerodynamics
Avoid “barbarian trimming” where you hack chunks out of the meat. This creates pockets where grease pools and edges that burn into bitter carbon. The goal is a consistent 6mm fat cap for self-basting. This thickness allows the fat to render slowly without extinguishing your coals. On a brisket or pork shoulder, smooth, rounded edges allow smoke to flow over the surface without turbulence, ensuring an even bark development across the entire cut. Aerodynamics matter because stagnant air leads to uneven cooking temperatures.
The Science of the Rest
The rest period is the final stage of cooking that cannot be skipped. As meat cooks, muscle fibres contract and squeeze out moisture. If you slice a brisket at its peak internal temperature of 95°C, those juices will flood your cutting board. Resting allows fibres to relax and reabsorb that liquid. For a standard 5kg brisket, a minimum rest of 2 hours in an insulated cooler is required. Pork ribs need at least 20 to 30 minutes. Slicing too early is the fastest way to turn a high-quality A$150 Wagyu brisket into expensive leather.
Precision continues during the carve. Always cut against the grain. Muscle fibres are like bundles of rope; cutting across them shortens the strands, making the meat tender. Slicing with the grain results in a chewy, stringy mess regardless of how well it was smoked. Look for the grain direction before you apply your rub and make a small “notching” cut to remember the angle after the bark forms. This simple step ensures every bite is competition-quality.
Don’t let poor prep ruin your hard work. Ensure your setup is professional by using premium natural hardwood charcoal for a clean, consistent burn every time. Get Sizzlin’!
The Path to Pitmastery: Quality Fuel and Expert Tools
Mastering the art of low and slow cooking requires more than just a shiny new smoker. While high-end equipment provides a solid foundation, your choice of fuel and your technical execution determine the final flavour. Many common beginner smoking errors happen because people treat charcoal as an afterthought. At Charcoal Kings, we focus on chemical-free, sustainable Australian hardwoods. These products burn hotter and longer than supermarket alternatives. They provide the thermal consistency needed to handle a 12-hour brisket stall without constant firebox fiddling.
Upgrading Your Fuel Game
Cheap briquettes often contain fillers and chemical binders that produce acrid smoke and excessive ash. This ash build-up blocks air vents, leading to the temperature fluctuations that ruin cooks. Switching to premium lump charcoal solves this problem. It burns cleaner and leaves behind 70% less residue than standard briquettes. You also need to match your wood to your meat. Australian Ironbark offers a robust, heavy profile perfect for beef. Gidgee provides an intense, steady heat for long burns. For a deeper dive into these options, read The Ultimate Guide to BBQ Charcoal to understand how to fuel your rig correctly.
Get Sizzlin’ with the Right Gear
You don’t need every gadget on the market, but three tools are non-negotiable for avoiding common beginner smoking errors. A dual-probe wireless thermometer allows you to monitor internal meat temps and ambient pit temps without opening the lid. A chimney starter gets your coals glowing in 15 minutes without the need for chemical firelighters. Finally, heavy-duty 40cm stainless steel tongs provide the reach and grip needed to move heavy cuts safely.
Your fuel strategy must adapt to your cooker. An offset smoker thrives on a mix of lump charcoal and split logs for maximum airflow. A hibachi or small portable grill performs best with dense, long-burning Binchotan that maintains heat for up to 4 hours. Use this checklist for your next session:
- Clean out all old ash from the firebox to ensure maximum airflow.
- Use 100% natural Australian hardwood charcoal to avoid chemical taints.
- Pre-heat your smoker for at least 30 minutes before adding meat.
- Keep a water pan inside to maintain humidity and stabilise temps.
Ready to level up? Shop our Premium Hardwood Charcoal and get your next cook right. Join the community of Charcoal Kings and start producing professional-grade BBQ in your own backyard. Get Sizzlin’!
Master the Pit with Better Fuel and Better Habits
Transitioning from a backyard novice to a seasoned pitmaster starts with fixing common beginner smoking errors. Mastery isn’t about luck; it’s about controlling variables. Managing airflow prevents the bitter creosote that ruins expensive cuts of meat. Keeping the lid closed maintains a steady temperature and avoids the 10 to 20 degree fluctuations that stall your cook. Most importantly, the fuel you choose dictates the final flavour profile. Professional Australian pitmasters don’t use supermarket briquettes loaded with fillers. They rely on high-performance fuel that burns hot and clean for hours.
Charcoal Kings provides 100% chemical-free charcoal sourced from sustainable, local Australian hardwoods. Our products are the standard for pros who demand a reliable burn without the interference of synthetic additives. When you eliminate poor-quality fuel and practice patience, you’re guaranteed a better result every time you light the fire. Don’t settle for dirty smoke when you can produce competition-grade results in your own backyard.
Upgrade to Premium Natural Hardwood Charcoal for a Cleaner Cook
Grab your gear and get sizzlin’.
Frequently Asked Questions
Why does my smoked meat taste bitter or like ash?
Bitter or ashy flavours result from creosote buildup caused by restricted airflow or unseasoned wood. This thick, white smoke coats your meat in a harsh chemical film. Ensure your exhaust vent is 100% open and use premium natural hardwood with less than 20% moisture content. Clean blue smoke is the goal for a professional result. Dirty fire is one of the most common beginner smoking errors that ruins a weekend cook.
How do I get a better smoke ring on my brisket?
A prominent smoke ring forms when nitric oxide and carbon monoxide react with myoglobin in cold meat. Put your brisket on the smoker straight from the fridge at 4 degrees Celsius. Maintain a moist environment by placing a water pan in the cook chamber. This allows the gas to penetrate deeper before the surface hits 60 degrees Celsius and the ring stops forming. It’s a simple trick for better presentation.
Is it better to smoke with charcoal or wood?
A combination of high-quality charcoal and hardwood chunks provides the best balance of heat and flavour. Charcoal acts as your reliable fuel source, burning steady and hot for up to 4 hours. Hardwood chunks provide the actual smoke profile. Relying solely on wood in a small offset smoker often leads to temperature spikes that are difficult for beginners to manage. Use both to ensure a consistent, clean burn.
How often should I add more charcoal to my smoker during a long cook?
You should typically add fresh coals every 60 to 90 minutes depending on your smoker’s insulation and the ambient Australian temperature. Don’t wait for the heat to drop before acting. Monitor your thermometer closely. Adding a small chimney of pre-lit, chemical-free lump charcoal ensures your cook temperature stays within a 5-degree range without producing acrid smoke from unlit fuel. Consistency is the mark of a seasoned pitmaster.
Can I use regular firewood from my backyard for smoking?
Avoid using backyard firewood because it often contains resin, sap, or high moisture levels that produce toxic smoke. Softwoods like pine or cedar will ruin your meat and potentially damage your smoker. Stick to seasoned Australian hardwoods like Ironbark or Jarrah. These woods are dried to professional standards, ensuring a clean burn and authentic BBQ flavour every time you cook. Quality fuel is non-negotiable for premium results.
What is the best temperature for low-and-slow smoking?
The ideal range for low-and-slow smoking is between 107 and 121 degrees Celsius. This temperature allows connective tissues in tough cuts like brisket or pork shoulder to break down over 8 to 12 hours. Staying in this window prevents the meat from drying out while ensuring a perfect bark. Precision is key to avoiding common beginner smoking errors during long sessions. Get your temp right and the meat will follow.
Does the type of charcoal really affect the flavour of the meat?
The type of charcoal you choose directly affects the final taste of your BBQ. Cheap briquettes often contain fillers and chemical binders that produce an artificial aftertaste. Premium natural hardwood charcoal burns cleaner and hotter, leaving only the pure essence of the wood. Using 100% organic lump charcoal ensures your meat tastes like meat, not a chemical factory. It’s the only way to achieve a professional finish.
How do I stop my smoker temperature from fluctuating so much?
Stable temperatures require consistent fuel and precise vent control. Start by using high-density lump charcoal that offers a 3-hour burn time. Adjust your intake vent in 5-millimetre increments and wait 15 minutes for the temperature to settle. Keeping your smoker out of direct wind can reduce temperature swings by up to 15 degrees in typical Australian backyard conditions. Small adjustments lead to big improvements in your BBQ quality. Get Sizzlin’!