

Most backyard pitmasters think they’re smoking cheese when they’re actually just creating a melted, bitter mess on a grill grate. It’s a frustrating mistake that ruins premium produce and wastes your time. If you’ve ever pulled a block of cheddar off the rack only for it to taste like a stale ashtray, you know that heat and dirty smoke are the primary enemies. This guide to cold smoking cheese provides the technical roadmap you need to master this craft in 2026. We focus on the precision of temperature control and the purity of the smoke source to ensure your results are consistently high quality.
You already appreciate the performance of natural hardwoods, so it’s time to apply that expertise to the art of cold infusion. We’ll show you how to transform ordinary Australian supermarket blocks into gourmet delicacies using your existing BBQ hardware. You’ll learn the science of maintaining a steady environment below 30 degrees Celsius and which timber species provide the best aromatic profile for different varieties. This article covers essential tools, timber selection, and the critical 14 day mellowing period required for pro-level results on your next grazing board.
Key Takeaways
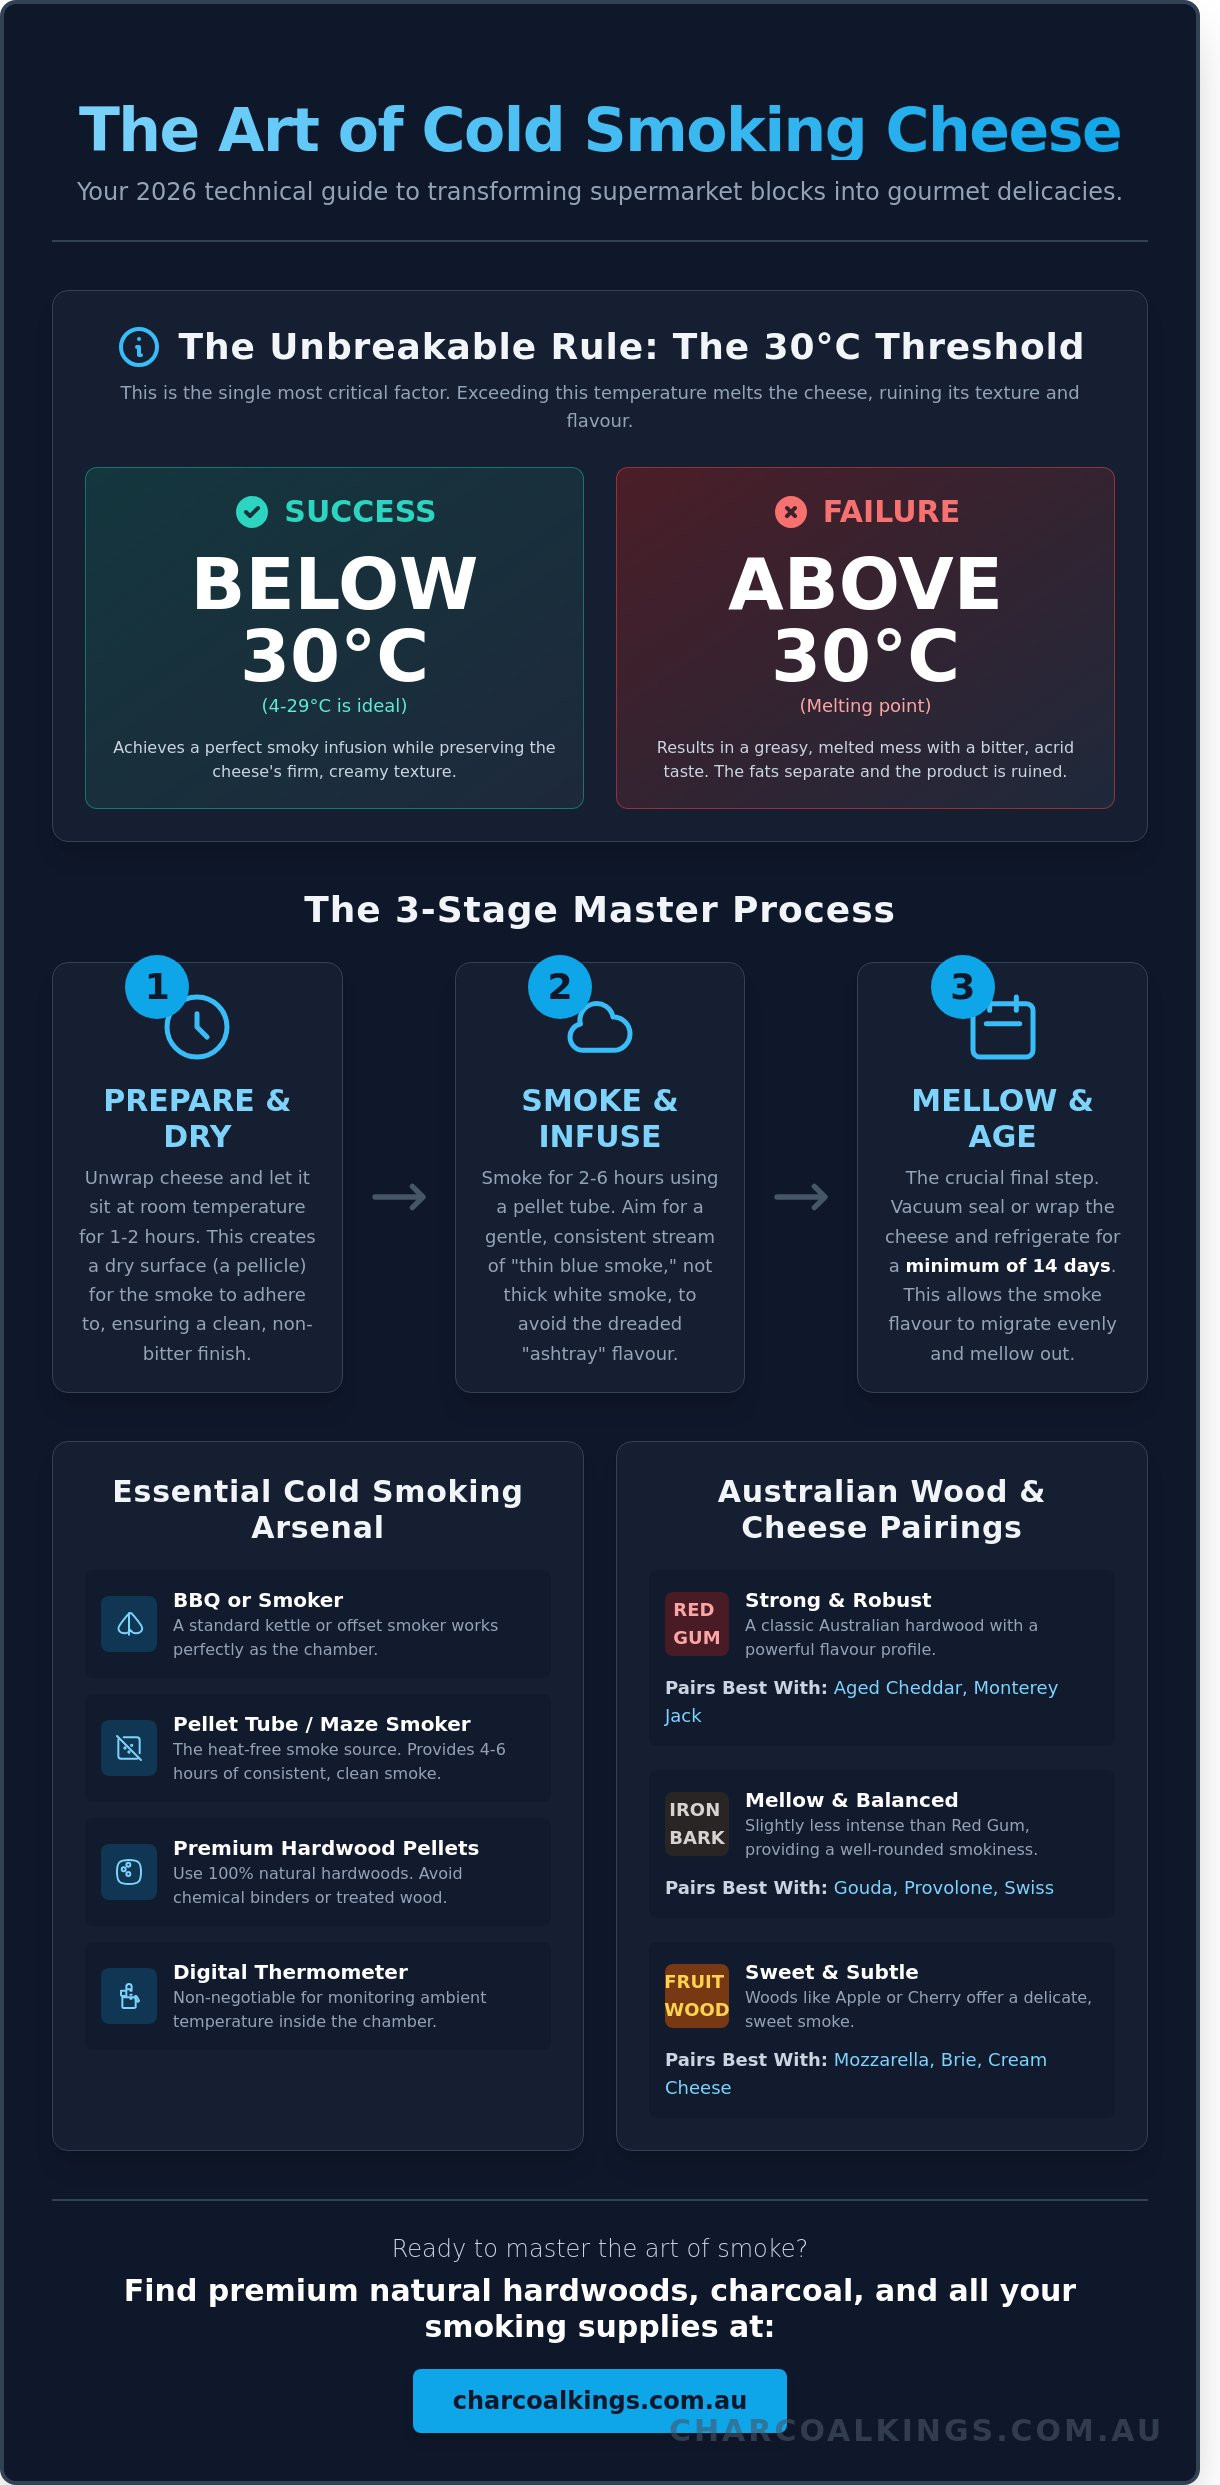
- Master the critical 30°C threshold to infuse rich flavour without compromising the texture of your semi-hard cheeses.
- Convert your kettle BBQ or offset smoker into a high-performance setup using a pellet tube for consistent, low-heat smoke.
- This guide to cold smoking cheese explains why the room-temperature drying phase is essential for achieving a clean, professional finish.
- Pair premium Australian hardwoods like Red Gum and Ironbark with specific cheese varieties to balance smoke intensity and fat content.
- Learn the science of smoke migration to avoid the “ashtray effect” and ensure a mellow, gourmet flavour throughout the entire block.
Cold Smoking vs. Hot Smoking: Understanding the 30°C Threshold
Cold smoking is a technique used to infuse deep, smoky profiles into food without applying any direct heat. Unlike hot smoking, which cooks the product until it reaches a safe internal temperature, this method keeps the chamber cool. This Smoked cheese process requires absolute precision because most semi-hard varieties, including cheddar, gouda, and Monterey Jack, begin to sweat and lose their structural integrity at exactly 30°C. If your smoker exceeds this limit, the milk fats separate. This results in a greasy, ruined block rather than a premium infused product.
To better understand this concept, watch this helpful video:
Achieving a professional result in your guide to cold smoking cheese depends on mastering smoke-flow rather than smoke-density. Many beginners make the mistake of trapping thick, billowing white smoke inside the cabinet. This creates a bitter, creosote-heavy taste that overpowers the dairy. You want a constant, gentle stream of “thin blue smoke” that moves across the surface of the food and exits through the vent. This ensures a clean hardwood infusion without the acrid aftertaste associated with poor ventilation.
The Critical Role of Ambient Temperature
Your environment is the most significant variable in any smoke session. In many Australian regions, daytime temperatures frequently exceed 25°C, leaving very little margin for error before hitting the 30°C melting point. Winter months and early mornings are the golden hours for this craft. If you are smoking in warmer conditions, place large pans of ice directly beneath the racks to drop internal temps. A reliable digital thermometer is a non-negotiable tool; it provides the real-time data needed to ensure your enclosure stays within the safe zone.
Chemical-Free Smoke: Why Fuel Quality Matters
Authenticity starts with the fuel you choose. Commercial “painted-on” liquid smoke is a chemical shortcut that fails to replicate the complexity of a natural hardwood fire. For a superior result, you must use clean, organic materials. Avoid any timbers that have been treated, painted, or glued, as these release toxic fumes into your food. Low-quality briquettes with chemical binders should also be avoided. To learn more about selecting the right base for your fire, check out our guide on Charcoal: The Ultimate Guide to Fuelling Your BBQ. Using premium, natural fuel ensures your guide to cold smoking cheese results in a pure, chemical-free flavour profile.
Essential Gear: Setting Up Your Cold Smoking Arsenal
Success with any guide to cold smoking cheese starts with temperature control. You aren’t looking for heat; you’re looking for a steady stream of clean, ambient smoke. Most pitmasters already own the foundations. You can easily convert an offset smoker or a standard kettle BBQ into a cold smoking chamber by separating the smoke generation from the food grate.
The pellet tube smoker is the most cost-effective entry point for Australians. These 30cm stainless steel tubes cost between A$25 and A$50 and provide 4 to 6 hours of consistent smoke. If you want more control, external cold smoke generators use a venturi effect to pump smoke into your chamber from the outside. This completely removes the heat source from the cheese, which is vital because maintaining temperatures below 30°C is necessary to mitigate food safety risks like bacterial growth and fat sweating.
For those using a traditional firebox, premium natural hardwood charcoal is the best base. Unlike briquettes filled with binders, natural lump charcoal burns clean and holds a steady, low-intensity ember. You only need a few lit coals to keep a single smoking chunk smouldering for hours without spiking the internal temperature of your pit.
Pellet Tubes vs. Maze Smokers vs. Generators
Choosing your device depends on your desired smoke duration. Pellet tubes are perfect for 4-hour sessions, while maze smokers, which use fine sawdust, can smoulder for up to 12 hours. Both require excellent airflow to prevent the fire from “snuffing out.” Ensure your bottom vents are open at least 25% to feed the embers oxygen. To get started, use a butane torch to light one end of your pellets. Let it flame for 10 minutes before blowing it out. This ensures the pellets are properly ignited to produce a thin, blue smoke rather than thick, bitter white clouds.
Hardware Compatibility: From Offsets to Kettles
If you’re using an offset smoker, place your smoke source in the firebox and the cheese at the far end of the cooking chamber. This 1.2-metre gap provides enough distance for the smoke to cool before it hits the dairy. For a DIY approach, the “Cardboard Box” method is highly effective. You connect a smoke source to a large cardboard box using a flexible foil dryer vent. This setup allows heat to dissipate through the tube, leaving only cold smoke for the cheese.
Before you begin, scrub your grill racks until they’re spotless. Residual grease or old beef fat from last Sunday’s roast will transfer off-flavours to your cheese. Clean stainless steel or chrome-plated racks are essential for a professional finish. Once your gear is ready, you can source premium fuel to ensure your smoke is as pure as possible. This preparation is the difference between a gourmet snack and a bitter, ruined block of cheddar.
The Step-by-Step Guide to Smoking Your First Batch
Successful cold smoking starts with the right product. Hard and semi-hard cheeses are the best choice for beginners in the Australian climate. Vintage cheddar, gouda, and swiss have lower moisture content and higher melting points. This makes them easier to manage when ambient temperatures hover around 20°C. Soft cheeses like brie or fresh mozzarella absorb smoke rapidly, often becoming overpowered or losing their shape if the smoker temperature climbs even slightly. This guide to cold smoking cheese focuses on results that last, so stick to the harder blocks for your first run.
Preparation: The Room Temp Rule
Never move cheese directly from a 4°C fridge into your smoker. Cold surfaces attract condensation when they hit air. This moisture layer acts as a magnet for heavy smoke particles, creating a bitter, grey soot that ruins the flavour. Remove your cheese from the packaging and let it sit on a wire rack at room temperature for at least 60 minutes. You want the surface to feel dry to the touch.
While the cheese rests, cut it into manageable blocks. Slices roughly 1-inch (2.5 cm) thick are the sweet spot for smoke penetration. Wear food-grade latex or nitrile gloves during this process. Natural oils from your skin can transfer to the cheese, which often leads to premature mould growth during the resting phase. Clean handling is the difference between a premium snack and a wasted batch.
Execution: Time, Airflow, and Density
Managing your fire is about quality, not quantity. You need a thin, blue smoke that is barely visible. Thick, billowing white smoke is a sign of poor combustion and will leave a chemical, “ashy” taste. Your smoker vents play a vital role here. Keep the exhaust vent wide open to ensure smoke moves across the cheese and exits quickly. Use the intake vent to control the burn rate of your pellets or sawdust.
Follow these timing benchmarks for consistent results:
- Mild Cheeses (Mozzarella, Jack): 2 hours
- Medium Cheeses (Gouda, Havarti): 3 hours
- Sharp Cheeses (Aged Cheddar, Parmesan): 4 hours
Temperature control is non-negotiable. Always keep the internal chamber below 32°C. Consult the official cheese smoking safety guidelines to understand how temperature fluctuations impact food safety and fat breakdown. Flip your cheese blocks every 45 to 60 minutes. This “flip” ensures the smoke coats every side evenly, preventing pale spots and ensuring a uniform deep gold colour. This guide to cold smoking cheese requires patience, so don’t rush the process by adding more fuel.
Australian Wood Profiles and Cheese Pairings
Success in this guide to cold smoking cheese depends on understanding smoke intensity. Fat is a sponge for flavour. High-fat cheeses like Brie or Camembert absorb smoke rapidly, while harder cheeses like aged Cheddar take longer to develop a deep profile. You must match the wood’s punch to the cheese’s texture to avoid an acrid or bitter result.
The Flavour Map: Woods for Every Palate
Apple and Cherry are the best entry-level woods for beginners. They produce a mild, sweet smoke that complements Goudas and Bries without masking their creamy notes. Ironbark and Red Gum are the heavy hitters. These bold, “Aussie” flavours are essential for aged Cheddars and Manchego. Ironbark is particularly prized for its high density and steady burn, providing a clean smoke that doesn’t overwhelm the palate. You can find more details on selecting the right timber in our Firewood: The Complete Australian Guide.
Advanced Infusions: Herbs and Spices
Advanced infusions are the final step in any comprehensive guide to cold smoking cheese. Experienced smokers add dried rosemary or whole peppercorns to their charcoal for a complex, aromatic finish. The “Glazing” technique involves brushing the cheese with a thin layer of maple syrup or honey before starting the process. This creates a tacky surface that helps smoke particles adhere more effectively. Using high-quality smoking woods ensures a clean finish. Cheap fuel leads to creosote buildup, which will ruin a batch of premium cheese instantly. Stick to natural products to protect your investment and your reputation as a pitmaster.
Ready to upgrade your setup? Shop our range of premium natural hardwoods and start smoking like a pro today.
The Mellowing Period: Why Patience is the Final Ingredient
Eating cheese immediately after it leaves the smoker is a common mistake for beginners. This results in the “Ashtray Effect.” The smoke particles sit heavily on the surface, creating a bitter, acrid taste that masks the quality of the dairy. You must allow for a resting period. This guide to cold smoking cheese isn’t complete without mastering the wait. During the mellowing phase, smoke molecules migrate from the exterior of the block toward the core. This chemical migration balances the flavour profile and ensures every bite delivers a consistent, premium smoke intensity.
Storage conditions determine the final quality of your product. A standard Australian refrigerator set to 4°C provides the stable environment needed for these enzymes and smoke compounds to settle. While parchment paper allows the cheese to breathe, it limits shelf life to approximately 6 weeks. For long-term results, vacuum sealing is the superior method. Properly sealed cheese can last 12 months or longer in cold storage. The lack of oxygen prevents the smoke from oxidising and turning sour, preserving the authentic hardwood character you worked hard to achieve.
The 2-Week Rule for Flavour Perfection
The first 14 days of resting are the most transformative. During this window, the harsh phenols in the smoke dissipate while the deeper, woody notes integrate with the cheese fats. Keep your fridge at a steady 4°C to prevent moisture loss. To find your preferred intensity, perform a taste test at specific intervals. Sample a small slice at day 7, day 14, and day 21. Most enthusiasts find that day 14 hits the “sweet spot” for a balanced, natural smoke profile. If you’re using a heavy wood like hickory, you might even extend this to 30 days.
Vacuum Sealing and Preservation
Removing oxygen is the most effective way to stop smoke from becoming acrid over time. Vacuum sealing also acts as a safety barrier against contaminants. Mould is the primary threat to home-smoked cheese, so hygiene is paramount during the packaging phase. Follow these steps for the best results:
- Use food-grade gloves and sanitised knives when handling the cheese post-smoke.
- Ensure the cheese surface is dry before placing it in the vacuum bag.
- Label each bag with the date and the specific wood type used.
Take Command of Your Smoker Today
Success in cold smoking hinges on maintaining that critical sub-30°C environment and respecting the mandatory 14-day mellowing period. This guide to cold smoking cheese has shown you how to pair Australian wood profiles with the right dairy for maximum impact. You now have the technical knowledge to move beyond basic grilling into the realm of artisanal craft. Every batch is an opportunity to refine your technique and develop a signature flavour profile that stands out.
The best results start with the best fuel. Our 100% Premium Natural Hardwood Charcoal is built for performance and features chemical-free manufacturing to protect your food’s integrity. We offer expertly curated smoking woods designed to deliver a clean, consistent smoke every time you light up. Professional-grade results are only possible when you use professional-grade materials that don’t compromise on purity.
Get Sizzlin’ with our Premium Smoking Woods and Charcoal!
Fire up your smoker and put these methods to the test. You’re ready to produce the finest smoked cheese in the country.
Frequently Asked Questions
Can I cold smoke soft cheeses like Brie or Camembert?
Yes, you can cold smoke soft cheeses like Brie and Camembert, but you must keep the temperature below 25 degrees Celsius to prevent the rind from collapsing. Chill the cheese in the fridge at 4 degrees Celsius for 2 hours before placing it in the smoker. Limit smoke exposure to 60 or 90 minutes to ensure the delicate interior isn’t overwhelmed by heavy smoke flavours.
What happens if my cheese starts to “sweat” or melt during the smoke?
Sweating occurs when the internal temperature of the smoker exceeds 30 degrees Celsius, causing fats to separate from the solids. If you see oil beads on the surface, remove the cheese immediately and place it in the fridge. This guide to cold smoking cheese recommends using a secondary smoke chamber or a tray of ice to maintain a consistent 20 degree environment during the process.
How long does smoked cheese need to rest before it tastes good?
Smoked cheese requires a minimum resting period of 14 days in a vacuum-sealed bag to allow the smoke molecules to penetrate the centre. Freshly smoked cheese often tastes like an ashtray because the phenols sit on the surface. Professional smokers at Charcoal Kings suggest waiting 3 to 4 weeks for the most balanced flavour profile in hard varieties like Cheddar or Gouda.
Do I need a special smoker, or can I use my Weber Kettle?
You don’t need a dedicated cold smoker because a standard Weber Kettle works perfectly with a pellet smoke tube or a maze generator. Simply place the smoke generator on the bottom grate and the cheese on the top rack. Ensure all vents are open at least 50 percent to maintain the airflow required for a clean, consistent burn without generating excessive heat.
What is the best wood for smoking a sharp Cheddar?
Hickory and Oak are the premium choices for sharp Cheddar because their robust profiles stand up to the bold acidity of the cheese. For a more subtle Australian twist, use Macadamia or Banksia wood. These hardwoods provide a steady burn and a deep mahogany colour. Always use 100 percent natural hardwood to avoid chemical residues that ruin the organic fats in the dairy.
How long will vacuum-sealed smoked cheese stay fresh in the fridge?
Vacuum-sealed smoked cheese remains fresh and safe for consumption for 6 to 12 months when stored at a constant 1 to 4 degrees Celsius. The smoke acts as a natural preservative, inhibiting bacterial growth on the surface. Once you break the vacuum seal, you should consume the cheese within 10 to 14 days to ensure peak quality and prevent mould development.
Why does my smoked cheese taste bitter or like creosote?
Bitterness is caused by “dirty smoke” resulting from restricted airflow or damp wood chips. You want a thin, blue wisp of smoke rather than thick, white clouds. If your smoker lacks ventilation, creosote builds up on the surface of the food. Always use seasoned hardwood with a moisture content below 20 percent to achieve a clean, professional result every time you follow a guide to cold smoking cheese.
Is it safe to cold smoke cheese in the middle of a South Australian summer?
Cold smoking is risky in South Australia when ambient temperatures exceed 35 degrees Celsius, as the smoker internal temperature will quickly surpass the 30 degree melting point. It’s safer to smoke during the night or early morning when temperatures drop below 20 degrees. Use a dual-probe thermometer to monitor the internal cabinet temperature and abort the session if it climbs toward the danger zone.