
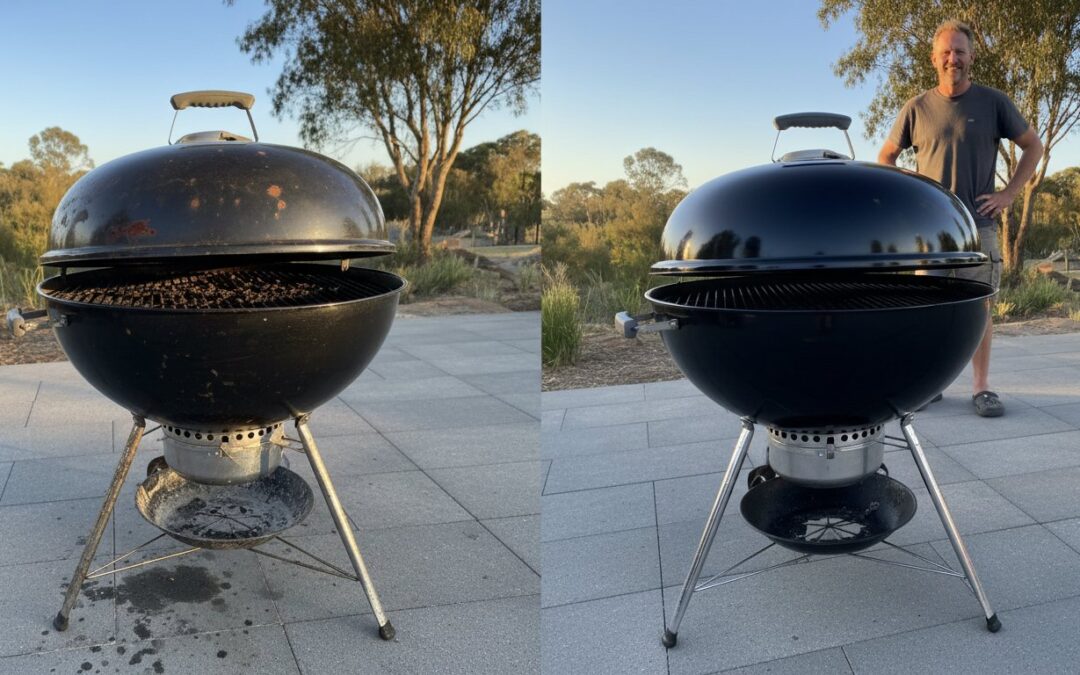
Failure to clean your grill is the leading cause of 20 percent of home grilling fires, turning a backyard staple into a genuine hazard. When you’re considering restoring an old bbq, it’s natural to feel frustrated by stubborn rust or worried about the structural integrity of the metal. You likely fear that toxic residues from heavy duty cleaners will linger on your cooking surfaces. Most people assume a weathered relic is destined for the scrap heap, but that’s rarely the case for a quality charcoal unit.
This process isn’t just a simple cleaning project; it’s a professional mechanical overhaul that returns your equipment to peak performance. You can transform a rusted frame into a high performance powerhouse that looks new and cooks better than the day you bought it. This guide shows you exactly how to remove oxidation safely and apply professional seasoning techniques using pure, additive free methods. You’ll learn to create a food safe environment that prevents future corrosion while ensuring your grill is ready for serious hardwood lump charcoal sessions.
Key Takeaways
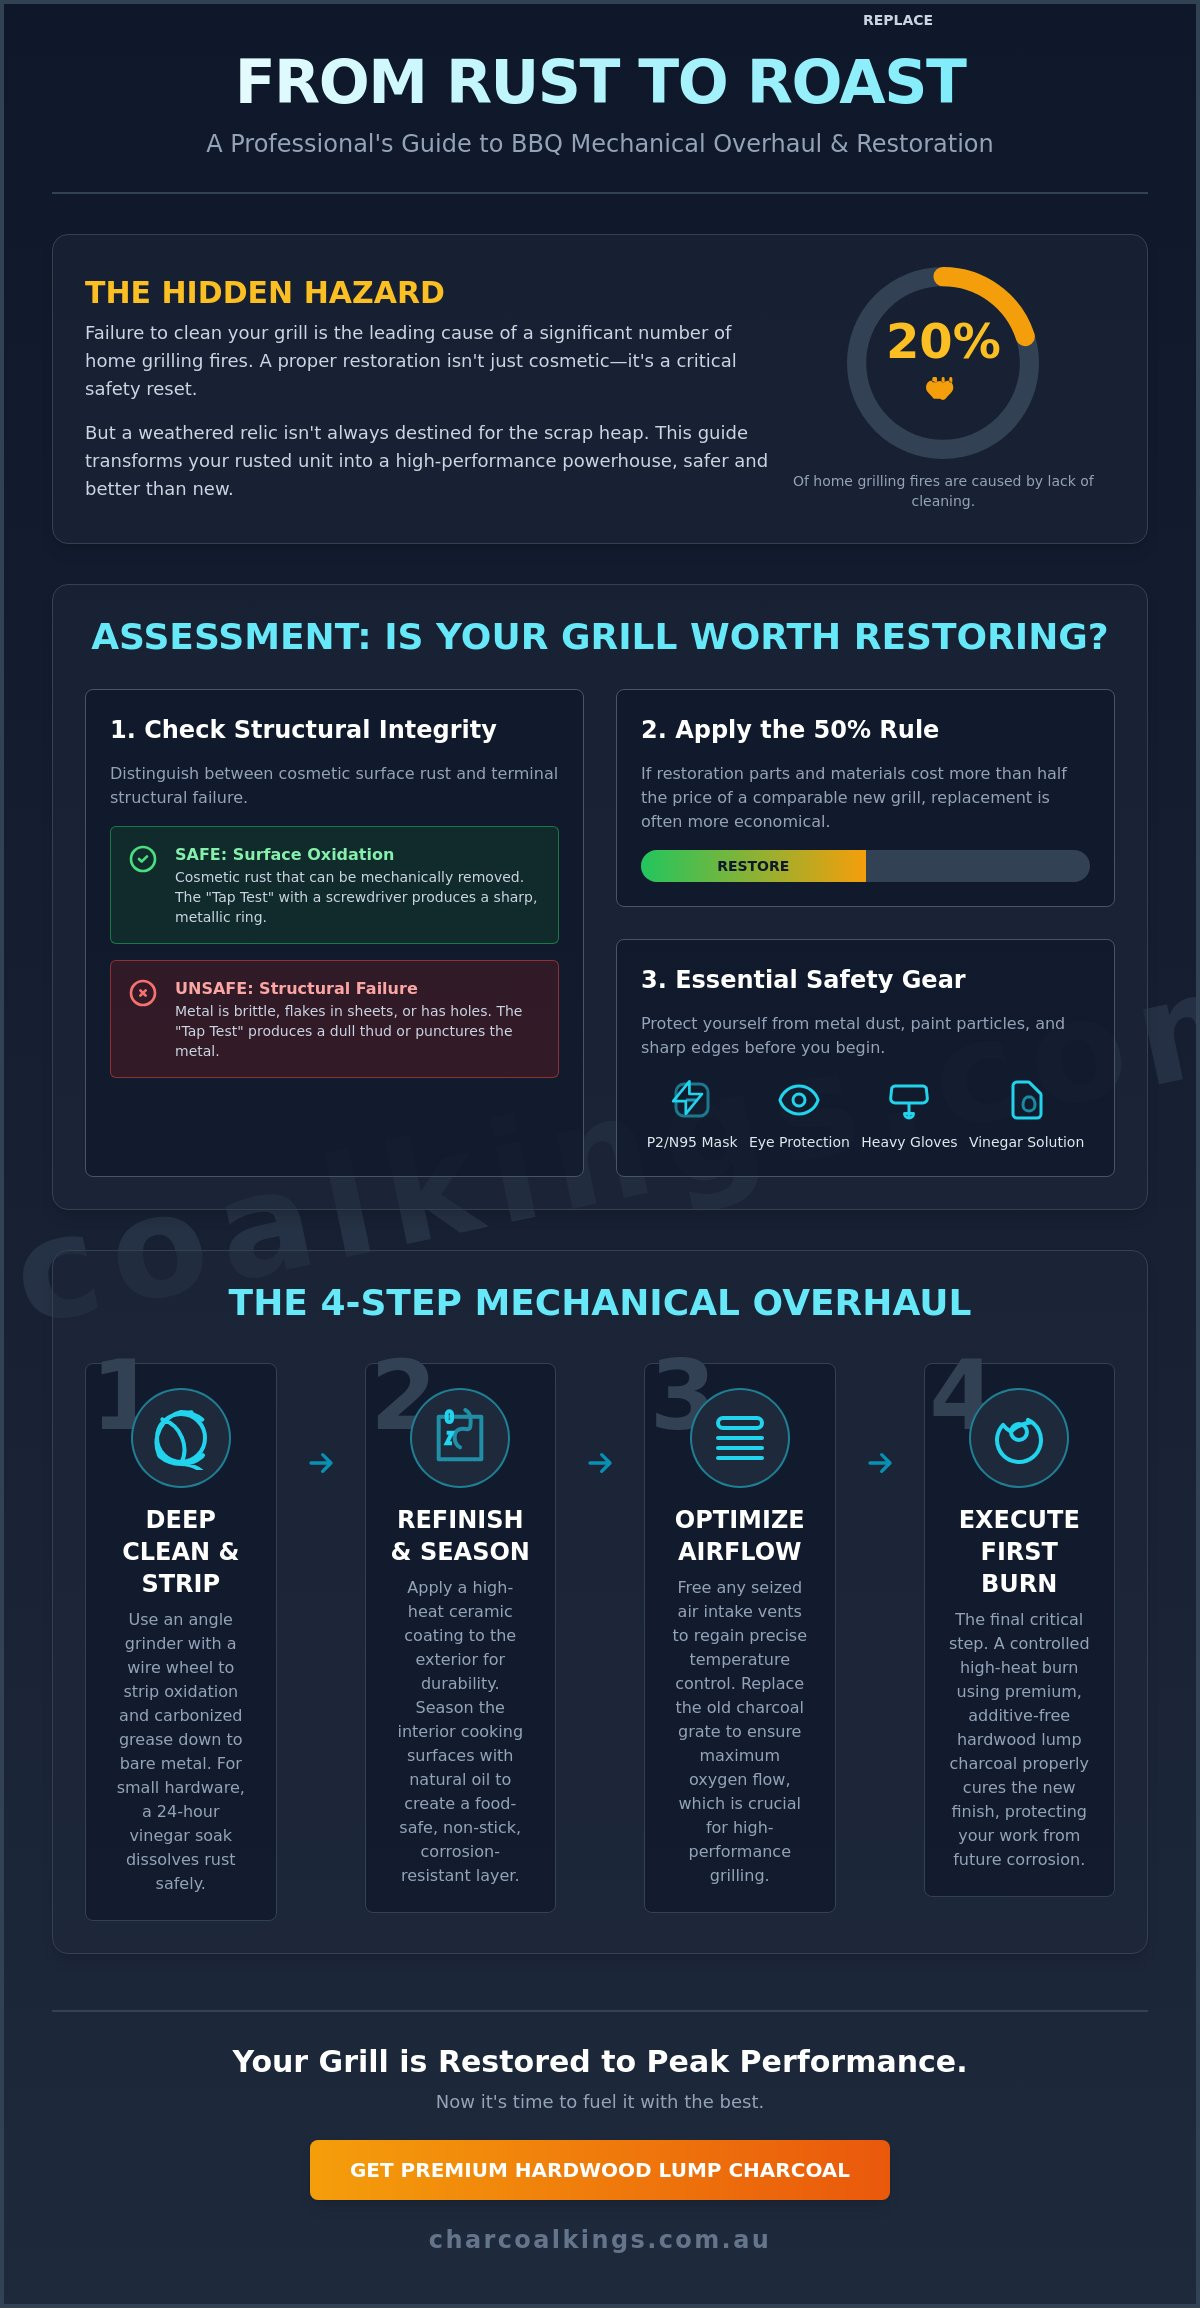
- Identify the difference between surface oxidation and terminal structural failure to ensure your grill is worth the mechanical overhaul.
- Utilize professional mechanical stripping techniques with wire wheels to remove rust safely without leaving toxic chemical residues.
- Master the process of restoring an old bbq by applying high-heat ceramic coatings to the exterior and natural oil seasoning to the interior.
- Recover peak performance by freeing seized air intake vents and replacing the charcoal grate to optimize oxygen flow.
- Execute a critical first burn using premium, additive-free fuel to properly cure the finish and protect the metal from future corrosion.
Assessment and Safety: Is Your Old BBQ Worth Restoring?
Before you commit to restoring an old bbq, you must decide if the metal is worth the labor. Most charcoal units suffer from surface oxidation. This is a manageable cosmetic issue that doesn’t affect the cook. Structural failure is different. It’s a genuine safety risk. You need to identify “terminal rust” in the firebox or charcoal grate. This is metal that has oxidized through the entire thickness of the steel. It leaves the unit brittle and prone to collapse under the weight of heavy fuel. Failure to clean a grill is the leading cause of 20 percent of home grilling fires. A professional restoration is your chance to reset that safety clock and ensure your equipment is sound.
Start by understanding your grill’s components and how they handle intense thermal stress. The firebox must contain heat safely. The charcoal grate must support burning Hardwood Lump Charcoal without sagging. Evaluate the cost of internal parts like the cooking surface and the ash management system. High-quality stainless steel replacements are expensive. Research shows that if repairs cost 50 percent or more of a new unit’s price, you should replace it instead. However, if the frame and basin are solid, a restoration offers superior value and performance over cheap, modern alternatives.
The “Tap Test” for Structural Integrity
Take a flat-head screwdriver and firmly tap the most rusted sections of the firebox and base. A healthy grill produces a sharp, metallic ring. If the tool produces a dull thud or sinks into the metal, the steel is compromised. Look for deep pitting in the basin. Surface rust wipes away with an abrasive; structural rust flakes off in thick, layered sheets. Check the welds where the legs meet the body. A failure here during a high-heat cook is a major hazard. If you see daylight through the primary chamber, the metal is too thin to survive the expansion and contraction of a hot fire.
Identifying Lead-Based Paints and Toxic Residues
Vintage grills manufactured several decades ago may contain lead-based paints. Never grind these surfaces without testing them first. You must also check for toxic residues from old chemical cleaners. These soak into porous rust over years of neglect. Grinding them releases hazardous particulates into your workspace. Safety is paramount during the teardown phase. The National Fire Protection Association reports that July is the peak month for grill fires, often stemming from poorly maintained equipment. A thorough assessment ensures your restored unit is a precision tool, not a liability.
Ensure you have the following safety gear before starting:
- P2 or N95 Mask: To prevent inhaling metallic dust and old paint particles.
- Eye Protection: Wrap-around goggles are necessary during all grinding phases.
- Heavy Gloves: To protect against sharp, rusted metal edges.
- Vinegar Solution: To neutralize old chemical residues before applying heat.
Deep Cleaning and Rust Removal Techniques
Manual scraping with a hand brush is insufficient for heavy pitting in charcoal basins. When restoring an old bbq, you need mechanical force to reach the virgin steel. An angle grinder equipped with a knotted wire wheel is the professional standard. It strips away years of oxidation and carbonized grease in seconds. For smooth exterior surfaces, a 60-grit flap disc provides a uniform profile. This level of preparation is essential for achieving the “near-white” metal finish required for high-heat paint adhesion. If the metal isn’t surgically clean, your new finish will fail within the first three cooks.
Chemical stripping requires a calculated approach. Heavy-duty oven cleaners dissolve grease quickly but often contain harsh lye. Avoid these on aluminum components or if you want to maintain a chemical-free cooking environment. For small hardware like nuts, bolts, and vent handles, a 24-hour vinegar soak is superior. The acetic acid dissolves rust without damaging the threads or the integrity of the fastener. Once you remove the hardware from the soak, scrub it with a steel wool pad and dry it immediately. This prevents flash rusting, which can occur within minutes on bare steel exposed to humidity.
Mechanical Rust Removal: The Pro Approach
Select a wire brush attachment that matches your tool’s RPM rating for safety. Use cup brushes for large flat areas and tapered wire wheels for tight seams or air intake valves. You must remove every trace of orange scale from the firebox. Any remaining rust will trap moisture under your new finish, causing it to bubble and peel during your first high-heat cook. For high-end vintage restorations, professional sandblasting is the most efficient option. It reaches every crevice of complex castings that a grinder cannot touch.
Degreasing the Interior Without Harsh Toxins
Interior surfaces require food-safe cleaning methods to protect the flavor of your meat. Use high-heat steam or natural citrus-based degreasers to break down the “alligator skin” of carbonized buildup. This flaky black residue is a byproduct of smoke and grease, not paint. Scrape it away completely to ensure your cooking environment remains pure. After degreasing, rinse the basin with clean water and dry it with a leaf blower or lint-free towels. Once the metal is bare and dry, you can begin selecting professional BBQ accessories to replace worn-out components and complete the rebuild.
If you encounter stubborn grease that resists citrus cleaners, a pressure washer is your best tool. Direct the spray into the corners of the firebox to blast out hidden ash and grease pockets. Always wear eye protection during this phase. Debris can kick back at high velocities. Once the cleaning is finished, inspect the metal one last time. You are looking for a silver, matte finish. This indicates the metal is ready for the refinishing and seasoning stages.
Refinishing and Seasoning the Metal
Once the metal is stripped to a near-white finish, it is vulnerable to immediate oxidation. You must apply a protective barrier to lock out moisture and oxygen. For the exterior, this means using a specialized high-heat ceramic paint with a rating of at least 600°C. Standard spray paints will bubble and peel the moment you ignite your first chimney of charcoal. When restoring an old bbq, the goal is a finish that survives the intense thermal stress of a long cook. This ceramic coating doesn’t just provide a clean aesthetic; it creates a hard, heat-resistant shell that prevents the steel from degrading under high temperatures.
Interior surfaces require a completely different approach. Never apply paint to the firebox walls or the underside of the lid. This is a critical safety flaw found in amateur restoration guides. Paint inside the cooking chamber will flake into your food and release toxic fumes when exposed to direct flame. Instead, use the interior seasoning method. This involves creating a natural polymerized barrier using high-smoke-point oils. This process mirrors the care of a cast iron skillet, resulting in a dark, non-stick surface that is entirely food-safe and naturally rust-resistant.
Painting the Exterior: Preparation and Application
Precision is vital during the painting phase. Tape off all handles, thermometers, and air vents using high-quality painter’s tape. You must apply the paint in thin, multiple coats rather than one heavy layer. This prevents sagging and ensures a durable bond. In Australia, White Knight and Rust-Oleum offer reliable high-temperature BBQ paints that withstand the local climate and high-heat fuel. Allow the paint to dry for at least 24 hours before moving to the “burn-in” phase. A controlled initial fire is necessary to chemically cure the ceramic resins into the metal.
The Art of Seasoning Cast Iron and Steel Grates
Selecting the right seasoning oil determines the longevity of your interior finish. Flaxseed oil is the professional choice for a hard, durable bond, though canola oil is a practical, high-smoke-point alternative. Apply an incredibly thin layer of oil to all bare metal surfaces inside the basin and on the grates. Wipe away any excess; you want a sheen, not a puddle. Heat the grill until the oil reaches its smoke point, typically between 200°C and 230°C. This triggers polymerization, turning the liquid oil into a hard, plastic-like protective layer. Maintaining this non-stick barrier requires a light application of oil after every cook to keep the metal seasoned and rust-proof.
The “burn-in” is the final step of the refinishing process. Start a small fire and gradually increase the temperature over 60 minutes. This slow ramp-up allows the exterior paint to set without cracking while the interior oil begins its first stage of polymerization. This disciplined approach ensures your restoration survives years of exposure to the elements and high-performance charcoal heat.
Optimising Airflow: Vents, Grates, and Ash Management
A charcoal grill is essentially an airflow engine. Oxygen is the throttle. If your intake and exhaust vents are seized, you have zero control over your cooking temperature. When restoring an old bbq, you must ensure every moving part in the air management system operates with mechanical precision. Air leaks around the lid or stuck sliders in the basin will cause temperature spikes and wasted fuel. You want a unit that responds immediately to small adjustments, allowing you to transition from a low-and-slow smoke to a high-heat sear without fighting the equipment.
The charcoal grate is the most overlooked component in the airflow chain. Years of intense heat from Hardwood Lump Charcoal cause standard steel grates to sag and warp. A sagging grate allows ash to pool in the center, choking the fire and dropping the temperature mid-cook. Replacing a compromised grate with a heavy-duty stainless steel or cast iron version is a mandatory upgrade for any serious restoration. It ensures a consistent gap between the fuel and the air intake, providing the oxygen flow necessary for a clean, efficient burn.
Restoring Seized Air Valves
Rust often welds vent sliders to the grill body. Don’t force them with a hammer; you’ll snap the tension tabs. Apply a generous amount of penetrating oil like WD-40 and let it sit for several hours. Once the slider moves, remove it and sand both the slider and the contact area on the grill. If the vent cover is warped, use a mallet to flatten it against a hard surface for a tight seal. Lubricate the moving parts with a high-heat graphite lubricant. Unlike grease, graphite won’t gum up or burn off when the firebox reaches 300°C.
Upgrading the Charcoal Grate
A high-performance charcoal grate must support the weight of the fuel while maximizing oxygen exposure. If your original grate is thin or rusted through, source a replacement with thicker bars. This prevents warping and improves heat retention. For those focused on low-and-slow smoking, consider a grate that allows for better coal organization. You can upgrade your restoration with professional-grade BBQ accessories to ensure your air management is flawless and your fuel burns with maximum efficiency.
Seal the lid to prevent “ghost airflow” that bypasses your vents. Install a high-temperature felt gasket around the rim of the lid. This creates a vacuum-like seal, forcing all air through the intake valves. Finally, ensure the ash pan or cleaning blades operate smoothly. You should be able to clear ash mid-cook without disrupting the fire. A clean basin is a responsive basin. Once these mechanical elements are tuned, your restored unit will outperform most modern grills straight out of the box.
The First Burn: Using Premium Fuel to Protect Your Work
The mechanical work is finished, but the restoration isn’t complete until you strike the first match. This initial fire is a critical chemical process that cures the exterior ceramic paint and solidifies the interior oil polymer. If you skip this step or use low-grade fuel, your hard work will fail. When restoring an old bbq, the goal is to create a durable, heat-resistant tool. Cheap briquettes often contain chemical binders and high moisture levels. This moisture creates steam that can trap impurities under your new seasoning, leading to premature rust. You need a dry, intense heat to set the finish properly.
Transitioning to Hardwood Lump Charcoal provides the clean, additive-free heat required for a professional result. Lump charcoal burns hotter and cleaner than processed alternatives. This high thermal output helps burn off any microscopic metal dust or restoration residue that survived the cleaning phase. It ensures the cooking environment is completely pure before you place your first cut of meat on the grates. A clean burn is the only way to verify that your airflow vents and ash management system are functioning as intended.
Why High-Quality Charcoal Matters
Purity is the foundation of a long-lasting restoration. Chemical-free fuel prevents corrosive residues from settling on your freshly seasoned metal. Higher heat output is also essential for “setting” the seasoning layer into the pores of the steel. Lower ash production is a functional benefit; it keeps your newly restored air vents clear and prevents the fire from being choked by debris. When you use premium fuel, you’re protecting the structural integrity of the firebox you just worked so hard to save.
Long-Term Storage and Protection
The Australian climate is brutal on bare metal. Even a perfectly restored grill will succumb to oxidation if left unprotected. A breathable BBQ cover is a mandatory investment. It prevents moisture from being trapped against the steel while blocking UV rays that degrade paint. Adopt the “5-minute rule” after every cook: scrape the grates and apply a light coat of oil while the metal is still hot. This simple habit maintains the rust-proof barrier indefinitely. During the off-season, perform a periodic “re-seasoning” by running a small fire to keep the oil layer thick and resilient. Explore our range of premium fuels to keep your grill in peak condition and ensure your restoration lasts for years of high-performance cooking.
Master Your Fire with a Professional Restoration
Restoring an old bbq is more than a weekend project; it’s a commitment to performance and safety. By prioritizing structural integrity and mastering the art of polymerization, you’ve transformed a rusted relic into a precision cooking tool. You now have a grill that manages airflow effectively and provides a food-safe environment for your cooks. Maintaining this standard requires a disciplined approach to post-cook care and a refusal to use inferior materials.
Protect your mechanical overhaul by choosing fuel that matches the quality of your work. Low-grade alternatives introduce moisture and chemicals that compromise your new seasoning and choke your vents. Upgrade your restored grill with Australia’s finest Hardwood Lump Charcoal. Our fuel is 100% Natural Hardwood with no chemical additives, providing the clean, intense heat trusted by professional pitmasters across Australia. We offer wholesale quality for retail prices so you can maintain peak performance without compromise. Your grill is ready. Fire it up and experience the difference that professional restoration and premium fuel make to your craft.
Frequently Asked Questions
How do I tell if my BBQ rust is too far gone to fix?
Rust is too far gone when it compromises structural integrity. Metal that has oxidized through the entire thickness of the steel is terminal and cannot be saved. Use a screwdriver to tap the firebox and base. If the tool pierces the metal or you see daylight through the primary chamber, the unit is a safety hazard. Restoring an old bbq requires a solid foundation of virgin steel to withstand the thermal expansion of burning charcoal.
Can I use regular spray paint on my BBQ exterior?
Regular spray paint is unsuitable for any part of a grill. It lacks the thermal resistance to survive temperatures above 100°C. You must use specialized ceramic-based paints rated for 600°C or higher to protect the exterior. Standard paint will bubble, release toxic fumes, and peel within minutes of ignition. Apply these high-heat coatings only to the exterior surfaces to ensure a durable, professional, and safe finish.
Is it safe to cook on a BBQ that had heavy rust?
It is safe to cook on a formerly rusted grill if you have removed all loose scale and seasoned the metal. Rust itself isn’t toxic, but it creates a porous surface that traps bacteria and old grease. Once you strip the metal to a silver finish and apply a polymerized oil barrier, the surface is food-safe. This seasoning prevents new rust from forming and ensures a clean cooking environment for your food.
What is the best oil for seasoning a restored BBQ grate?
Flaxseed oil is the professional choice for creating a hard, durable non-stick bond. It polymerizes more effectively than most vegetable oils when exposed to heat. Canola oil is a reliable and accessible alternative with a high smoke point. Both oils create a protective layer on your grates when heated until they smoke. Avoid using animal fats for long-term storage, as they can go rancid and ruin the flavor of your next cook.
How do I remove rust from a BBQ without using power tools?
White vinegar is the most effective non-mechanical method for rust removal. Submerge small hardware in a bath of vinegar for 24 hours to dissolve the oxidation. For larger surfaces, apply a vinegar-soaked rag and scrub with steel wool or a stiff brass brush. This requires more manual labor than an angle grinder but is a viable path when restoring an old bbq without the noise or dust of professional power tools.
Why did my BBQ paint peel off after the first use?
Paint failure is usually caused by inadequate surface preparation. If any grease, carbonized buildup, or loose rust remains on the metal, the paint cannot form a permanent bond. Peeling can also occur if you skip the critical “burn-in” phase. A slow, controlled initial fire is necessary to cure the ceramic resins. Without this step, the paint remains soft and prone to heat damage during your first high-performance cook.
How often should I re-season my restored charcoal grill?
You should apply a light coat of oil to the grates after every single cook. This “5-minute rule” maintains the protective barrier while the metal is still warm. For the firebox and interior walls, a deeper re-seasoning is recommended at the start of each grilling season. Consistent maintenance is the only way to prevent moisture from triggering new oxidation in the porous steel of your charcoal grill during the humid months.
Can I use a wire brush on a porcelain-coated BBQ grate?
Never use a stainless steel wire brush on porcelain-coated grates. The stiff wire will scratch or chip the glass-like porcelain finish. Once the coating is compromised, the exposed iron underneath will rust rapidly. Use a nylon brush or a soft brass brush instead. If the porcelain is already heavily chipped, consider replacing the grate entirely to ensure a smooth, rust-free cooking surface that won’t contaminate your meat with sharp debris.