

Most backyard grillers waste 35% of their premium hardwood charcoal by treating their grill like a high-speed furnace with no brakes. You have likely experienced the sting of a A$55 wagyu ribeye ruined by a sudden flare-up or a roast chicken that stays raw at the bone while the skin turns to carbon. It’s a common frustration that separates the hobbyists from the masters. Mastering the essential technique of setting up a two-zone fire for grilling is the only way to claim total authority over your cook. It provides the thermal control needed to handle expensive cuts without the stress of unpredictable hot spots.
We believe that every Australian pitmaster should have the confidence to manage their fire with surgical precision. This guide will show you how to divide your grill into direct and indirect cooking areas to achieve perfectly seared steaks and juicy, slow-cooked roasts every time. You will learn the exact coal configurations for your kettle and how to manipulate airflow for steady temperatures. We are breaking down the physics of fire management so you can stop reacting to your grill and start commanding it. Let’s get sizzlin’!
Key Takeaways
- Eliminate the frustration of burnt exteriors and raw centers by mastering the division of direct and indirect heat zones.
- Discover why premium hardwood lump charcoal is the superior fuel choice for maintaining stable, long-lasting temperatures across your grill.
- Follow a professional step-by-step process for setting up a two-zone fire for grilling to ensure optimal airflow and consistent results.
- Take total control of your cook by using the bottom vents as a temperature accelerator to harness the physics of the chimney effect.
- Unlock advanced techniques like the reverse sear to deliver restaurant-quality steaks and perfectly juicy roasts every time you light the fire. Get Sizzlin’!
What is a Two-Zone Fire and Why is it Essential for Grilling?
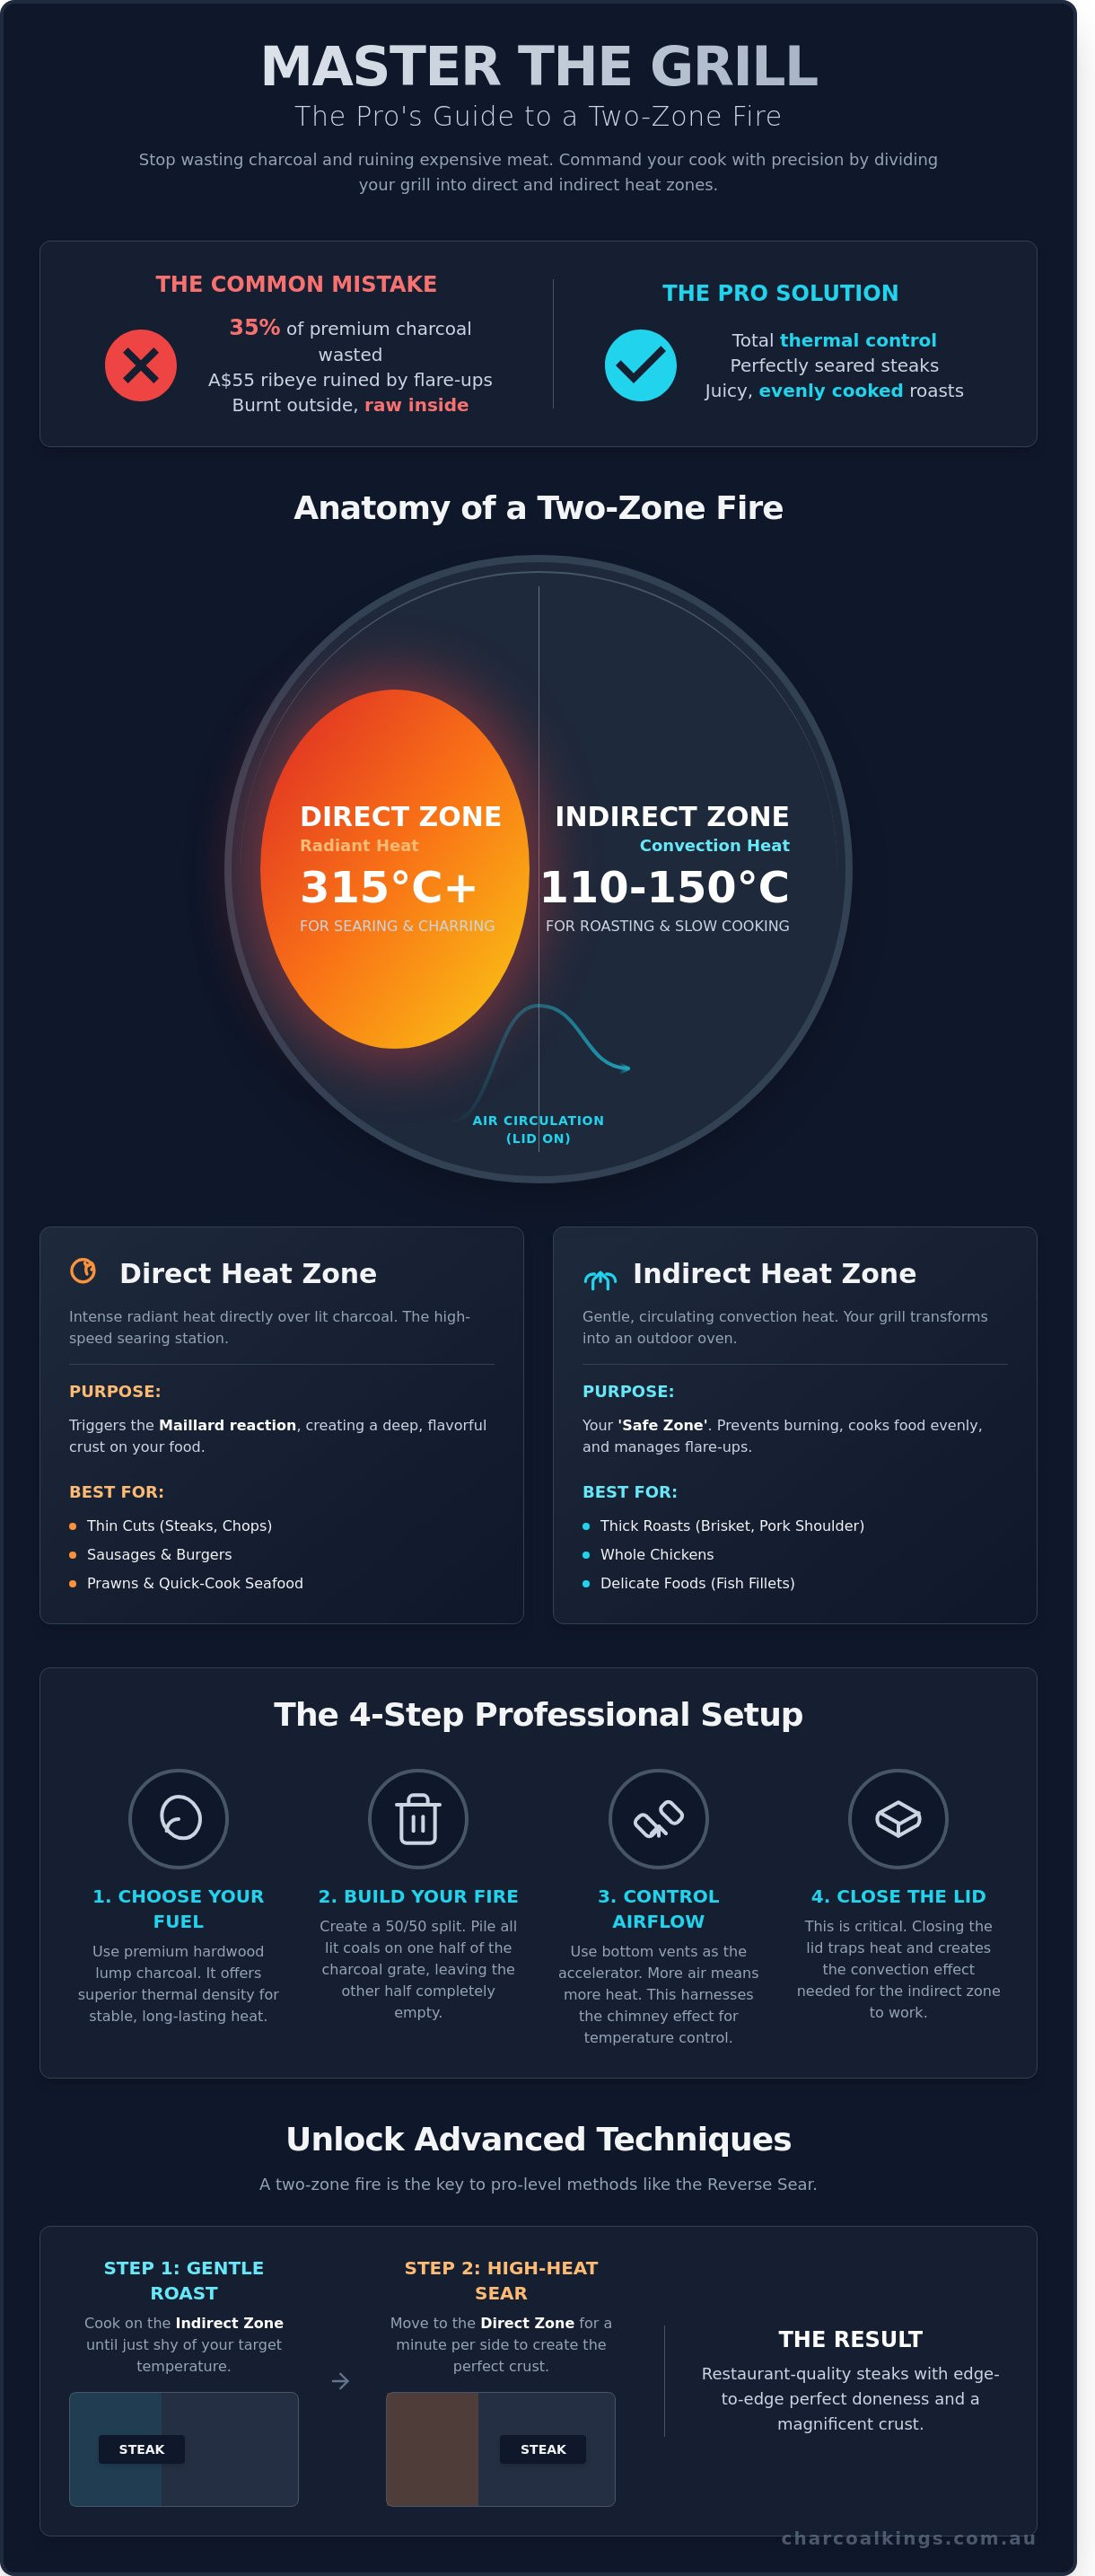
Professional grilling isn’t about blasting meat with maximum heat until it turns to carbon. It’s about heat management. A two-zone fire is the simple division of your grill into two distinct temperature areas: a direct heat zone and an indirect heat zone. This configuration is the foundation of all professional-grade backyard barbecuing. It provides the control needed to cook premium natural hardwood charcoal fueled meals without the stress of ruined meat. Mastering the art of setting up a two-zone fire for grilling transforms a basic cookout into a precision culinary event.
The setup solves the most common problem found in Australian backyards: the “burnt-outside-raw-inside” syndrome. When you cook a thick A$55 ribeye over high heat alone, the exterior often reaches 100°C and burns before the center hits a safe 54°C for medium-rare. Data from culinary tests suggests that cooking thick cuts over direct heat for more than 4 minutes per side leads to a 35% higher chance of surface charring before the internal temperature is reached. By using two zones, you create a versatile environment that handles everything from high-speed searing to low-and-slow roasting.
To better understand this concept, watch this helpful video:
Direct vs. Indirect Heat: Understanding the Difference
Direct heat relies on radiant energy. When food sits directly over the coals, it’s exposed to intense infrared heat that can exceed 315°C. This is essential for the Maillard reaction, the chemical process that creates the dark, flavourful crust on a steak. However, radiant heat is unforgiving. It cooks fast and can lead to flare-ups if fat drips onto the embers. This zone is perfect for thin cuts like minute steaks or local prawns that only need 2 minutes of heat.
Indirect heat works like a traditional convection oven. By understanding what indirect grilling is, you can master the art of gentle cooking. The air inside the grill circulates around the food, cooking it evenly from all sides at a lower, more stable temperature. This “safe zone” is your insurance policy. If a flare-up occurs on the hot side, you simply slide the meat to the cool side to prevent scorching. It’s the difference between a stressed cook and a confident pitmaster.
The Anatomy of a Two-Zone Grill Layout
Creating this layout requires a 50/50 split on your charcoal grate. You stack your lit premium lump charcoal or briquettes on one half of the grill while leaving the other half completely empty. This physical separation is vital. The empty side isn’t “wasted” space; it’s a critical tool for temperature regulation. When you close the lid, the grill becomes a convection chamber. Fresh air enters through the bottom vents, passes over the coals, and swirls around the food on the indirect side before exiting the top vent. This flow ensures a consistent internal temperature, allowing you to roast large joints of meat or bake delicate snapper fillets with precision.
- Direct Zone: Used for searing, charring, and thin cuts like sausages or burgers.
- Indirect Zone: Used for roasting, slow cooking, and resting meat after a heavy sear.
- Lid Position: Must be closed to maintain the convection effect and prevent heat loss.
This setup turns a basic kettle grill into a high-performance outdoor oven. It’s the only way to ensure your A$120 brisket or Sunday roast comes out perfect every time. Get Sizzlin’!
Choosing Your Fuel: Why Hardwood Lump Charcoal Wins
You can’t master a two-zone fire with subpar fuel. Your choice of charcoal determines if your indirect zone stays at a rock-steady 110°C or drops to 80°C halfway through your cook. Premium hardwood lump charcoal offers the thermal density required for high-performance grilling. It burns hotter and cleaner than compressed alternatives. This stability is vital when setting up a two-zone fire for grilling because you need distinct, manageable temperature separation between your searing station and your roasting area.
Thermal density refers to the energy packed into every piece of wood. Hardwood lump is essentially carbonised timber. It retains the natural cell structure of the tree, allowing for rapid oxygen intake and intense heat release. Cheap briquettes often rely on coal dust and starch, which lack this organic efficiency. When you are managing two zones, you need the direct side to hit temperatures exceeding 600°C for a proper sear while the indirect side remains clear of acrid smoke. Natural lump delivers this without the chemical interference found in budget bags.
Burn time is the silent hero of the indirect zone. If you are roasting a whole chicken or a beef brisket, you don’t want to be opening the lid every 30 minutes to top up the coals. Every time you open that lid, you lose your heat pocket. High-quality hardwood provides a consistent 4-hour burn time. This allows you to set your vents and walk away, confident that the thermal mass of the charcoal will maintain the environment. For those looking for step-by-step instructions on heat management, starting with a clean-burning, long-lasting base is the first rule of the craft.
Lump Charcoal: The Professional Choice
Professional pitmasters choose lump for its versatility and raw power. It reaches peak temperatures that briquettes simply can’t touch. This is essential for the direct side of your two-zone setup. You want that intense radiation to create a Maillard reaction on your steaks in under 90 seconds. Natural hardwood also produces significantly less ash than processed fuels. In a long cook, ash is the enemy. It settles at the bottom of your grill and clogs the intake vents. This starves the fire of oxygen and leads to temperature crashes. Natural lump leaves behind roughly 2% to 3% of its original weight in ash, keeping your airflow paths wide open for the duration of a 5-hour roast. The flavour profile is another win. You get a clean, wood-fired aroma that enhances the meat rather than masking it with the smell of burning binders.
Briquettes vs. Natural Wood: Thermal Consistency
Standard supermarket briquettes often contain sawdust, limestone, and mineral fillers. These additives produce a distinct chemical smell that can taint delicate proteins like lamb or poultry. While some use briquettes for their uniform shape and predictable burn rate, the trade-off is often a lower peak temperature and a mountain of grey ash. If you are setting up a two-zone fire for grilling, you need a fuel that responds quickly to airflow changes. Lump charcoal reacts almost instantly when you tweak your vents. Charcoal Kings Premium Hardwood Lump provides a 100% natural solution that eliminates the risk of off-flavours. It’s an investment in your final result. Spending a few extra A$ on quality fuel prevents the frustration of a stalled fire or a ruined roast. When you use a premium product, you spend less time fussing with the vents and more time perfecting your recipes. Get Sizzlin’!
Step-by-Step: Setting Up a Two-Zone Fire for Grilling
Mastering the mechanics of setting up a two-zone fire for grilling starts with a clean foundation. Airflow is the lifeblood of a charcoal fire. If your grill is choked with ash from last weekend’s cook, you’re already fighting a losing battle. Blocked bottom vents can reduce oxygen intake by up to 45%, leading to a fire that struggles to reach searing temperatures or dies out prematurely. Before you even think about striking a match, clear out the old debris. Ensure the intake vents move freely and provide an unobstructed path for air to feed the coals from beneath.
High-performance grilling requires precision. Professional pitmasters don’t guess; they control the environment. By starting with a clean bowl, you ensure that the heat remains consistent across your direct zone while keeping the indirect side cool enough for gentle roasting. This preparation phase is what separates a backyard hobbyist from a seasoned expert who understands the physics of fire.
Lighting the Fire Correctly
Don’t reach for the lighter fluid. Liquid fire starters and “quick-light” briquettes are packed with petroleum-based chemicals that will ruin the flavour of premium Australian hardwood charcoal. These additives produce acrid smoke that soaks into your meat, leaving a chemical aftertaste that no amount of rub can hide. Instead, use a chimney starter. It’s the most reliable tool in your kit, capable of holding roughly 2.5kg of lump charcoal or briquettes for a standard 57cm kettle grill.
- Place two or three natural wood wool firelighters on the charcoal grate and light them.
- Set the chimney starter directly over the flames.
- Wait 15 to 20 minutes for the convection effect to pull heat through the stack.
- Look for the indicator: the coals at the top must show a distinct layer of grey ash.
When the top coals are glowing orange and covered in ash, they’ve reached their peak energy output. Pouring them too early results in uneven heat, while waiting too long wastes the fuel’s longevity. Timing is everything when you’re aiming for that 300°C sear.
Banking the Coals and Positioning the Grate
Once the coals are ready, pour them carefully onto one side of the lower charcoal grate. You want to create a concentrated pile that covers exactly half of the grill’s surface area. This layout is the core of setting up a two-zone fire for grilling properly. Use long-handled stainless steel tongs to move the stray pieces, ensuring the direct zone is a flat, even bed of glowing embers. A tight bank of coals radiates more intense heat than a scattered layer, allowing for better temperature graduation across the cooking surface.
Position your cooking grate so the hinged access door, if your grill has one, sits directly over the coals. This allows you to add more fuel or wood chunks for smoking without removing the entire grate and disturbing your food. If you’re using a standard grate, ensure it’s locked into place and stable. The physical height of the grate matters; it should sit approximately 10cm to 12cm above the coals to prevent immediate charring while still allowing for a heavy crust to form on steaks.
Finalise the setup by putting the lid on with the top vents fully open. Give the grill a 10-minute preheat period. This step isn’t just about heating the metal; it’s about stabilising the internal air currents. A preheated grill prevents food from sticking and ensures that when you drop that Cape Grim ribeye onto the mesh, the thermal mass of the grate is ready to deliver an instant, professional-grade sear. Get sizzlin’!
Mastering Airflow: Using Vents to Control Your Zones
Airflow is the engine of your charcoal grill. Once you understand the physics of the chimney effect, you gain total command over your cook. Inside a closed kettle or ceramic grill, hot air naturally rises. As this heat escapes through the top vent, it creates a vacuum that pulls fresh, oxygen-rich air through the bottom intake. This continuous cycle is what keeps your premium hardwood charcoal burning steady and clean.
When setting up a two-zone fire for grilling, you aren’t just managing fuel; you’re managing a weather system. The bottom vent acts as your accelerator, while the top vent acts as your steering wheel. By manipulating these two points, you can maintain a 110°C low-and-slow environment on the indirect side while the direct side remains a 300°C searing furnace. Keeping the lid closed is non-negotiable for this process. Every time you lift the lid, you break the convection cycle and cause a temperature spike that can take 10 minutes to stabilises.
The Role of the Bottom Intake Vent
The bottom vent controls the volume of oxygen reaching your coals. Oxygen intake correlates directly to heat output. For high-heat searing, leave the bottom vent 100% open to feed the fire. For roasting or smoking, you will likely need to close the vent until only a 2mm to 5mm gap remains. This restriction starves the fire just enough to maintain a consistent, lower temperature. You should rarely close the bottom vent completely during a cook. Doing so cuts off the oxygen entirely, which will extinguish your 100% natural lump charcoal within roughly 12 to 15 minutes.
The Top Exhaust Vent and Heat Direction
The top vent determines the path the heat takes before it leaves the grill. A professional pro tip is to always position the top vent directly over the indirect side of the grate. This placement forces the hot air and smoke to travel across your food before exiting. It turns your grill into a functional convection oven. This is the most effective way to ensure even cooking when setting up a two-zone fire for grilling.
- Fine-Tuning: Use the top vent for minor adjustments. Moving the exhaust slider by just a few millimetres can shift your internal temperature by 10 to 15 degrees Celsius.
- Reading Smoke: The top vent is your diagnostic tool. Thick, billowing white smoke usually indicates poor combustion or “dirty” fire. You want to see thin, almost invisible blue smoke. This indicates your Charcoal Kings hardwood is burning at peak efficiency.
- Heat Retention: If your grill is running too hot, closing the top vent halfway is often more effective for immediate dampening than adjusting the bottom vent alone.
Mastering these vents ensures that your fuel lasts longer and your meat cooks more evenly. High-quality charcoal produces minimal ash, which prevents the bottom vents from clogging during long 8-hour cooks. If you want to achieve these professional results, you need the right fuel to back up your technique.
Advanced Techniques: The Reverse Sear and Beyond
Mastering the basics is just the start. Professional pitmasters use setting up a two-zone fire for grilling to achieve results that standard high-heat grilling cannot touch. This setup provides total control over the cooking environment. It allows for precision that eliminates the “grey band” of overcooked meat often found in thick steaks. Using 100% natural hardwood charcoal ensures a clean, consistent heat source for these advanced maneuvers. It is the only way to achieve a perfect edge-to-edge pink finish.
The Reverse Sear Method Explained
The reverse sear is the gold standard for any steak thicker than 38mm. Traditional methods sear first, but this often results in a 5mm ring of dry, overcooked meat. The reverse sear flips the script for a superior result.
- Step 1: Place your seasoned meat on the indirect side. Maintain an ambient grill temperature between 105°C and 120°C. Gently bring the internal temperature of the meat to 46°C for a medium-rare finish. This slow rise preserves muscle fibers and retains 15% more internal moisture compared to high-heat starts.
- Step 2: Move the meat to the direct side once it hits the target. Use a surface temperature of 300°C or higher. Sear for 60 seconds per side to develop a heavy Maillard-reaction crust.
This method works because it dries the surface of the meat during the slow phase. A dry surface sears faster. You get a better crust without overcooking the interior. It is the best approach for 2kg Tomahawk steaks or premium Australian Wagyu.
Versatility Across Different Proteins
The two-zone system is not just for steaks. Use the indirect zone for 1.8kg whole chickens or 1.5kg pork roasts. Positioning these larger cuts away from the coals prevents the outside from burning before the center reaches a safe 74°C. If one item finishes early, move it to the furthest edge of the indirect zone. This holding area keeps food at a safe serving temperature without further cooking. For groups of 10 or more, transition to a three-zone split. Place high-heat coals on both sides with a neutral cool zone in the middle. This allows you to cook 20 sausages at once while keeping 10 buns warm in the center.
Essential Tools for Zone Management
Precision requires the right gear. You cannot guess internal temperatures when a difference of 2°C changes the final result. A digital instant-read thermometer is mandatory. It provides a reading in under 3 seconds, ensuring you do not lose heat by keeping the lid open too long. Charcoal baskets are another critical addition. They keep your premium lump charcoal or briquettes contained, preventing fuel creep into your indirect zone. This clear physical barrier is essential for maintaining a 100°C temperature differential between your zones. Check out our range of BBQ Accessories for professional fire management tools that help you rule the grill. High-quality tools paired with chemical-free fuel ensure every cook is a success. Get Sizzlin’!
Master Your Next Cookout with Total Heat Control
Mastering the dual-zone method eliminates the frustration of unevenly cooked meat. By creating distinct high-heat and low-heat areas, you gain the flexibility to sear a steak at 300 degrees Celsius and finish it gently on the cool side. Setting up a two-zone fire for grilling is the most effective way to prevent flare-ups and ensure your food stays juicy. Australia’s top pitmasters rely on this technique alongside 100% natural hardwood lump to achieve championship-quality results every time. High-quality fuel burns steady for over 4 hours, giving you the reliability needed for long cooks or quick sears.
Superior grilling starts with the right foundation. Avoid the chemicals and fillers found in low-grade briquettes that ruin the flavor of your meat. Our charcoal is 100% natural hardwood, designed to burn hotter and cleaner for a professional finish. You’ve got the skills to manage your airflow and zones; now it’s time to use the fuel the pros trust. Take your backyard BBQ to the next level and taste the difference that premium quality makes.
Get Sizzlin’ with Premium Hardwood Charcoal from Charcoal Kings!
Grab your tongs and fire up the pit; your best meal is just one cook away.
Frequently Asked Questions
What is the best type of charcoal for a two-zone fire?
Premium natural hardwood lump charcoal is the best fuel for this technique. It burns hotter and cleaner than standard briquettes, reaching temperatures over 350 degrees Celsius. High-quality Australian hardwood provides consistent heat without the 15 percent ash byproduct found in cheaper alternatives. This keeps your airflow clear and your temperatures stable throughout the entire cooking process.
Do I need to keep the lid on when using a two-zone setup?
Keep the lid on to maintain the convection effect required for the indirect zone. Closing the lid allows heat to circulate around the food like an oven. This method prevents flare-ups by limiting oxygen to the coals. Open the vents 50 percent to 100 percent to regulate the internal temperature between 110 and 135 degrees Celsius for perfect roasting results.
How long will a two-zone fire stay hot?
A standard chimney starter of premium lump charcoal lasts between 60 and 90 minutes at high heat. Setting up a two-zone fire for grilling allows you to extend this time by managing airflow. If you use high-density Binchotan, you can achieve burn times exceeding 4 hours. Monitoring your temperature with a digital probe ensures you know exactly when to replenish your fuel source.
Can I set up two zones on a small portable grill?
You can set up two zones on a small portable grill by stacking charcoal on exactly one half of the grate. Setting up a two-zone fire for grilling in a compact 37 centimetre kettle requires a charcoal basket or a firebrick to keep the coals contained. This creates a 15 centimetre safety zone on the cool side, allowing you to sear and roast even in limited space.
Where should I place the meat for the best results?
Place meat on the indirect side, away from the coals, to cook it through without burning the exterior. Start thick cuts on the cool side until they reach an internal temperature of 45 degrees Celsius. Move them to the direct side for a final 2 minute sear. This reverse sear technique ensures even cooking and a perfect crust every time you use your grill.
What happens if the direct side gets too hot?
Move your food to the indirect zone immediately if the direct side exceeds your target temperature or causes flare-ups. Use long-handled tongs to shift the meat to the cool side where there are no coals. Closing the bottom intake vent by 75 percent will also reduce the intensity of the fire. This gives you total control over the cooking process without ruining your expensive cuts.
Is a two-zone fire only for thick steaks?
Two-zone fires work for everything from delicate fish to 2 kilogram whole chickens. Use the indirect zone for roasting poultry or baking Australian damper. The direct side is perfect for quick-cooking items like prawns or sliced vegetables. Having two distinct heat levels provides the versatility needed to cook an entire 3 course meal on a single piece of equipment.
How do I add more charcoal during a long cook?
Add 10 to 12 fresh pieces of unlit lump charcoal directly onto the existing hot embers. This maintains a steady temperature for long cooks like a 6 hour pork shoulder session. Ensure the new charcoal is 100 percent natural hardwood to avoid chemical fumes affecting your food. Open the vents fully for 5 minutes after adding fuel to help the new pieces ignite quickly.