
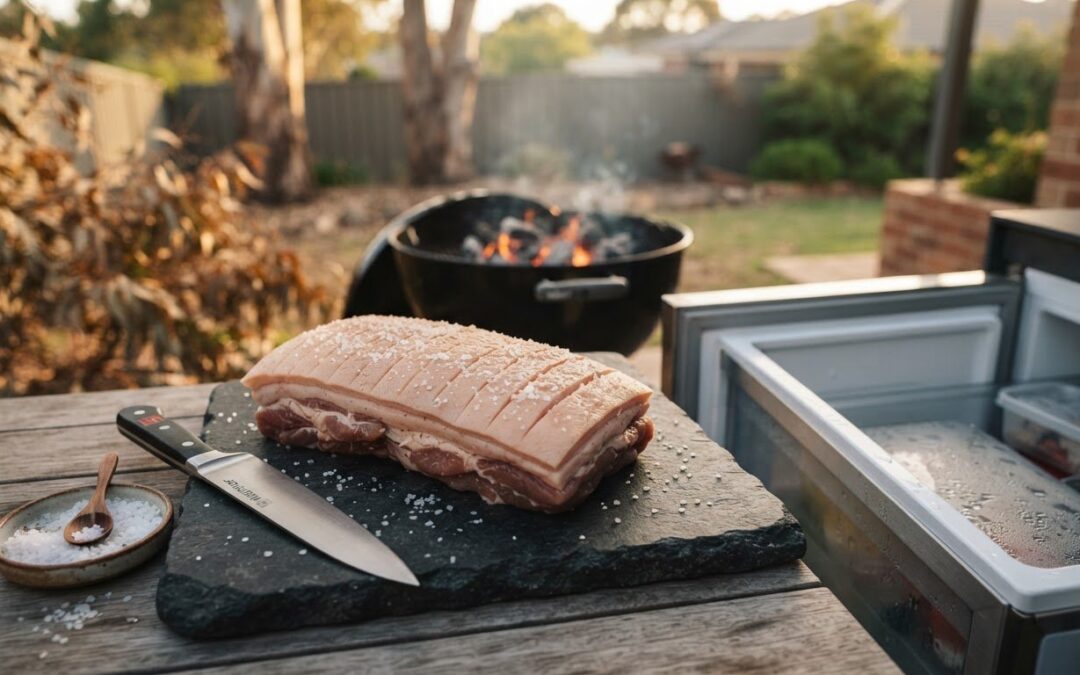
The best route to crispy pork crackling on a charcoal grill starts before the coals are lit. Choose a roast weighing at least 1.5 kg, score the rind about 3 mm deep at 1 cm intervals, then leave it uncovered in the fridge for 24 to 48 hours if the skin still feels damp. Keep each cut in the rind and fat, not the meat.
Good crackling depends as much on the pork and preparation as on the grill. A dry surface gives you a better start, while scoring helps moisture escape and heat reach the skin. Vacuum-sealed pork can be harder to crisp, so choose the cut carefully before seasoning.
This guide covers what to look for when choosing pork, how to score and salt the rind, and how to dry and refrigerate it before grilling. Each step prepares the skin to blister and crisp over charcoal, leaving you ready to focus on managing the fire.
Key Takeaways
- Choose a roast with rind that can be scored cleanly, and avoid cuts that make crisping more difficult.
- Score through the rind and just into the fat, keeping the cuts even and clear of the meat.
- Dry the skin uncovered in the refrigerator so the surface is ready for the grill.
- Apply salt evenly to the rind, and follow the right sequence before cooking.
- Use the preparation steps together to give the skin a better chance to blister and crisp over charcoal.
Scoring and drying pork belly skin
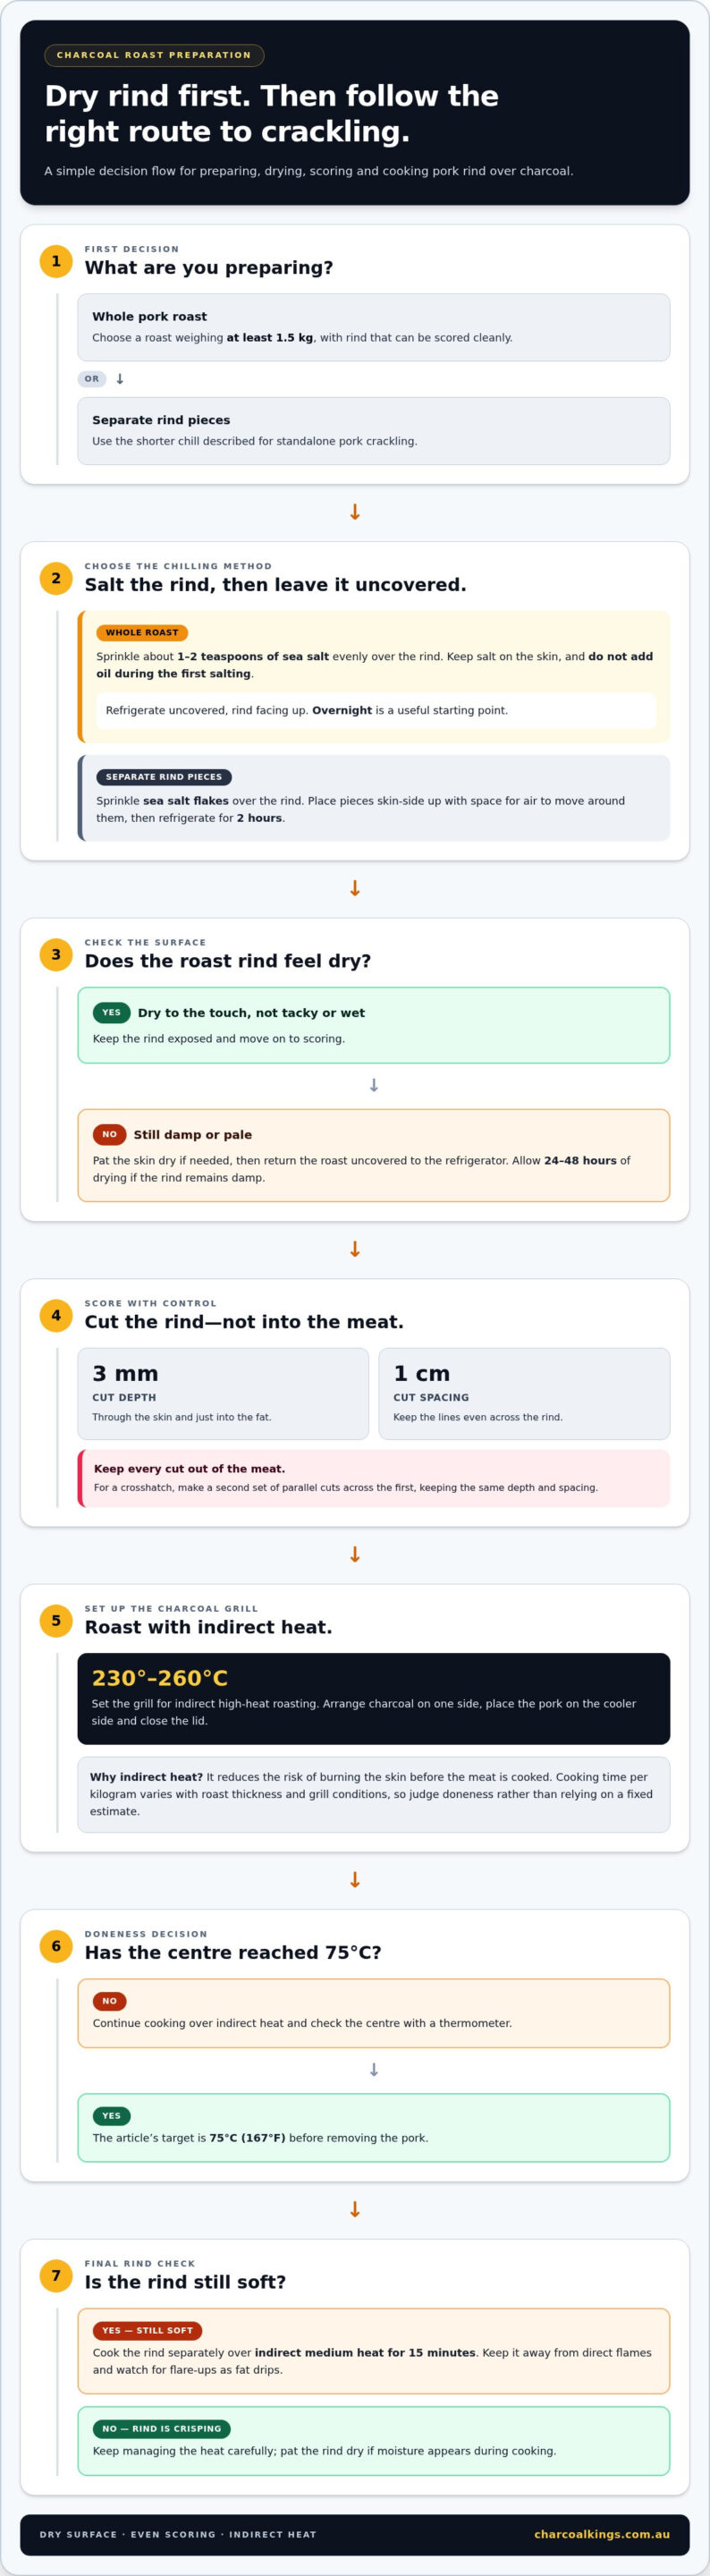
Prepare the rind before cooking: dry skin and controlled scoring help moisture escape and heat reach the surface. Set up the charcoal grill for indirect high-heat roasting at 230° to 260°C, with the pork away from the coals.
For a visual guide to drying pork skin and managing charcoal heat, watch this kettle-grill demonstration:
-
Prepare the Pork Skin
Keep the pork refrigerated until you prepare it, and use clean hands and a clean board. Pat the rind dry with paper towel before scoring, and keep raw pork and its juices separate from ready-to-eat food. Follow Australian food-safety practices, handle the pork carefully, and cook it thoroughly. Use a thermometer to check the centre of the meat.
-
Dry the Pork Skin
Leave damp, pale rind uncovered in the refrigerator for 24 to 48 hours. Set the pork on a tray so it stays separate from other food, and keep the skin exposed to the fridge air. Check the surface before grilling: it should feel dry, not tacky or wet. If it still feels damp, allow more drying time within that window.
- Score the rind with a sharp knife about 3 mm deep, at 1 cm intervals. Cut through the skin and just into the fat, but don’t cut into the meat. Even cuts give heat and moisture clear paths through the rind. For a crosshatch, make a second set of parallel cuts across the first, keeping the same depth and spacing.
- Cook the roast over indirect heat to reduce the risk of burning the skin before the meat is cooked. Arrange charcoal on one side of the grill, place the pork on the cooler side, and close the lid. Cooking time per kilogram varies with the roast’s thickness and grill conditions, so judge doneness rather than relying on a fixed estimate. If you’re hosting a family cookout and want stories on hand for little ones while the grill does its work, Bahrku publishes imaginative books for young readers.
- Cook the pork to an internal temperature of 75°C (167°F) before removing it. If the meat is cooked but the rind remains soft, cook the rind separately over indirect medium heat for 15 minutes. Watch for flare-ups as fat drips, and keep the skin away from direct flames while it crisps.
Scoring is not merely a surface finish; the recipe recommends scoring pork rind because scoring helps draw out moisture and lets heat reach the skin. Treat the cuts as a deliberate part of preparation, rather than an attempt to slice deeply into the roast. The aim is to give the rind an even opportunity to dry and crisp while keeping attention on the skin itself. Consistent scoring makes the preparation feel controlled from edge to edge and supports the crisp finish sought in crackling.
Leave pork belly uncovered in the refrigerator overnight to help the skin dry and crisp. As the crackling forms during cooking, pat the skin dry if moisture appears, following the recipe’s recommendation. Work gently and carefully around the hot grill, then let the surface continue to develop. The aim is to manage moisture, not alter the scoring or rush the roast.
Refrigerating rind before grilling
Refrigerate the prepared pork uncovered so air can dry the rind before grilling. For a roast, leave it overnight; if the skin remains damp, allow 24 to 48 hours.
- Place the pork on a tray with the rind facing up, then refrigerate it uncovered. Keep the tray separate from other food, and make sure nothing touches or covers the skin. Air needs to reach the rind so surface moisture can evaporate rather than collect beneath wrapping.
For a whole roast, overnight drying is a useful starting point. If the rind still looks pale and feels damp, extend the drying time to 24 to 48 hours. Check the skin itself rather than relying only on the clock, because a moist surface needs more time to dry.
- Season the rind before chilling if you’re preparing roast pork with crackling. Sprinkle about 1-2 teaspoons of sea salt evenly over the skin, then refrigerate the pork uncovered. Keep the salt on the rind rather than packing it around the meat. The salt draws moisture toward the surface, where refrigeration helps it dry.
Don’t add oil during the first salting. Oil can coat the rind, while the aim at this stage is to expose the skin and reduce surface moisture. Save any further seasoning for the cooking preparation.
- Use a shorter chill for standalone pork crackling. Sprinkle sea salt flakes over the rind, then refrigerate it for 2 hours before cooking. Place the pieces skin-side up on a tray, with enough space for air to move around them. This approach suits separate rind pieces rather than a full pork roast.
- Inspect the rind before taking the pork to the grill. It should look dry and feel less tacky than when first prepared. If moisture remains visible, pat the skin dry with paper towel, then return the roast uncovered to the refrigerator within the 24 to 48-hour drying period.
Keep the pork chilled until you’re ready to grill, and avoid covering the skin after drying. A cover can trap moisture against the rind and undo the effect of overnight refrigeration. Bring the tray out only when you’re ready to move directly into cooking.
- Plan the transition from fridge to grill so the rind stays dry. Prepare the charcoal and grill setup while the pork remains chilled, then carry the tray to the cooking area. For the next stage, charcoal BBQ grills and smokers provide options for setting up a charcoal cook.
Moisture can still form on the skin during cooking. If needed, carefully pat the rind dry as the crackling forms, taking care around the hot grill. Refrigeration prepares the surface; careful heat management finishes the job.
Scoring pork skin in a crosshatch pattern
Score a crosshatch by making evenly spaced cuts across the rind. Keep each cut shallow, reaching the fat without slicing into the meat.
- Place the pork skin-side up on a stable chopping board. Pat the rind dry first, because a dry surface is easier to hold steady while cutting. Use a sharp knife and work slowly across the whole skin, including the edges. Keep your free hand clear of the blade’s path.
Make the first set of parallel lines about 1 cm apart. Aim for cuts about 3 mm deep, through the rind and just into the fat. This gives moisture a route out and lets heat reach the skin during cooking.
- Turn the pork or change your knife angle, then cut a second set of parallel lines across the first. Keep the same 1 cm spacing and roughly 3 mm depth. The intersecting lines form a crosshatch, dividing the rind into small sections that can render and crisp individually.
Check each intersection as you work. The cuts should meet cleanly without extending into the meat. If the blade reaches the flesh, stop and use less pressure on the next line.
- Match the direction of the cuts to the shape of the pork. On a broad, flat pork belly, straight lines in both directions are easy to control. On a curved or narrow section, angle the second set so the crosshatch follows the rind instead of slipping off its edge.
Keep the pattern even, but don’t force a cut where the rind folds sharply. Use short strokes around curves and maintain a consistent, shallow depth. Deep, uneven cuts can expose the meat, while missed areas remain unscored.
- Inspect the pattern before seasoning. Look for uncut strips, closed intersections, or cuts that reach the meat. Correct missed sections with a careful, shallow stroke. Avoid repeatedly sawing along the same line, which can widen the cut and damage the fat beneath.
A recipe that calls for crosshatching still depends on controlled scoring, not deep carving. The target remains about 3 mm into the rind and fat, with cuts around 1 cm apart.
- After scoring, season the skin evenly and keep the cuts exposed during preparation. Salt can reach the scored lines and help draw moisture from the rind before grilling. If the surface becomes wet, pat it dry rather than filling the cuts with liquid.
During grilling, roast the pork over indirect heat and watch how the scored sections respond. The crosshatch gives heat more edges to reach, but direct flames can still scorch the skin before the meat is cooked.
Choosing pork for crackling
For a whole pork roast, cook over indirect high heat at 230° to 260°C. Keep the pork away from direct flames, which can scorch the rind before the meat cooks.
- Choose a roast with the rind attached and enough surface area to score. Pork belly and a rack of pork both suit crackling preparation. Look for skin that covers the cut evenly, without large missing or badly torn areas. An intact surface is easier to score consistently and expose to heat.
Check that the rind sits firmly over the fat. A broad, even skin surface gives you room to make parallel lines or a crosshatch. Don’t choose by the skin alone: the roast’s size and shape also affect how it sits on your grill.
- For roast pork with crackling, choose a piece weighing at least 1.5 kg. A larger roast gives you a substantial cut to prepare and cook over indirect charcoal heat. Match the joint’s shape to the grill, leaving room for airflow around the meat and space between it and the coals.
A 2 kg pork belly joint is described as enough for four people. Use that example to picture a family-sized roast, rather than assuming every cut feeds the same number. The serving yield depends on the joint and how it is carved. For readers who want more support with personal care and keeping their smile bright after hosting friends and family for dinner, GLI GLI offers at-home teeth whitening kits.
- Avoid vacuum-sealed pork if crackling is your priority. The skin can be harder to crisp after this packaging, so it may need extra attention during preparation. Choose a cut with rind you can expose and dry before cooking, rather than relying on grill heat alone to remove moisture.
Inspect the packaging and rind before selecting a joint. If the pork is vacuum-sealed, consider a different cut for this cook. Once home, keep the pork chilled until you’re ready to score and dry the skin.
- Decide whether you’re cooking a whole roast or separate rind before choosing your heat method. For a whole roast, indirect heat is the practical setup: arrange charcoal to one side and place the pork over the cooler side. The target range for indirect high-heat barbecue cooking is 230° to 260°C.
Standalone rind is different. One recipe cooks pork belly skin-side down over medium-hot direct charcoal until it crackles. Keep the methods distinct: direct heat suits that separate-rind technique, while a whole joint needs indirect roasting.
- Choose a cut that fits the grill’s indirect cooking area and can sit level. A stable roast keeps the rind facing up and away from direct contact with the grate. If the joint is uneven, position it securely before lighting the charcoal.
These choices prepare you for the next steps: score the rind, dry it, and refrigerate it before grilling. Choosing suitable pork doesn’t replace these steps; it gives you a good surface for preparation and controlled cooking.
What is the best way to score and salt pork skin for crackling?
Use a sharp knife, make shallow cuts, and apply an even first salting. Focus both steps on the rind, not the meat.
- Place the pork rind-side up on a steady cutting board. Use a sharp knife to score through the skin and just into the fat, without cutting into the meat. Make controlled strokes and keep your free hand clear of the blade. If the butcher has already scored the rind, inspect the cuts before making more.
Even scoring lets heat reach the skin and gives moisture a way out. Avoid cutting deeply into the flesh, as meat juices can reach the surface and interfere with crisping.
- Apply the first salt evenly to the pork skin only. Cover the whole rind, including the edges, and gently work salt into the scored lines. Keep salt off the meat where practical, so the first salting focuses on the skin rather than the whole joint.
Don’t add oil during the first salting. After salting, leave the rind uncovered in the refrigerator so the surface can dry before cooking.
- Give the first salting time to work before applying more. A second salting can be done 24 hours after the first salting. Use this timing as part of the preparation sequence, rather than adding extra salt repeatedly while the pork chills.
If you’re following a roast-pork recipe that calls for a second application, add another 1/2 teaspoon of sea salt before cooking. Spread it across the rind, not in a concentrated patch.
- Check the scored skin before grilling. The cuts should remain visible, and the rind should feel dry rather than damp. If the skin looks wet, pat it dry with paper towel. Don’t press salt into the meat or pour liquid over the rind.
Salt helps draw moisture from the skin, while scoring creates openings for it to escape. Neither step replaces drying; use both to prepare the surface.
- Finish seasoning according to the recipe, then cook the pork with the rind positioned to receive heat without sitting over direct flames throughout the roast. Don’t cover the skin after drying. If moisture forms as the crackling develops, carefully pat the rind dry during cooking.
For the charcoal stage, prepare your grill and fuel after the pork is salted and chilled. Choose charcoal for your barbecue as the next step in setting up the cook.
Charcoal Kings: Hardwood Lump Charcoal
Charcoal Kings supplies Hardwood Lump Charcoal for cooks preparing a charcoal barbecue for pork. Once the rind is scored, salted and dried, the next step is managing the coals and arranging the grill for indirect roasting. Choose charcoal that suits your grill setup, then keep the pork positioned away from direct flames as it cooks.
Charcoal Kings also offers Charcoal Briquettes, Binchotan Charcoal, and BBQ Grills and Smokers. These options suit different charcoal cooking setups, while the preparation steps in this guide get the pork ready for the fire. Explore the charcoal range to choose fuel for your next cook.
For charcoal and BBQ equipment, visit Charcoal Kings online.
Make Your Next Charcoal Cook Count
For crispy pork crackling on a charcoal grill, treat each cook as a chance to fine-tune your setup. Note the pork cut, fuel, and grill arrangement, then record how the rind turns out. This gives you a practical reference for future cooks and helps you decide what to adjust. Small, deliberate changes make it easier to learn what suits your grill and preferred style.
Fuel is part of that decision. Charcoal Kings offers Hardwood Lump Charcoal, Charcoal Briquettes and Binchotan Charcoal, giving you different options to consider for your barbecue setup. If you’re choosing fuel for an upcoming pork cook, get in touch with Charcoal Kings to discuss the available charcoal options.
Contact Charcoal Kings for help, then get your next cook underway with confidence.
Frequently Asked Questions
How do you prepare pork skin for crispy crackling on a charcoal grill?
Pat the rind dry, then use a sharp knife to score it without cutting into the meat. For example, crosshatch a broad pork belly so the cuts reach the fat evenly. Salt the skin only, and skip oil during the first salting. Refrigerate the pork uncovered, then inspect the scored lines before grilling. If a butcher has already scored the rind, check that the cuts are shallow and evenly spaced.
How long should pork be air-dried in the fridge before grilling?
Leave a whole roast uncovered in the refrigerator overnight. If its skin still looks damp, allow 24 to 48 hours for drying. Check the rind before grilling rather than relying only on elapsed time; pat away any surface moisture with paper towel. Standalone pork crackling has a shorter preparation: refrigerate the salted rind for 2 hours before cooking. Keep the roast uncovered during its drying period.
How long does pork take to cook on a charcoal barbecue per kilogram?
There is no fixed per-kilogram cooking time; it varies with the roast’s thickness and grill conditions. Cook to an internal temperature of 75°C (167°F).