

Most backyard pitmasters are accidentally ruining an A$120 Wagyu brisket by chasing the wrong kind of smoke. You’ve likely spent 12 hours tending a fire only to end up with meat that tastes like a bitter ashtray and looks like it’s covered in oily soot. It’s a common struggle when you’re trying to figure out how to achieve clean blue smoke while battling fluctuating temperatures and stubborn creosote buildup. You want that deep, mahogany bark and a clean flavour profile, but thick white clouds keep getting in the way of your results.
We’ve spent over 10 years perfecting the art of the burn at Charcoal Kings, and we’re finally handing over the master blueprint. You’ll learn the exact fire management techniques and natural fuel secrets required to produce the “Thin Blue Smoke” that defines world-class barbecue. We’re covering everything from the 20 minute pre-heat rule to the precise oxygen ratios needed for a clean burn. This guide ensures your next cook delivers the expert-level results your hard work deserves. Get sizzlin’!
Key Takeaways
- Understand the critical difference between bitter white smoke and Thin Blue Smoke to ensure professional-grade flavor profiles in every cook.
- Master the “small, hot fire” principle and airflow management techniques to maintain complete combustion and prevent creosote buildup.
- Learn why using premium, seasoned Australian hardwoods like Ironbark or Red Gum with under 20% moisture is non-negotiable for quality results.
- Discover the expert fire management secrets and fuel selection required for how to achieve clean blue smoke consistently in any weather.
- Identify and fix common troubleshooting issues, such as dirty smoke production even when your smoker has reached the target temperature.
What is Clean Blue Smoke and Why Does it Matter?
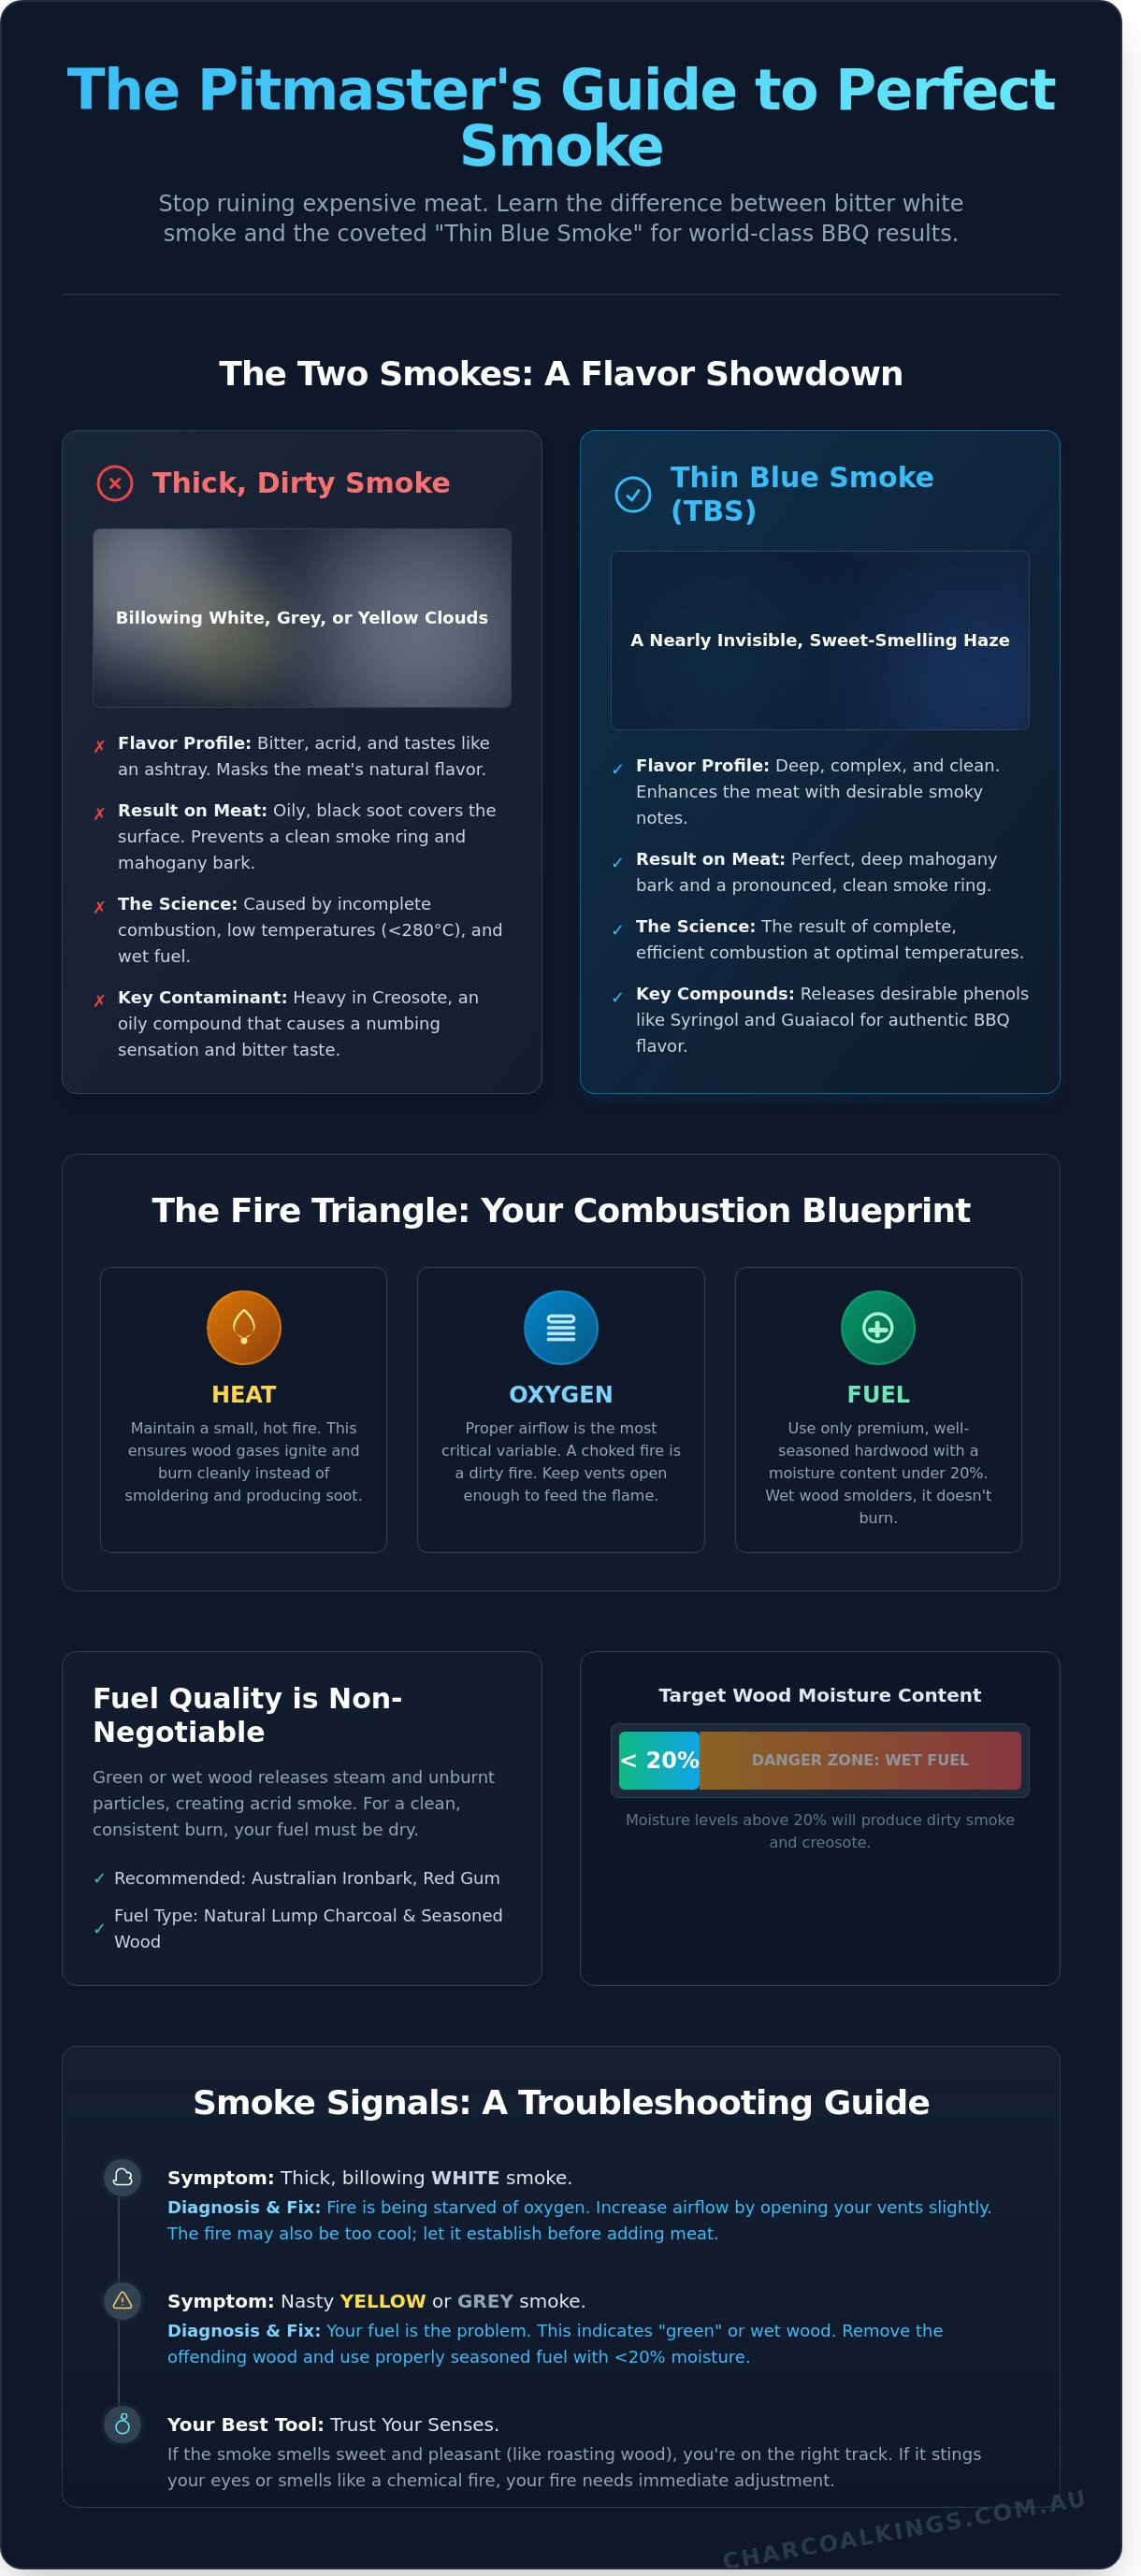
Thin Blue Smoke, or TBS, represents the pinnacle of professional barbecue. It’s a nearly invisible, faint blue haze that dances above the exhaust stack. This visual cue tells you that your fire has reached a state of clean, efficient combustion. In the process of smoking food, this specific type of smoke delivers the essential phenols and aromatic compounds that create a deep, complex flavour profile. Understanding how to achieve clean blue smoke is the primary difference between a meal that tastes like a stale campfire and one that tastes like a world-class smokehouse.
To better understand the visual difference between good and bad smoke, watch this helpful video:
Many beginners mistake heavy, billowing clouds for high-quality smoke. This is a critical error that ruins expensive cuts of meat. White smoke is a sign of incomplete combustion. It contains large carbon particulates and unburnt gases that haven’t reached their ignition temperature. When these particles hit your meat, they stick to the moisture on the surface. This creates a bitter, acrid taste that masks the natural flavour of the protein. A 2023 technical analysis of wood combustion showed that smoldering fires at temperatures below 280°C produce up to 45% more soot than fires burning at optimal thermal efficiency.
The Anatomy of Dirty Smoke
Identifying the colour of your exhaust is the first step in fire management. Billowing white smoke usually signals a fire that’s starved for oxygen. If the smoke turns yellow or grey, it’s an even bigger red flag. This often indicates that the wood is too “green” or wet, containing moisture levels well above the recommended 15% to 20% range. Thick, heavy smoke acts as a physical barrier on the meat. It prevents the chemical reaction between nitrogen dioxide and myoglobin. This is why dirty fires rarely produce a deep, clean smoke ring. The presence of creosote is the primary concern here. This chemical compound is thick and oily. It causes digestive discomfort and a distinct numbing sensation on the tongue.
The Flavour Goal: Clean Smoke vs. No Smoke
Some enthusiasts chase the “invisible smoke” myth. While clean heat is better than dirty smoke, you still want a hint of blue to ensure you’re actually seasoning the meat. If you see absolutely nothing, you might be cooking with heat alone, missing the unique character that premium hardwood provides. Your nose is your most reliable diagnostic tool at the pit. If the smoke smells sweet, like toasted wood or light incense, you’re on the right track. If it stings your eyes or smells like a burning tyre, your fire needs more airflow immediately. Learning how to achieve clean blue smoke requires patience and high-quality fuel. Creosote is the byproduct of incomplete wood combustion. Using premium natural charcoal and properly seasoned wood ensures your fire stays in the blue zone for the duration of your cook.
The Science of Combustion: Why Smoke Changes Colour
Mastering the pit requires a firm grasp of the fire triangle: fuel, heat, and oxygen. When these three elements find equilibrium, you get the thin blue smoke that professional pitmasters demand. If one element is out of sync, the quality of your cook suffers. Understanding this balance is the primary way to learn how to achieve clean blue smoke for every session. Most backyard cooks struggle because they focus only on the fuel, neglecting the physics of the burn itself.
Clean smoke is the result of nearly complete combustion. In this state, the fire consumes the wood gases efficiently, leaving behind minimal particulate matter. Thick, white smoke consists of large particles of unburnt fuel, water vapour, and soot. These particles are often larger than 1 micron in size. Blue smoke appears translucent because the particles are so small, usually less than 0.5 microns, that they scatter shorter wavelengths of light. This chemical transition is essential because it releases syringol and guaiacol, which are key to the science of smoke and flavor. Without reaching the correct thermal threshold, these flavour compounds remain trapped in heavy, bitter resins.
Temperature is the non-negotiable factor here. Wood doesn’t just burn; it goes through stages of thermal decomposition. To off-gas cleanly, your fuel source must reach internal temperatures between 300°C and 400°C. If your firebox stays below 250°C, the wood won’t reach the stage of high-efficiency combustion. You’ll end up with “dirty” smoke that deposits creosote on your brisket, leaving a numbing, metallic aftertaste. Using premium natural hardwood ensures your fire maintains the energy needed to stay in this clean-burning zone.
The Pyrolysis Process
Pyrolysis is the chemical decomposition of wood caused by heat in the absence of oxygen. Before the wood actually catches fire, it breaks down into gases and charcoal. This process begins around 200°C, but the “Sweet Spot” for the best-smelling smoke occurs between 340°C and 400°C. At these temperatures, the lignin in the wood breaks down into aromatic compounds that provide the classic BBQ profile. Smouldering wood is the enemy of quality. When wood smoulders at low temperatures, it releases nitrogen compounds and phenols that taste like acrid soot. You want a small, hot fire rather than a large, choked-down pile of logs.
Oxygen: The Secret Ingredient
Oxygen acts as the primary regulator for smoke clarity. If you choke the fire at the intake vents to lower the temperature, you create a “stale” environment. This lack of oxygen prevents the gases from burning off, forcing them out of the chimney as thick, white clouds. The relationship between draft and smoke velocity is simple. A taller chimney or a well-managed firebox creates a vacuum effect, pulling fresh air through the fuel.
- Air Intake: Keep it open enough to maintain a bright, active flame.
- Exhaust Velocity: A restricted exhaust vent traps bitter gases inside the cook chamber.
- Draft: Proper airflow ensures that gases spend only a few seconds in contact with the meat.
A restricted exhaust is a common mistake in Australian BBQ. Many beginners close the top damper to “hold the smoke in,” but this only creates a stagnant environment. Stagnant smoke cools down, condenses, and turns into creosote. You want a constant stream of fresh, moving air to carry the light, blue smoke across your food and out the stack at a steady velocity.
Master Your Fire: Practical Steps for Perfect Airflow
A clogged firebox is a dead fire. Before you even strike a match, you must clear out the remnants of your previous cook. Removing old ash is vital because a layer of just 2 centimetres of spent ash can restrict intake airflow by 30 percent. This restriction starves your coals of oxygen, leading to smouldering wood and bitter, creosote-heavy smoke. Start with a clean slate every single time to ensure the air moves freely from the intake to the chimney.
The “Small, Hot Fire” principle is the foundation of professional Texas-style BBQ. Many beginners make the mistake of tossing in a single, massive log to save time. This is a mistake. One large log, perhaps 15 centimetres in diameter, has less surface area than three smaller splits of 5 centimetres each. These smaller pieces ignite faster and burn hotter, which is exactly how to achieve clean blue smoke. You want active flames, not glowing logs that just sit there and off-gas.
Maintain an active coal bed in a “V” shape or a concentrated mound. This concentrated heat source acts as a furnace for any new fuel you add. When your coal bed is spread too thin, it loses the thermal mass required to ignite fresh wood instantly. You need that core temperature to stay high so the wood undergoes pyrolysis immediately rather than slowly baking and releasing thick white clouds.
- Clean the grate: Ensure the air holes in your firebox aren’t blocked by charcoal shards.
- Size matters: Cut your Ironbark or Red Gum splits to a uniform size, roughly the thickness of a drink can.
- Air path: Keep the path between the intake vent and the cook chamber opening clear of obstructions.
Managing the Intake and Exhaust
Stop fiddling with your exhaust vent. For the best results, leave your chimney wide open. This creates a strong “draw,” pulling oxygen through the firebox and pushing smoke out before it can become stale. Manage your cooking temperature at the intake vent instead. If you’re running too hot, reduce the intake by 25 percent and wait for the reaction. Don’t “set and forget” your vents during the first hour of a cook. You must actively monitor the fire as the metal in your smoker expands and the ambient Australian temperature shifts.
Follow the 10-minute rule. After adding a new split, wait exactly 10 minutes before you judge the smoke quality. It’s normal to see a brief puff of grey as the wood catches, but it should transition to that invisible blue tint quickly. Your visual cues are just as important as your thermometer. A steady flame height of 15 to 20 centimetres above the coal bed indicates you have enough oxygen for a clean burn. If the flames disappear and you see only glowing red, your airflow is likely too restricted.
The Preheating Secret
Cold wood is the enemy of quality BBQ. When you toss a room-temperature split onto a hot coal bed, it creates a massive temperature drop. This thermal shock is the primary cause of immediate white smoke. To prevent this, place your next two splits on top of the firebox or inside the warming rack if your offset smoker has one. This dries out any residual moisture and brings the internal temperature of the wood up to 50 or 60 degrees Celsius.
On a kettle grill, you can achieve a similar effect by placing your wood chunks on the indirect side of the grate for 15 minutes before moving them onto the charcoal. Preheated wood catches fire almost instantly. Wood should ignite within 60 seconds of touching the coal bed. This rapid ignition is a crucial step in how to achieve clean blue smoke consistently throughout a long 12-hour brisket cook. If it takes three minutes to catch fire, your wood is too cold or too wet, and your meat will suffer the consequences. Get it hot, keep it small, and keep that air moving.
The Fuel Factor: Why Quality Charcoal and Wood Matter
The secret to a perfect cook starts with what you put in the firebox. You can’t expect high-end results from low-grade fuel. To understand how to achieve clean blue smoke, you have to look at the moisture levels in your wood. Seasoned wood, which has a moisture content below 20%, is the only way to go. If your wood is green or damp, the fire spends all its energy evaporating water instead of combusting the wood fibers. This creates thick, white steam and bitter creosote that ruins your meat. Premium hardwoods like Ironbark and Red Gum provide the density needed for a sustained, clean burn.
Using 100% natural fuel is non-negotiable for serious pitmasters. Low-grade briquettes often contain chemical binders, sawdust, and fillers that produce a foul-smelling “chemical” smoke. This acrid air coats your food in a grey soot that tastes like kerosene. Avoid lighter fluids at all costs. These petroleum-based products linger in your smoker and destroy the natural fats of the meat. Stick to natural fire starters and high-quality lump charcoal to keep your flavour profile pure and professional.
Selecting the Right Australian Hardwoods
Ironbark is the gold standard for Australian low and slow BBQ. It’s incredibly dense, which means it burns hot and long without constant reloading. This density allows for a more controlled combustion, making it easier to maintain the steady temperatures required for blue smoke. While heavy hardwoods like Ironbark or Box provide a robust, traditional smoke, fruitwoods like Cherry or Apple offer a sweeter, milder profile. These are perfect for pork or poultry where you want the smoke to compliment, not overpower, the protein.
- Ironbark: High density, long burn time, subtle earthy flavour.
- Red Gum: High heat output, classic Australian BBQ aroma.
- Fruitwoods: Best used as chunks for shorter cooks or specific flavour notes.
If you don’t have a moisture meter at home, you can still test your wood. Seasoned wood is significantly lighter than green wood because the water has evaporated. Give two pieces a knock; a sharp “clink” like a baseball bat means it’s dry. A dull, heavy “thud” means it’s still too wet for the pit. Check the ends of the logs for small cracks, or “checking,” which is a clear sign the wood has been properly seasoned for at least 12 months.
Lump Charcoal vs. Briquettes
Lump charcoal is the ultimate heat foundation. It’s 100% natural wood that’s been carbonized in a kiln, leaving behind pure carbon. Because it’s irregular in shape, it allows for superior airflow compared to uniform briquettes. Better airflow means your fire can breathe, which is essential for how to achieve clean blue smoke. Lump charcoal also produces roughly 70% less ash than standard briquettes. High ash buildup is a silent killer; it chokes the oxygen supply and forces your fire to smolder, creating that dreaded dirty smoke.
For those searing at extreme temperatures, Binchotan is a specialized high-carbon charcoal that burns at over 1000 degrees Celsius. It’s virtually smokeless and scentless, providing a clinical, high-heat environment for clean grilling. While standard lump is better for smoking, having a versatile fuel source ensures you’re ready for any cook. High-quality fuel isn’t just an expense; it’s an investment in the final taste of your brisket or ribs. Don’t settle for supermarket scraps when you’re aiming for championship-level results.
Get Sizzlin’ with the right gear. Using premium hardwood lump ensures your fire stays hot and your smoke stays blue. When your fuel is clean, your food is better. It’s that simple.
Troubleshooting Dirty Smoke: Common Pitfalls and Fixes
Hitting a steady 110°C on your digital probe doesn’t guarantee a perfect cook. Many pitmasters reach their target temperature only to find thick, billowing white clouds pouring from the exhaust stack. This is “dirty smoke,” and it’s the result of incomplete combustion. You’re essentially seasoning your meat with soot and ash. If your wood won’t ignite without the firebox door standing wide open, you have a draft problem. The fire is starving for oxygen. This usually happens because the chimney isn’t pulling enough air through the intake. To fix this, ensure your exhaust vent is 100% open. You shouldn’t control heat by choking the exhaust; you must control it at the intake to maintain a healthy flow.
For kettle grill users in Australia, the method of fuel arrangement dictates the smoke quality. The Minion Method involves placing lit coals on top of a pile of unlit ones, which works well in vertical smokers or Weber Smokey Mountains. However, for a standard 57cm kettle, the Snake Method is superior for learning how to achieve clean blue smoke. By arranging briquettes in a double-stacked semi-circle and lighting only one end, you ensure that only a small amount of fuel burns at any given time. This prevents the “flashover” effect where too much fuel ignites simultaneously, leading to a spike in temperature and a drop in smoke quality.
- White Smoke: Indicates the fire is too cold or lacks oxygen. Open the intake vents.
- Blue Smoke: The goal. Indicates the wood is gassing off and burning cleanly.
- Yellow/Grey Smoke: This is the worst kind. It means your wood is smouldering or your smoker is filthy. Stop the cook and fix the fire.
The Over-Fueling Trap
Adding too much charcoal at once is a common error that kills your oxygen-to-fuel ratio. When you dump a fresh chimney of cold fuel onto a small bed of coals, the temperature drops instantly. The fire begins to smoulder as it struggles to ignite the new mass. If your fire goes cold and starts producing white clouds, don’t just wait. Use a set of bellows or a high-powered torch to force oxygen into the base of the fire. Always establish a red-hot coal bed for at least 35 minutes before adding your first piece of smoking wood or your meat.
Smoker Maintenance for Better Flavour
A greasy smoker produces “off” flavours that ruin expensive cuts of meat. Over time, grease and soot create creosote, a thick, black, bitter substance. If you see a 2mm layer of shiny gunk on your chimney walls or the inside of your lid, it’s time for a deep clean. This residue can flake off or drip onto your food during 12-hour cooks. Run a “burn-off” at 260°C after every five sessions to carbonise old fat and sugar. This ensures the only thing flavouring your meat is the premium hardwood you’ve selected. Clean equipment is essential for anyone trying to master how to achieve clean blue smoke consistently.
Maintaining your gear is just as important as the fuel you choose. Using the right accessories can make the difference between a frustrated afternoon and a successful low and slow session. Get Sizzlin’ with the right tools and accessories from Charcoal Kings!
Fire Up for Your Best BBQ Yet
Mastering the fire is a skill that separates the backyard hobbyist from the seasoned pitmaster. You now understand that precise airflow management prevents the thick, white smoke that ruins a good cut of meat. You also know that combustion science depends entirely on maintaining a hot, stable coal bed. Learning how to achieve clean blue smoke ensures your BBQ has that light, sweet timber flavor every single time. It’s the difference between a meal that’s merely edible and one that wins competitions.
Don’t waste a 12 hour cook on inferior fuel that produces acrid soot and bitter flavors. Professional Australian pitmasters rely on 100% natural hardwood because it contains zero chemicals and burns at a consistent, high heat. We provide fast Australia-wide shipping to ensure you’re always ready for the next cook, whether you’re feeding the family or catering a large event. Take control of your pit today and see the difference that premium fuel makes.
Upgrade your fuel to Charcoal Kings Premium Hardwood for the cleanest smoke possible.
Get Sizzlin’!
Frequently Asked Questions
Is blue smoke better than white smoke for BBQ?
Blue smoke is superior to white smoke because it indicates complete combustion and cleaner flavour. Thick white smoke contains high levels of creosote and soot that leave a bitter, medicinal taste on your meat. Thin blue smoke consists of microscopic particles that penetrate the food without overpowering it. This ensures your brisket or ribs taste like premium hardwood rather than an ash tray.
How long does it take to get blue smoke after lighting the fire?
Expect to wait 30 to 45 minutes after lighting your charcoal to see that faint blue tint. Your smoker needs to reach a steady internal temperature and the wood must reach its auto-ignition point of roughly 300 degrees Celsius. Don’t rush the process by putting meat on early. Wait for the heavy white clouds to dissipate and the air coming from the stack to look almost clear.
Can I get blue smoke in an electric or pellet smoker?
You can achieve clean blue smoke in pellet or electric smokers by using high-quality, 100% natural hardwood pellets. These units are designed for efficient combustion, meaning they often produce very little visible smoke once they reach the set temperature. If you see thick clouds, your pellets might be damp or the fire pot is restricted by ash. Keep your burn pot clear to maintain the right airflow.
Why is my BBQ smoke grey or black?
Grey or black smoke indicates your fire is starved of oxygen or burning at an insufficient temperature. This incomplete combustion creates carbon-heavy exhaust that ruins food. Open your intake vents by 25 percent to increase airflow immediately. Ensure you aren’t using wood with a moisture content above 20 percent, as wet wood smoulders rather than burns, producing that acrid, dark soot.
Does the type of wood affect how easy it is to get blue smoke?
Denser hardwoods like Ironbark or Red Gum require more heat to reach the clean-burning stage compared to lighter fruitwoods. Using seasoned wood with a moisture level between 10 and 15 percent makes it much easier to learn how to achieve clean blue smoke. Softwoods or unseasoned timber contain resins and sap that produce heavy, bitter smoke regardless of how much oxygen you provide.
Should I soak my wood chips or chunks in water before smoking?
Never soak your wood chips or chunks in water before a cook. Soaking wood lowers the combustion temperature and creates steam rather than smoke. This steam carries impurities and forces your fire to work harder to evaporate the moisture before it can actually burn. Use dry, premium natural hardwood to ensure a clean, consistent burn from the moment you start your session.
What is the best temperature to achieve thin blue smoke?
The optimal range for thin blue smoke is between 107 and 135 degrees Celsius. At these temperatures, the wood volatiles ignite properly without burning too fast. Maintaining a steady 121 degrees Celsius is often the sweet spot for most offset smokers. This heat level provides enough energy to keep the fire clean while slowly rendering fat in your meat.
How do I maintain blue smoke during a 12-hour brisket cook?
Maintain blue smoke during long cooks by adding small, pre-heated wood splits every 45 to 60 minutes. Adding cold wood can drop the firebox temperature by 10 or 20 degrees, causing a temporary spike in dirty smoke. Learning how to achieve clean blue smoke over 12 hours requires managing your coal bed. Keep a 5 centimetre layer of glowing embers to ignite new fuel instantly. Get Sizzlin’!