
Fighting your Weber Kettle to hold a stable, low temperature is a common frustration. Charcoal burns out too quickly on long cooks, and the risk of ruining a premium cut of meat is high. This uncertainty prevents many from achieving true low-and-slow barbecue. There is a better way. The snake method for weber kettle is the most reliable technique for transforming your classic grill into a precision smoker, delivering consistent heat and clean smoke for hours on end.
This is the definitive guide to mastering that method. Here, you will learn the exact process for setting up a flawless charcoal snake for a 6 to 12-hour smoke session. We provide the expert knowledge to control your vents and lock in a steady 110-135°C cooking temperature. Forget guesswork. Gain the confidence to produce perfectly cooked ribs, pulled pork, and brisket with a professional-quality smoke flavour, every single time.
Key Takeaways
- The snake method transforms your Weber Kettle into a genuine low-and-slow smoker, delivering stable temperatures for hours without constant attention.
- Follow our step-by-step guide to build the perfect snake method for weber kettle, ensuring a predictable and steady burn for your entire cook.
- Mastering your vents is the secret to temperature control. Learn why the bottom vent is your accelerator and how to use it for rock-solid heat management.
- Quickly identify and fix common problems like temperature spikes or the snake burning out, ensuring you produce perfectly smoked meat from your very first attempt.
What Is the Snake Method and Why Is It Perfect for Your Kettle?
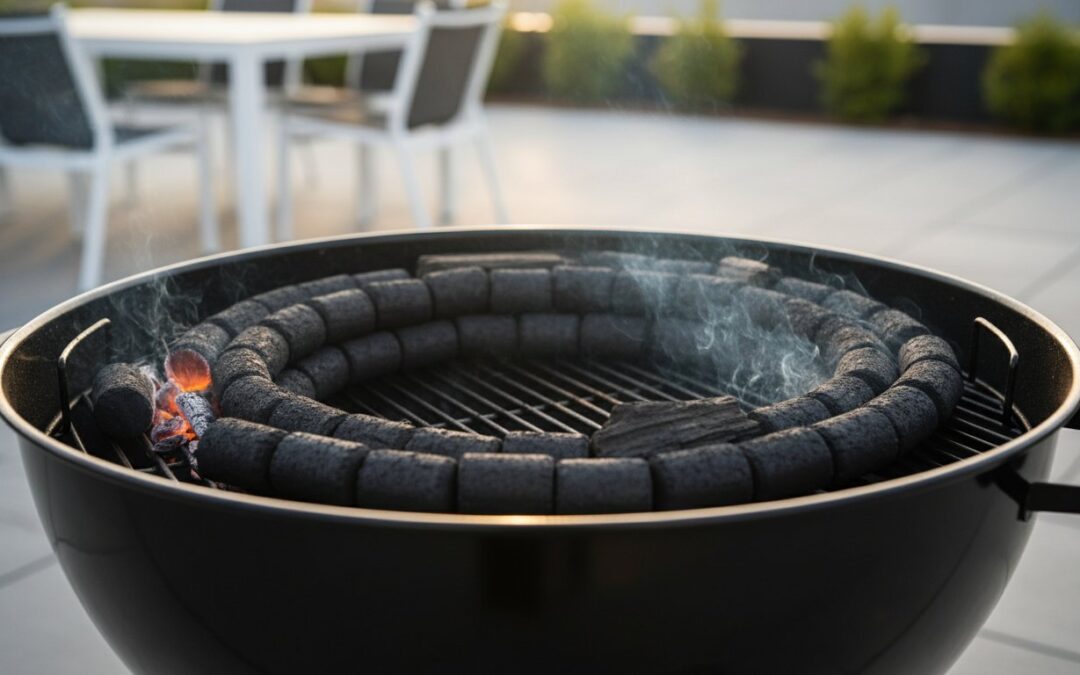
The snake method is a charcoal arrangement technique designed for long, low-temperature cooking. It transforms your classic Weber Kettle into a highly efficient smoker. The concept is simple: you arrange a chain of unlit charcoal briquettes, typically two-by-two, around the inside edge of the grill. This chain acts like a slow-burning fuse. You start by placing a few lit coals at one end, which then sequentially ignite their neighbours over many hours. This process delivers exceptional temperature stability, making the snake method for weber kettle a masterclass in fuel efficiency and control.
To see this low-and-slow technique in action, watch this detailed guide:
Unlike a standard two-zone fire built for high-heat roasting or searing, the snake is purpose-built for smoking. It provides a much longer, more stable burn than the Minion Method, where lit coals are placed on top of a pile of unlit fuel. While there are many different grilling methods, the snake’s predictable, fuse-like ignition provides a hands-off experience. The primary benefits are clear: superior fuel efficiency, burn times exceeding 8-10 hours on a single load of quality briquettes, and rock-solid temperature stability for perfect results every time.
The Main Advantages of Using the Snake
This method delivers serious performance without needing expensive equipment. It is the key to unlocking your kettle’s full potential.
- Turns any Weber Kettle into a capable smoker. Produce authentic, wood-fired barbecue on the grill you already own.
- Requires no expensive accessories. Achieve precise temperature control without costly electronic controllers.
- Extremely consistent heat. It offers genuine ‘set it and forget it’ cooking for hours on end.
- Ideal for classic low-and-slow cuts. Perfectly suited for cooking brisket, pork butt, and ribs to tender perfection.
When to Choose the Snake Method
The snake method is a specialised technique. It excels in specific scenarios where other fuel setups fall short.
- For any cook longer than 3 hours. This is where its fuel efficiency and stability truly shine.
- When you need precise temperature control below 150°C (300°F). It maintains a low, steady heat ideal for smoking.
- Excellent for overnight cooks. Set it up and rest easy, knowing you won’t need to refuel until morning.
- Less ideal for high-heat searing or quick grilling. For that, a standard two-zone fire is the superior choice.
Essential Gear and Fuel: Setting Up for Success
To master the snake method for weber kettle, you don’t need an arsenal of expensive equipment. The foundation is simple: a classic Weber Kettle or a similar round charcoal grill. Its iconic shape is perfect for creating the indirect heat zone this technique requires. However, precision is key for low-and-slow cooking, and that’s where a few critical tools make all the difference.
Your most important investment beyond the grill is a quality dual-probe digital thermometer. One probe monitors the ambient temperature at grate level, while the other tracks the internal temperature of your meat. This real-time data is non-negotiable for achieving consistent results. Experts agree that stable temperature is the primary goal, a fact confirmed in extensive testing the snake method for reliability. Other highly recommended accessories include:
- Chimney Starter: For lighting your initial briquettes cleanly and efficiently without lighter fluid.
- Long Tongs: Essential for safely arranging charcoal and wood chunks.
- Heat-Resistant Gloves: Protect your hands when handling a hot grill lid or chimney starter.
Finally, a simple foil pan filled with water, placed in the centre of the charcoal grate, acts as a heat sink. It helps stabilise the grill’s internal temperature and adds moisture to the cooking environment, preventing your meat from drying out over a long cook.
Choosing Your Fuel: Briquettes vs. Lump Charcoal
The fuel you choose directly impacts the performance of your snake. For this method, high-quality briquettes are the superior choice. Their uniform size and shape ensure a predictable, steady, and long-lasting burn. While lump charcoal can be used, its irregular pieces make it difficult to build a consistent snake, leading to temperature spikes. Always use premium, natural briquettes made without chemical binders, which can produce an acrid, unpleasant flavour. For a reliable burn every time, try our Premium Charcoal Briquettes.
Selecting and Placing Smoking Woods
Authentic barbecue flavour comes from smoke. For the long, slow burn of the snake method, use wood chunks, not chips. Chips burn too quickly and offer little value. Place 3-5 fist-sized chunks along the first third of the snake, resting them directly on top of the briquettes. As the snake burns, it will ignite the chunks sequentially, providing hours of consistent smoke. Do not soak your wood; dry wood smoulders correctly and produces a clean, thin blue smoke, which is exactly what you want. Match your wood to your meat-fruitwoods like cherry or apple for pork and poultry, and stronger woods like hickory or ironbark for beef.
Building the Perfect Snake: A Step-by-Step Visual Guide
Mastery of the snake method for weber kettle begins with a precise and consistent setup. There are no shortcuts here. A well-built snake is the foundation for a successful low-and-slow cook, delivering stable temperatures for hours. Start with a clean Weber kettle and an empty charcoal grate to ensure optimal airflow and a predictable burn. Follow these steps exactly for reliable results every time.
Step 1: Constructing the Charcoal Chain
The structure of your snake determines its performance. We use the proven ‘2×2’ arrangement for a steady, long-lasting burn. Place two briquettes side-by-side on the charcoal grate, then place another two directly on top of them. Continue this pattern, overlapping each new set of four briquettes by about half, similar to a line of dominoes. Extend this chain halfway to three-quarters of the way around the grate’s perimeter. A longer snake provides a longer burn time; a half-circle is ideal for cooks up to 6 hours, while a three-quarter snake can push 8-10 hours with quality briquettes.
Step 2: Adding Wood and the Water Pan
With the charcoal chain built, it’s time to introduce smoke and moisture. Place 3-4 chunks of your preferred smoking wood directly on top of the first few inches of the snake-the end you intend to light. This ensures you get quality smoke flavour from the very beginning of the cook. Next, take a disposable aluminium foil pan and fill it halfway with warm water. Placing it in the empty space inside the curve of your snake will help regulate the kettle’s temperature and add moisture to the cooking environment, preventing your meat from drying out.
Step 3: Lighting the Fuse and Preheating
Do not light the entire snake. The goal is a slow, gradual burn. Use a chimney starter to light just 8-12 briquettes. Once they are fully lit and covered in a layer of white ash, carefully place them at the very beginning of your snake, nestled against the first unlit briquettes. This “fuse” will slowly ignite the rest of the chain. This controlled start is crucial for temperature stability. In-depth analysis, like this Testing the Snake Method from Barbecue Bible, demonstrates just how effective this gradual ignition is. Place the main cooking grate in position, put the lid on, and ensure the top and bottom vents are about half-open. Allow 20-30 minutes for the temperature to climb and stabilize in your target 110-125°C (225-250°F) range before adding your meat.
Mastering Temperature Control: Vents, Water, and Weather
Once your snake is lit, your job shifts from builder to operator. Consistent temperature control is the most crucial skill for low-and-slow barbecue, and it’s what separates good results from great ones. The snake method for weber kettle makes this incredibly manageable by turning your vents into precise dials for your fire.
Think of it this way: the bottom vent controls oxygen intake-it’s your accelerator. The top vent controls the exhaust, drawing heat and clean smoke across your food. The golden rule is patience: always make small adjustments and wait at least 15 minutes to see the effect before adjusting again.
Setting Your Vents for 110-135°C (225-275°F)
For the target low-and-slow temperature range, your vent settings are simple. Start with the bottom intake vent open about 25%, roughly the width of a pencil. The top exhaust vent should always remain at least 50% open to ensure proper airflow and prevent bitter smoke from settling on your meat. To raise the kettle’s temperature, open the bottom vent slightly more. To lower it, close the bottom vent a fraction. The top vent is largely a set-and-forget control in this method.
The Role of the Water Pan
A simple aluminium pan filled with water is a non-negotiable tool for the snake method. It serves three critical functions:
- Heat Sink: The water absorbs and radiates heat, creating a stable and even thermal environment inside the kettle. This helps prevent drastic temperature spikes.
- Moisture: As the water evaporates, it adds humidity to the cooking chamber. This helps keep your meat from drying out over a long cook and assists in forming a better bark.
- Drip Tray: It catches fat drippings, preventing them from hitting the hot coals and causing flare-ups or acrid, unpleasant smoke.
On very long cooks (8+ hours), check the water level and carefully top it up with boiling water if it gets low.
Adjusting for Wind and Cold
The Aussie weather can be unpredictable, and it directly impacts your kettle. Wind is your biggest variable; it can act like a bellows, forcing extra oxygen into the bottom vent and causing your temperature to spike. The solution is simple: position your kettle so the bottom vents are shielded from the direct wind. In cold weather, your kettle will radiate more heat. You may need to start with a few extra lit briquettes or run your bottom vent slightly more open. A full snake will also burn faster in the cold, so be sure you’re using a quality, long-burning fuel like our premium hardwood briquettes to go the distance.
Common Snake Method Mistakes and How to Fix Them
Even the most seasoned pitmasters run into trouble. A live fire is a dynamic element, but don’t get discouraged. Most issues that arise when using the snake method for a Weber Kettle are simple to diagnose and even simpler to correct. Think of this as your guide to getting any cook back on track. With a few minor adjustments, you’ll maintain perfect temperature control for hours.
Problem: My Temperature is Too High
The Cause: A runaway temperature is almost always due to too much oxygen or too much initial fuel. This can happen from having the vents wide open, a windy day forcing air into the kettle, or a poorly seated lid.
The Solution: Act quickly to starve the fire of oxygen.
- Close the bottom vent to a tiny sliver, almost completely shut. Give it 15-20 minutes to respond.
- Ensure the lid is on tight with no major gaps. A proper seal is critical for temperature management.
- If you’ve just started the cook, use long tongs to carefully remove a few of the lit briquettes.
Problem: My Temperature is Too Low
The Cause: The fire is struggling, likely from a lack of oxygen, not enough lit coals to start, or ash buildup smothering the lit briquettes.
The Solution: Gently introduce more air to feed the fire.
- Open the bottom vent slightly wider, about a quarter of the way. Make small adjustments and wait to see the effect.
- Give the side of the kettle a few firm taps with your hand. This helps dislodge ash from the charcoal grate, allowing air to flow freely.
- Check that your top vent is not blocked by grease or debris and is at least half open.
Problem: The Snake Went Out
The Cause: A dead snake is frustrating but fixable. The chain reaction has been broken, usually because briquettes were spaced too far apart or because ash has completely smothered the burning coals.
The Solution: The goal is to re-establish the chain of burning fuel.
- Use tongs to carefully check the lit end of the snake for heavy ash buildup and clear it away.
- Light another 5-6 briquettes in a chimney starter and, once ashed over, place them at the lit end of the snake to get it going again.
- This issue often highlights fuel quality. For a reliable, long-lasting burn, always start with premium, dry hardwood briquettes that burn consistently with less ash.
Master the Snake and Unleash Your Kettle’s Potential
You now have the complete blueprint to transform your classic Weber Kettle into a precision low-and-slow smoker. Mastering the snake method for weber kettle isn’t just a technique; it’s a game-changer that unlocks hours of stable, predictable heat for incredible results. By carefully constructing your charcoal fuse, mastering your vent adjustments, and avoiding those common pitfalls, you have total control over your cook. From tender pulled pork to a perfectly smoked brisket, your kettle’s potential is now fully realised.
A world-class technique demands world-class fuel. The foundation of any memorable smoke is the quality of your charcoal-it dictates the heat, the flavour, and the consistency of your cook. Fuel your success with the same premium, 100% natural hardwood charcoal trusted by competition BBQ teams and restaurants across the country. With Australia-wide delivery, getting the best for your BBQ is simple. Shop our premium briquettes and lump charcoal to fuel your next smoke.
Now go on, build that perfect snake and Get Sizzlin’!
Frequently Asked Questions
How long does the snake method last in a Weber Kettle?
A correctly built snake method for a Weber kettle provides a long, stable burn. Using a standard 2×1 briquette arrangement in a 57cm kettle, expect a burn time of 8 to 12 hours. The exact duration depends on the quality of your fuel and your target temperature. Premium, natural briquettes deliver the most consistent performance and longest burn times, ensuring you don’t have to refuel during a critical cook. This method is built for endurance.
Can I use the snake method with lump charcoal instead of briquettes?
Briquettes are the superior fuel for the snake method. Their uniform shape creates a predictable and steady burn, which is essential for low-and-slow cooking. While lump charcoal can be used, its irregular sizing makes building a consistent snake difficult, leading to temperature spikes and drops. For reliable results and stable heat management, we always recommend using high-quality briquettes. They provide the control needed for mastering this technique.
What is the best temperature to maintain for the snake method?
The optimal temperature range for the snake method is between 110°C and 135°C (225°F to 275°F). This zone is perfect for rendering fat and breaking down connective tissue in classic low-and-slow cuts like brisket and pork butt. Maintain this temperature by making minor adjustments to the top and bottom vents on your kettle. Precision is key; small changes prevent major temperature swings over the long duration of the cook.
Do I need to add more charcoal during a long cook?
No. The primary advantage of the snake method is its set-and-forget nature. A well-constructed snake using premium briquettes is designed to last for an entire 8-12 hour cook without needing more fuel. Interrupting the cook to add charcoal can cause temperature fluctuations and release valuable heat and smoke. Build your snake to the appropriate length for your cook from the start and let the kettle do the work.
How do I set up the food on the grate for the snake method?
Position your meat on the cooking grate opposite the lit end of your charcoal snake. This is the fundamental principle of indirect cooking, protecting the meat from direct flame. Below the meat, on the charcoal grate, place a foil pan filled with water. This water pan acts as a heat sink to stabilise the kettle’s temperature and adds crucial moisture to the air, preventing your food from drying out during a long smoke.
Should the lid vent be over the food or over the fire?
The lid vent must be positioned over the food, not the fire. This placement is critical for proper airflow and smoke flavour. It pulls the hot air and smoke from the burning end of the snake, across the surface of the meat, and then out of the kettle. This ensures your food is evenly cooked and thoroughly smoked. Placing the vent over the fire would simply exhaust the heat and smoke immediately, bypassing the food entirely.