

You’ve just unboxed your brand-new smoker-a serious piece of kit ready for some low-and-slow action. But before you even think about that first brisket, there’s a crucial step that separates the pros from the amateurs. Get it wrong, and you risk a first cook that tastes of chemicals or, worse, find your new investment starting to rust after just a few sessions. That’s why understanding how to season a new smoker Australia-style isn’t just a suggestion; it’s the essential first mission for any new pitmaster.
Forget vague manufacturer pamphlets. This is your definitive, no-nonsense guide. We’ll show you exactly how to burn off manufacturing residues, build a protective, non-stick patina, and create the perfect foundation for incredible, clean smoke flavour. Follow our simple checklist to protect your smoker, guarantee amazing results from your very first cook, and ensure your new gear lasts for years of premium BBQ. Let’s get it done right.
Key Takeaways
- Seasoning is a non-negotiable first step that protects your smoker from rust and burns off manufacturing residues, guaranteeing better flavour from day one.
- Our definitive guide on how to season a new smoker Australia provides a clear, step-by-step process to achieve a perfect, protective cure on your first attempt.
- Discover the common mistakes beginners make, such as using the wrong oil or incorrect temperatures, and learn the pro techniques to get it right the first time.
- The seasoning process has important nuances depending on your equipment; we cover the specific adjustments needed for offset, pellet, and kamado smokers.
Why Seasoning Your New Smoker is a Non-Negotiable First Step
You’ve just unboxed your new smoker, and the temptation to fire it up for its first cook is massive. But hold on. The single most important thing you can do for your smoker’s longevity and the quality of your BBQ is to season it first. Think of it like seasoning a new cast iron pan; it’s a crucial, one-time process that creates a protective foundation for years of incredible flavour. Skipping this step is a fast track to rust and food tainted with a harsh, chemical taste. Getting this right is a core part of the process for how to season a new smoker in Australia.
For a visual guide on getting your smoker ready for a low and slow burn, this video is a great starting point:
Burning Off Manufacturing Residue
From the factory floor to your backyard, your new smoker has collected a range of contaminants. The initial seasoning burn is designed to eliminate these unwanted residues, which can include machine oils, solvents, dust, and fumes from curing paint. Burning these off at a high temperature sterilises the cooking chamber and ensures the only thing flavouring your brisket is the smoke you create, not a harsh chemical aftertaste.
Creating a Protective, Rust-Proof Barrier
The real magic of seasoning happens when oil meets heat. By coating the interior surfaces with a high-smoke-point oil and running the smoker for several hours, you create a hard, black, polymerised layer known as a patina. This slick surface seals the raw steel from oxygen and moisture-the two key ingredients for rust. This is, without question, the most effective way to protect your investment and prevent corrosion from taking hold inside your smoker.
Priming Your Smoker for Perfect Flavour
A brand-new smoker has a sterile, metallic smell that can transfer to your food. The seasoning process replaces this with a neutral, smoky foundation. This initial layer of smoke particles adheres to the newly formed patina, starting the flavour build-up that all great smokers have. Every cook from here on will add to this base, deepening the flavour profile and contributing to that authentic barbecue taste. This initial cure is a fundamental part of mastering the process of smoking food and setting your gear up for success.
The Pitmaster’s Toolkit: Gear You’ll Need to Get Started
Before you fire up that new rig, a little preparation goes a long way. Think of this as your pre-flight checklist. Assembling your gear beforehand ensures the entire process is smooth, efficient, and uninterrupted. Proper preparation is the foundation of good barbecue and aligns with fundamental food safety guidelines for smoking, ensuring your equipment is ready for a clean, safe cook from day one. Getting this right is a crucial step when learning how to season a new smoker in Australia.
Cleaning Supplies
First, you need to remove any manufacturing residue. Your smoker must be spotless before applying oil. Don’t overcomplicate it; basic household items are all you need.
- Mild Dish Soap and Warm Water: To cut through any protective oils, grease, or dust from the factory floor.
- A Non-Abrasive Sponge or Clean Rags: To wash down all interior surfaces without scratching the metal.
- Paper Towels: Essential for thoroughly drying every part of the smoker before the next step.
The Right Type of Oil
The goal is to create a protective, non-stick layer inside your smoker. This requires a cooking oil with a high smoke point, meaning it can withstand high temperatures without burning and creating bitter, acrid flavours.
- Ideal Oils: Canola oil, grapeseed oil, sunflower oil, or even traditional lard are excellent choices. Avoid oils with low smoke points like extra virgin olive oil.
- Application: A spray can of your chosen oil provides the easiest and most even coverage. Otherwise, apply a thin, even coat using paper towels. You want a light sheen, not a dripping mess.
Quality Fuel and Smoking Wood
The heat source you use for seasoning is just as important as the one you use for cooking. You are building the foundational flavour profile of your smoker, so start with a clean, natural fuel source.
You’ll need a full chimney starter of premium, natural lump charcoal. Briquettes often contain binders and chemical additives that can impart an off-taste, which is the last thing you want baked into your new pit. Natural charcoal burns hotter and cleaner. For a touch of authentic smoke flavour, add a couple of chunks of a mild smoking wood like apple or cherry once the smoker is up to temperature. Choose a natural lump charcoal for a clean, chemical-free burn.
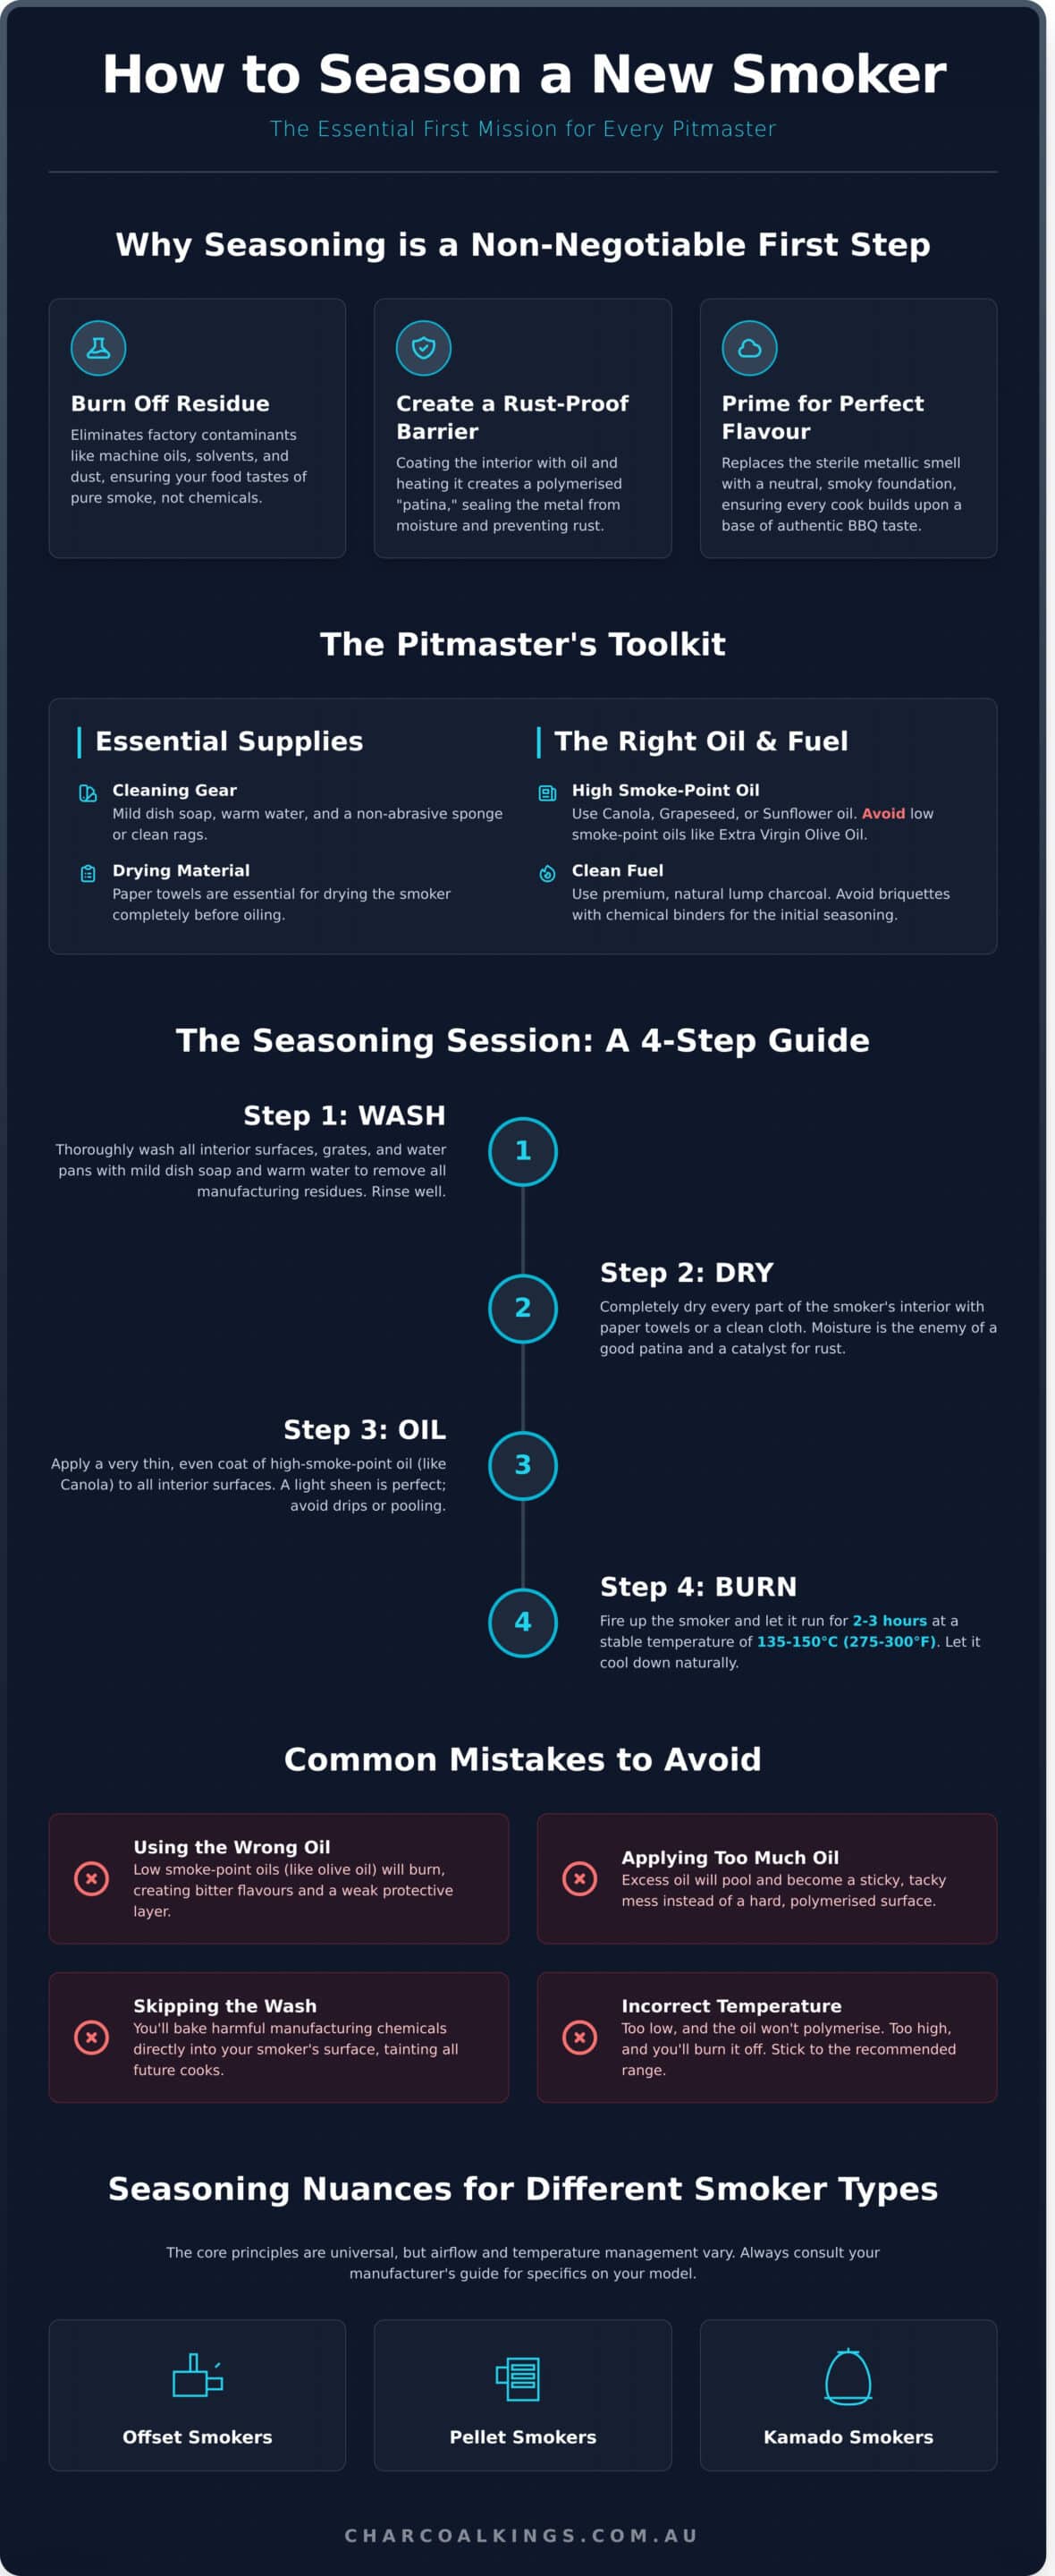
The Seasoning Session: A Step-by-Step Guide
Now for the main event. This is the core of learning how to season a new smoker in Australia, but don’t be intimidated. The process is straightforward and mostly hands-off. Think of it as a simple ‘set and forget’ task that pays massive dividends in flavour and performance down the track. Follow these steps precisely for a perfectly cured smoker.
Step 1: The Initial Clean-Out
Your smoker arrives with residual oils, dust, and solvents from the manufacturing process. These must be removed completely before you introduce heat or food. Get this done right, and you’re building on a clean foundation.
- Remove everything: Take out all internal components like grates, water pans, and hooks. Strip away every last bit of packaging, zip ties, and stickers from both the interior and exterior.
- Wash thoroughly: Using warm, soapy water and a basic sponge, wash all interior surfaces. This includes the grates, the inside of the lid, and the main chamber walls.
- Rinse and dry: Rinse all soap residue away with clean water and let the smoker air dry completely. You can speed this up with a lint-free towel, but air drying is best to ensure no moisture is trapped.
Step 2: Applying a Thin Coat of Oil
With the smoker clean and dry, it’s time to apply the polymerizing oil. The key here is moderation. You are applying a microscopic layer, not basting a roast. A thin coat is all you need to create a protective, food-safe surface.
Using a paper towel or a lint-free cloth, lightly coat all interior surfaces with your chosen high-smoke-point oil. Don’t forget the inside of the lid, the walls, and the firebox. The goal is a light sheen, not a dripping, oily mess. Too much oil will result in a sticky, uneven finish.
Step 3: Firing Up and Stabilising Temperature
It’s time to introduce heat. Your goal is a consistent, low-to-medium temperature that will allow the oil to bake onto the steel without burning off. Precision here sets the stage for a perfect cure.
- Light your fuel: Get a chimney of quality lump charcoal lit and wait for the coals to be fully ashed over.
- Set the temp: Pour the hot coals into the firebox. Assemble your smoker and adjust the vents to bring the temperature up to a stable 120-150°C (250-300°F).
- Stabilse: Let the smoker sit at this target temperature for 15-20 minutes to ensure the heat is even and consistent before moving on.
Step 4: Adding Smoke and Curing the Patina
This final step is where the magic happens. The combination of heat and smoke will polymerize the oil, creating the hard, protective patina you’re after. During this phase, the interior of your smoker will slowly transform from dull grey metal to a dark, semi-glossy black. This is the non-stick, rust-proof barrier you want.
Once the temperature is stable, add a few chunks of smoking wood to the hot coals. Close the smoker and let it run for 2-3 hours, making minor vent adjustments as needed to stay in the 120-150°C (250-300°F) range. This process transforms the liquid oil into a solid layer; if you want to understand the science of seasoning, it’s the same principle used for cast iron cookware. After a few hours, simply shut all the vents and let the fire extinguish naturally.
Common Mistakes to Avoid When Seasoning (And How to Fix Them)
Getting the seasoning right from day one sets your smoker up for a lifetime of performance. Knowing what not to do is just as important as the steps themselves. When you’re figuring out how to season a new smoker australia, avoiding these common errors is half the battle. Think of this as the pro checklist to guarantee a perfect result.
Mistake 1: Using the Wrong Oil
Problem: Reaching for any old oil from the kitchen, especially low-smoke-point oils like extra virgin olive oil or butter.
Result: These oils simply can’t handle the heat. They will burn and produce a foul, bitter smoke that will taint your smoker from its very first run. Instead of creating a hard, protective layer, you’ll be left with a sticky, useless coating that fails to protect the metal and can flake off into your food on future cooks.
Solution: Stick to the script. Use a neutral, high-smoke-point oil. Canola, grapeseed, sunflower, or rice bran oil are all excellent, affordable choices. These oils polymerise cleanly, creating the durable, non-stick surface you’re after.
Mistake 2: Getting the Fire Too Hot
Problem: Running the smoker at high grilling temperatures (200°C and above), thinking that hotter and faster is better.
Result: Extreme heat will incinerate the oil before it has a chance to bond with the metal and polymerise. You’ll burn the coating straight off, leaving behind a flaky, sooty mess instead of a sleek, black patina. It’s the equivalent of trying to slow-cook a brisket in a blast furnace-it just doesn’t work.
Solution: Low and slow is the name of the game. Keep your smoker’s temperature stable within the 120-150°C range. This is the ideal environment for the oil to undergo its chemical transformation into a hard, protective shell. Using quality, consistent fuel like our natural lump charcoal makes managing this temperature range straightforward.
Mistake 3: Applying Too Much Oil
Problem: A common beginner mistake is thinking ‘more is more’ and slathering on a thick, heavy layer of oil.
Result: Excess oil won’t cure properly. It will pool in corners, drip, and bake into a tacky, uneven surface that feels sticky to the touch. This flawed coating will trap dust and is prone to flaking off during your first real cook, defeating the entire purpose of seasoning.
Solution: Aim for a micro-thin layer. The process is simple: apply the oil, then grab a clean, lint-free cloth and wipe it all off as if you applied it by mistake. The barely-visible sheen that remains is the perfect amount. This is a crucial detail in learning how to season a new smoker australia-wide.
Seasoning Nuances for Different Smoker Types
The fundamental goal of seasoning is the same for every smoker: to create a protective, flavour-enhancing patina. However, the best application method varies based on your smoker’s construction. Understanding these differences is a critical part of knowing how to season a new smoker in Australia, ensuring you get peak performance from your specific gear from the very first cook.
While the core steps of cleaning, oiling, and heating apply universally, here are the specific adjustments for the most popular smoker types on the Aussie market.
For Offset Smokers
Offsets have a large surface area of raw steel that needs a solid, protective coating. Pay extra attention to oiling not just the main cooking chamber, but also the internal components that see the most intense heat and airflow.
- Baffle and Tuning Plates: These manage heat and smoke flow. A thorough coat here prevents rust and helps create a non-stick surface.
- Firebox Interior: Give the inside of the firebox a good wipe-down with oil.
- Connection Point: Ensure the throat or opening between the firebox and cook chamber is well-coated.
Consistent temperature is key for an even cure. Managing your fire with a reliable fuel source, like our premium lump charcoal, will provide the steady heat needed for a perfect seasoning run.
For Kamado / Ceramic Smokers
The porous ceramic interior of a kamado (like a Big Green Egg or Kamado Joe) seasons differently. It will absorb smoke and fats over time, building its own natural patina. You do not need to heavily oil the ceramic walls.
Instead, focus your oil application on the metal parts: the cooking grates, any cast iron plates, and the heat deflector. The most important rule with ceramic is to bring the temperature up slowly. Rushing the heat can cause thermal shock, potentially cracking the ceramic. A slow, gentle climb to your target temperature is the safest and most effective method.
For Pellet Grills
For pellet grills, your first step is non-negotiable: follow the manufacturer’s initial ‘burn-in’ or ‘start-up’ procedure detailed in your manual. This is not the same as seasoning.
This process typically involves running the grill at a high temperature (often over 200°C) for 30-60 minutes. The goal is to burn off any residual machine oils, solvents, or debris from the manufacturing process. Once this high-heat burn-in is complete, you can then proceed with a lower-temperature seasoning cycle (around 120-135°C) with oiled grates to build that protective layer for cooking.
Your Smoker is Seasoned: The Foundation of Flavour
You’ve done the hard yards. You understand that seasoning isn’t just a suggestion-it’s the non-negotiable first step to protecting your smoker and building a lifetime of incredible flavour. By following this guide, mastering how to season a new smoker australia-style is no longer a mystery. You’ve cleaned, coated, and completed that crucial first burn, creating a protective, non-stick patina that’s ready for its first true low-and-slow cook.
The quality of that first burn starts with the quality of your fuel. As Australia’s trusted source for premium BBQ fuels, we provide expert advice because we are passionate about charcoal cooking. Our clean-burning, all-natural products ensure your smoker is seasoned with pure heat, not nasty chemicals, for the best possible flavour foundation. Don’t compromise on the most important step.
Get Sizzlin’! Shop our premium lump charcoal for a perfect seasoning burn.
Your smoker is now a blank canvas, ready to create something legendary. Get out there and make some smoke.
And when you’re not tending the smoker, maybe you’re looking for another way to enjoy the great Australian outdoors. If racquet sports are your game, you can explore Tennis Equipment to gear up for your next match.
Frequently Asked Questions
What is the best oil to use for seasoning a new smoker?
The best oil for seasoning is one with a high smoke point and neutral flavour. We recommend using canola, grapeseed, or sunflower oil. These are readily available across Australia and are cost-effective. These oils polymerize effectively under heat, creating a hard, non-stick, and protective layer inside your smoker. This process is crucial for preventing rust and creating a clean surface for cooking. Avoid oils with strong flavours or low smoke points.
How long does the seasoning process for a new smoker take?
The entire seasoning process takes between three and five hours. This includes an initial one-hour burn-off to eliminate any manufacturing residues, followed by a two-to-four-hour seasoning run with the oil applied. The exact duration depends on your specific smoker model and how well you can maintain a stable temperature. This is a critical investment of time that ensures your smoker performs at its peak for years to come.
Do I ever need to re-season my smoker after this first time?
A complete re-seasoning is rarely required if you maintain your smoker properly. Regular use and correct cleaning habits will preserve the protective layer. However, you may need to touch up specific areas if you notice rust forming or if the surface flakes after an aggressive clean. Simply wipe a thin layer of oil on any affected spots before your next cook to maintain the smoker’s integrity and prevent corrosion.
What temperature should I season my smoker at?
Maintain a steady temperature between 120°C and 150°C (approximately 250°F to 300°F). This temperature range is the sweet spot for oil polymerization, allowing it to cure into a hard, protective coating without simply burning away. Running the smoker too hot can damage the finish and create a flaky, ineffective layer. Use quality lump charcoal to hold this temperature consistently for the entire two-to-four-hour seasoning period for the best results.
Can I use olive oil to season my smoker?
No. Do not use olive oil, particularly extra virgin olive oil, for seasoning your smoker. It has a very low smoke point and will burn off quickly, producing a bitter, acrid smoke that will ruin the coating and impart a foul taste on future cooks. This results in a sticky, gummy mess rather than a hard, protective patina. Always use a neutral oil with a high smoke point for a durable and food-safe finish.
My smoker has a porcelain or enamel coating inside. Does it still need seasoning?
Yes, it still requires an initial burn-in. While the porcelain or enamel coating provides rust protection for the chamber walls, this first run is essential for burning off any residual solvents, dust, or oils from the factory. Furthermore, the cooking grates and any other bare metal components inside still need to be seasoned with oil to prevent rust and create a non-stick surface. This is a key step in learning how to season a new smoker in Australia correctly.