

The primal allure of charcoal grilling is undeniable-that deep, smoky flavour a gas barbie just can’t replicate. Yet, the hesitation is real. The fear of a failed ignition, unpredictable heat, and a perfectly good steak turned to ash is enough to keep anyone from lifting the lid. Forget the uncertainty. This is your definitive charcoal grilling for beginners guide, engineered to put you in complete control and transform you from a nervous novice into a confident grill master.
We’re cutting through the smoke with a no-nonsense, step-by-step process. You will learn to select and light premium natural charcoal correctly, manage temperature using nothing but vents, and understand the essential gear you truly need. We’ll walk you through setting up for that perfect sear, ensuring your first cook is a massive success. It’s time to master the flame and deliver incredible flavour. Get ready to get sizzlin’.
Key Takeaways
- Your success starts before the fire is lit. Learn the essential gear required for a flawless setup and a controlled cook from the very beginning.
- The fuel you choose defines the flavour and performance. Understand the critical differences between natural lump charcoal and briquettes to master your results.
- Forget gas knobs-on a charcoal grill, airflow is everything. We show you how to use your vents to precisely manage temperature for a perfect cook.
- This comprehensive charcoal grilling for beginners guide moves beyond theory, providing a step-by-step walkthrough to lighting your fire and achieving the perfect sear.
Before You Light: Essential Gear and Grill Setup
Success in charcoal grilling is not about luck; it is about preparation. Before you ever strike a match, having the right equipment and a safe setup provides the foundation for a perfect cook. This section of our charcoal grilling for beginners guide covers the essentials that eliminate guesswork and ensure your grilling is both easy and safe. While the core history and methods of grilling have remained consistent, modern tools make the process reliable and repeatable.
For a visual walkthrough of a basic charcoal grill setup, this video is an excellent starting point:
Your Grilling Toolkit Checklist
Arm yourself with these essentials for a controlled, successful cook. This is your foundation for performance.
- A quality charcoal grill: Whether it’s a classic kettle or a ceramic kamado, invest in a well-built unit.
- A chimney starter: This is the single best tool for lighting charcoal quickly and evenly without lighter fluid.
- Long-handled tongs and a sturdy spatula: Keep a safe distance from the heat while maintaining complete control over your food.
- An instant-read meat thermometer: This tool is non-negotiable. It is the only way to guarantee your meat is cooked perfectly and safely.
Choosing Your First Grill
Your grill is your primary investment. For those new to the craft, here are the top contenders:
- The Classic Kettle Grill: Highly versatile and affordable, this is the ideal starting point for learning temperature control for searing and indirect cooking.
- Kamado Grills: These ceramic cookers offer superior heat retention, making them excellent for low-and-slow smoking as well as high-heat searing. A larger investment for the serious enthusiast.
- Portable Grills: Perfect for apartment balconies, camping trips, or small-scale cooks where space is at a premium.
Grill Placement and Safety First
Fire is a powerful tool that demands respect. Your safety is paramount. Always follow these rules:
- Set up on a flat, stable, and non-flammable surface like concrete or paving stones. Never grill on a wooden deck or dry grass.
- Maintain a safe distance-at least three metres-from fences, sheds, overhanging branches, or any part of your house.
- Have a water source or a fire extinguisher nearby. Preparation prevents disaster.
- Always check your local council’s fire regulations and be aware of any Total Fire Bans in your area, especially during the hotter months.
Choosing Your Fuel: Lump Charcoal vs. Briquettes
Before you even think about what you’re cooking, you need to decide what you’re burning. Not all charcoal is created equal, and your choice of fuel is the foundation of flavour in everything you grill. What you burn is just as important as what you cook. This is a crucial step in any good charcoal grilling for beginners guide, as the right fuel makes all the difference between a good meal and a great one. For a deeper dive into the fundamentals, this comprehensive beginner’s guide from The Kitchn offers excellent advice. Let’s break down the two main types you’ll find.
Natural Lump Charcoal: The Expert’s Choice
This is the purist’s choice for a reason. Natural lump charcoal is made from 100% real pieces of hardwood that have been burned down in a low-oxygen environment. There are no binders, no fillers, and no chemicals-just pure carbonized wood. This results in superior performance and authentic flavour.
- Lights Faster: The irregular shapes allow for better airflow, so it gets going quickly.
- Burns Hotter: Lump provides intense searing heat, perfect for steaks and burgers.
- Less Ash: Being all-natural, it produces significantly less ash, making cleanup easier.
- Superior Flavour: It imparts a clean, smoky flavour that enhances your food without overpowering it.
For the best results, we recommend starting your journey with a quality hardwood lump. See our range of premium hardwood lump charcoal.
Charcoal Briquettes: The Uniform Alternative
Briquettes are the uniform, pillow-shaped blocks you commonly see. They are manufactured by compressing sawdust and wood scraps with binders like starch to hold their shape. While their consistency is their main advantage, it often comes at a cost.
- Consistent Burn: Their uniform shape provides a very predictable and stable burn rate.
- Good for Long Cooks: This stability makes them a decent option for low-and-slow cooking where you need steady, long-lasting heat.
- Potential for Additives: Cheaper briquettes can contain additives and chemicals that may affect the flavour of your food.
What to Avoid: Lighter Fluid and Self-Lighting Charcoal
As you progress through this charcoal grilling for beginners guide, remember this critical rule: never use lighter fluid or self-lighting (match-light) briquettes. These products are soaked in petroleum-based chemicals to make lighting easier, but that convenience comes with a heavy price. The chemical residue can fail to burn off completely, leaving an unpleasant, chemical taste on your food.
The professional solution is a chimney starter. It’s a simple, one-time purchase that uses newspaper and airflow to light your charcoal quickly and cleanly, completely eliminating the need for any chemical accelerants. Your taste buds will thank you.
The Art of the Fire: Lighting and Arranging Your Coals
This is the step that separates the amateurs from the pros. Managing a live fire might seem intimidating, but the process is straightforward and delivers results you can’t get from gas. Mastering the fire is the single most important skill in charcoal grilling. Forget lighter fluid and guesswork; we use a proven, reliable method for a perfect burn every time. This is the foundation of any good charcoal grilling for beginners guide.
Lighting Charcoal with a Chimney Starter
A chimney starter is a non-negotiable piece of kit. It’s the fastest, most effective way to get your premium hardwood charcoal roaring hot without chemicals. The method is foolproof.
- Place two or three firelighters or some crumpled newspaper on your grill’s charcoal grate.
- Fill the chimney starter to the top with your chosen lump charcoal or briquettes.
- Set the chimney directly over the firelighters and light them.
- Wait 15-20 minutes. You will see flames coming from the top of the chimney and the top coals will be covered in a fine grey ash.
- Carefully pour the lit coals into your grill. Always wear heat-resistant gloves.
Creating a Two-Zone Fire: Your Secret Weapon
Once your coals are lit, don’t just spread them evenly. For total heat control, you need to create two distinct heat zones. Dump all the hot coals over one half of the grill grate, leaving the other half completely empty. This simple setup is your secret weapon.
You now have a direct heat zone (the hot side) for searing and a indirect heat zone (the empty side) for finishing cooks or as a safe zone if things get too hot. Sear a thick steak over the direct heat, then move it to the indirect side to cook through without burning. This technique provides unmatched control and is essential for grilling everything perfectly.
How Much Charcoal Should You Use?
The amount of charcoal depends on the job. There’s no need to waste fuel. As a general rule, a full chimney of charcoal is ideal for high-heat cooking like searing steaks or grilling for a larger group. For shorter cooks like sausages, burgers, or chicken wings, a half-full chimney provides more than enough heat. You can always add more unlit coals to the lit ones to extend your cooking time if needed.
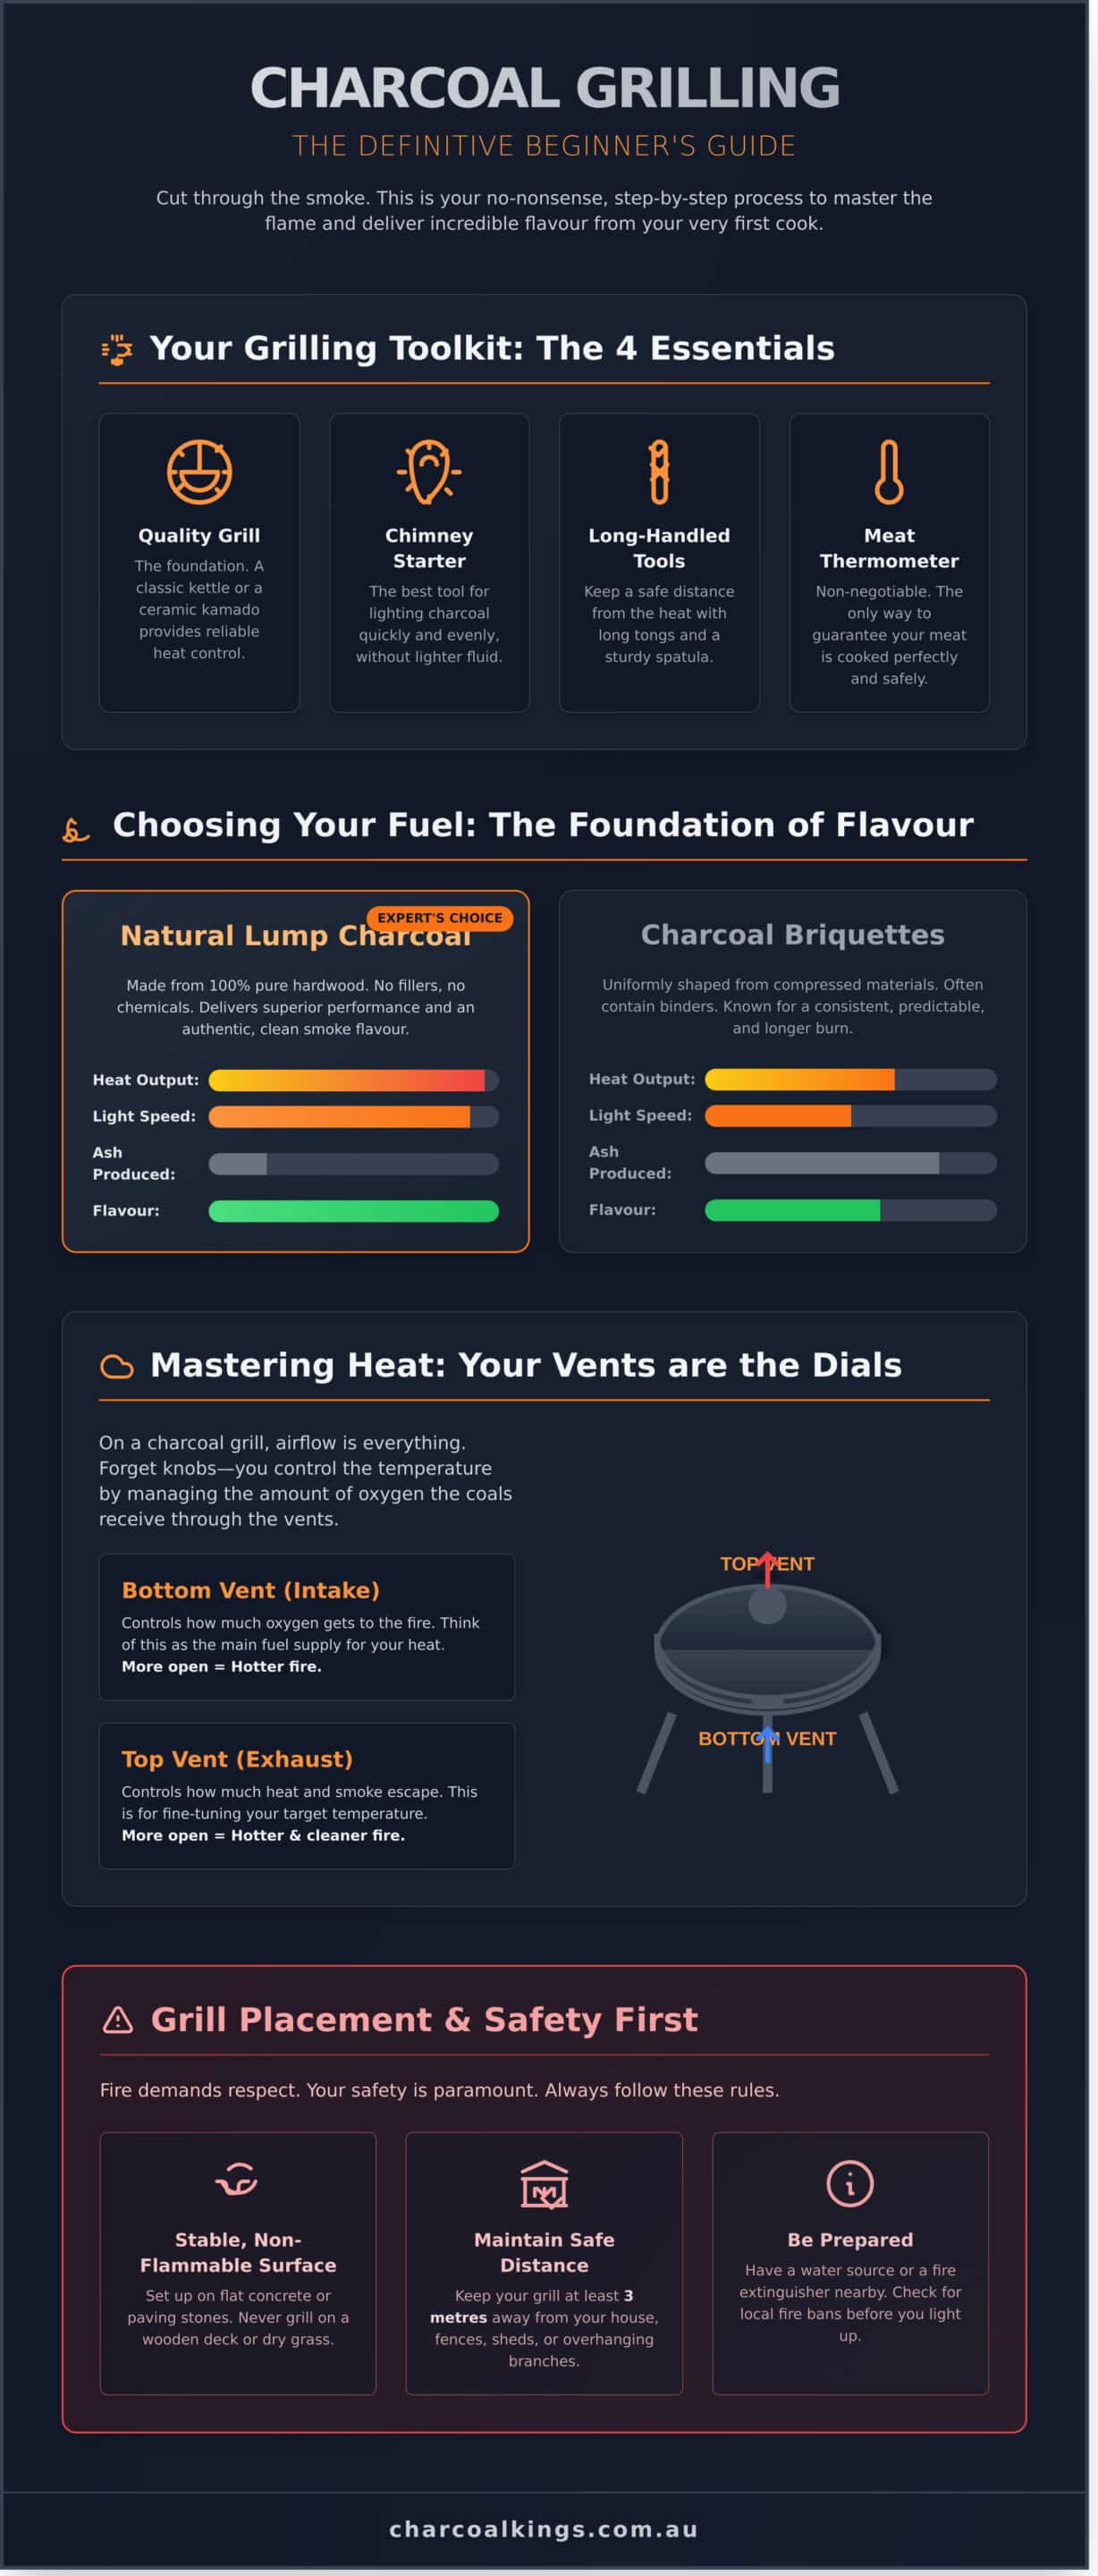
Mastering Heat Control: Your Vents Are the Dials
Forget the knobs on a gas barbie. On a charcoal grill, you command the fire with air. Your vents are the temperature dials, and learning to use them is what separates the beginners from the pros. The concept is simple: fire needs oxygen to burn. More air equals a hotter fire; less air cools it down. Mastering this is a fundamental lesson in any quality charcoal grilling for beginners guide, giving you the precision to cook anything from a perfectly seared steak to low-and-slow ribs.
The Bottom Vent: Your Main Accelerator
The bottom vent, or intake damper, is the engine of your grill. It feeds fresh oxygen directly to the burning coals from below, controlling the overall potential heat of your fire. Your approach to this vent should be direct and purposeful.
- Fully Open: Use this setting when lighting your charcoal and preheating the grill. Maximum airflow gets the coals white-hot, fast.
- Partially Closed: Once at temperature, adjust this vent to maintain it. Closing it halfway is a good starting point for a medium heat (around 180°C).
- Never Fully Closed: Starve the fire of oxygen and it will go out. Always keep the bottom vent at least slightly open while cooking.
The Top Vent: Your Fine-Tuning Control
The top vent, or exhaust damper, lets heat and smoke escape. It works in tandem with the bottom vent to fine-tune your cooking temperature. Closing it slightly traps more heat and smoke, raising the internal temperature. Opening it wider lets heat escape, lowering the temperature. A crucial rule: always keep it at least halfway open. A fully closed top vent traps stale smoke, which creates a bitter, acrid flavour on your food.
Reading the Temperature: Grill Thermometer vs. Hand Test
For consistent results, you need an accurate temperature reading. While the thermometer built into your grill lid gives a general idea of the air temperature inside the dome, it’s not measuring the heat where it matters: at the grate. For true precision, an ambient probe thermometer placed on the cooking grate is best. For a quick, classic method, use the hand test. Carefully hold your palm about 15cm above the grate:
- High Heat (230°C+): You can hold your hand there for 2-4 seconds.
- Medium Heat (175-230°C): You can last for 5-7 seconds.
- Low Heat (120-175°C): You can hold your hand there for 8-10 seconds.
Understanding these controls is the most important skill you’ll learn. This is how you take charge of the fire and grill with confidence.
Your First Cook: A Simple Guide to Perfect Burgers
You have the fuel and the knowledge; now it’s time to put it all into practice. There is no better first cook than a classic burger. This simple walkthrough is a core lesson in our charcoal grilling for beginners guide, demonstrating how to manage your fire for perfect results. It combines proper lighting, two-zone heat control, and timing into one delicious success. Mastering this fundamental cook builds the confidence to tackle anything on the grill.
Follow these steps for a flawless result every time.
Step 1: Prep and Light
Begin by lighting a full chimney starter of premium natural lump charcoal. Our chemical-free charcoal ensures a clean, pure smoke flavour. While it heats-about 15-20 minutes-season your burger patties and prepare your buns and toppings. Once the coals are glowing red and covered in a light grey ash, carefully pour them onto one side of the charcoal grate. This establishes your essential two-zone fire.
Step 2: Sear and Cook
Place the seasoned patties directly over the hot coals-your direct heat zone. Keep the lid open to maximise the searing temperature. Sear for 2-3 minutes per side until a deep brown crust forms. This high, direct heat is what creates that incredible, flame-grilled flavour that gas simply can’t match. Once both sides are seared, move the burgers over to the cooler, indirect side of the grill.
Step 3: Finish and Rest
Now, close the grill lid. This traps the heat and turns your grill into an oven, allowing the burgers to cook through gently without burning. Cook until they reach your desired doneness. We recommend using an instant-read thermometer for precision; aim for 71°C for a well-done, food-safe burger in Australia. Remove the burgers from the heat and let them rest on a plate for at least 5 minutes. This crucial step allows the juices to settle, guaranteeing a perfect bite.
You’ve just executed a perfect two-zone cook. The result is a juicy burger with a flavourful, seared crust-the foundation of great barbecue.
Cleanup and Common Beginner Troubleshooting
A successful cook doesn’t end when the food comes off the heat. Proper shutdown and cleanup are essential skills for any grill master, ensuring safety, extending the life of your equipment, and setting you up for success next time. Mastering these final steps is a crucial part of this complete charcoal grilling for beginners guide.
Shutting Down Your Grill Safely
Once you are finished cooking, close both the top and bottom vents on your grill completely. This starves the fire of oxygen, causing the coals to extinguish safely and efficiently. Allow the grill to cool down entirely-this can take several hours-before putting on a cover. A major benefit of using quality lump charcoal is that partially burned pieces can often be reused for your next cook.
Cleaning the Grates
The best time to clean your grill grates is right after you’ve finished cooking, while they are still hot. Use a high-quality, stiff-bristled grill brush to scrape away any food residue and carbon build-up. A clean cooking surface is non-negotiable. It prevents your food from sticking, ensures you get those perfect, clean sear marks, and guarantees that the only flavour you taste is the one you intended.
Troubleshooting Quick-Fixes
Even seasoned pros run into issues. The key is knowing how to react without panic. Here are some of the most common problems and their straightforward solutions:
- Fire isn’t hot enough: Your fire needs more oxygen. Open the bottom and top vents wider to increase airflow and raise the temperature.
- Sudden flare-ups: This is caused by fat dripping onto hot coals. Immediately move your food to the indirect heat zone and let the flames die down.
- Food is burning on the outside: Your direct heat is too intense. Move the food to the cooler, indirect side of the grill to finish cooking through without charring the exterior.
- Fire is dying out: Ash build-up is likely smothering your coals. Use your grill’s cleaning system or a poker to carefully knock ash down. You may also need to add more charcoal.
Consistent maintenance and quick problem-solving are what separate the amateurs from the pros. By following these simple tips, you’ll keep your gear in top condition and ensure every cook is better than the last. To guarantee the best results from the start, always build your fire with premium, natural hardwood charcoal. You’ve got the knowledge-now get sizzlin’!
Master the Flames: Your Grilling Journey Starts Here
You are no longer a spectator. Armed with the knowledge from this charcoal grilling for beginners guide, you have the power to create incredible, flame-kissed food. Remember the fundamentals: it all begins with quality gear and choosing the right fuel for pure, hardwood flavour. From there, mastering your vents is the key to unlocking precise temperature control, turning your grill from a simple fire pit into a versatile outdoor oven. Don’t fear the process; embrace it, and for a little inspiration on what’s possible, you can learn more from restaurants that have perfected the art of live-fire cooking.
The foundation of great barbecue is great fuel. At Charcoal Kings, we are Australia’s trusted supplier for a reason. We provide expert advice for everyone from beginners to pitmasters and supply premium hardwood charcoal with no chemicals and no additives-just pure, authentic flavour. Start your journey with the best, and you’ll taste the difference from your very first cook.
Ready to start? Shop our premium natural charcoal and get sizzlin’!
Frequently Asked Questions
Is charcoal grilling difficult for a complete beginner?
No. While charcoal grilling has a learning curve, it is not difficult. The process is straightforward once you master two key skills: lighting the charcoal efficiently and controlling temperature using the vents. Unlike gas, charcoal rewards you with superior, smoky flavour. Our charcoal grilling for beginners guide is designed to give you the confidence to master the flame. With a little practice, any beginner can achieve professional results.
What is the easiest and safest way to light a charcoal grill?
A chimney starter is the most effective and safest method. It eliminates the need for lighter fluid, which can leave a chemical taste on your food. Simply fill the chimney with charcoal, place natural firelighters or newspaper underneath, and light it. The coals will be perfectly lit and ready to pour into your grill in about 15-20 minutes. This technique ensures a fast, even, and clean start to your cook.
How do I control the temperature on a charcoal grill without knobs?
Temperature on a charcoal grill is controlled by airflow. Your grill has vents-typically a bottom intake vent and a top exhaust vent. To increase the heat, open the vents wider to allow more oxygen to the fire. To decrease the heat, partially close the vents to restrict oxygen. Think of the bottom vent as your primary accelerator and the top vent for fine-tuning. Mastering your vents is the key to mastering your heat.
Should I start with lump charcoal or briquettes?
For the best performance and flavour, we recommend starting with 100% natural hardwood lump charcoal. Lump charcoal lights faster, burns hotter, and produces far less ash than briquettes, which often contain chemical binders. It also responds more quickly to vent adjustments, giving you precise temperature control. While briquettes are uniform, premium lump charcoal delivers a cleaner burn and a more authentic barbecue taste.
How do I know when the charcoal is hot enough to start cooking?
Your charcoal is ready for cooking when the majority of the pieces are glowing red and covered in a thin layer of light grey or white ash. This process usually takes 15-20 minutes after lighting them in a chimney starter. If you see tall, active flames or large patches of black on the charcoal, it is not ready. Cooking too early will result in uneven heat and can impart a harsh, bitter flavour to your food.
Can I add more charcoal while I’m grilling?
Yes, adding more fuel is essential for long cooking sessions. The best method is to light a new batch of charcoal in a chimney starter separately. Once the new coals are fully ashed over, carefully add them to the existing hot coals in your grill. This prevents a significant temperature drop and avoids the thick, acrid smoke that unlit charcoal produces. Never add unlit fuel directly onto your food.
How do I put out a charcoal grill when I’m finished?
The safest way to extinguish your charcoal is to starve it of oxygen. Place the lid back on the grill and completely close both the top and bottom vents. The fire will die out naturally over several hours. Never pour water into a hot kettle or ceramic grill, as the sudden temperature change can cause thermal shock and crack the unit. Once the grill is completely cold, the ash can be safely removed and disposed of.